|
IRC and mIRC Basics |
||||||||||||||||||||||||||||||||||||||||||||
|
|
|||||||||||||||||||||||||||||||||||||||||||
| Welcome to PSPUG's online Beginners' Classes. Tonight's session will cover the basics of IRC and the mIRC software. When we're done tonight you'll be much more comfortable with the mIRC environment and IRC protocols. | ||||||||||||||||||||||||||||||||||||||||||||
|
Also, we'll get everyone set up for hearing sounds. For that, you'll need the download file on the left (shipbell.wav). | |||||||||||||||||||||||||||||||||||||||||||

|
The mIRC WindowsThis is the Channel window (or box) where we see our 'chat'. The window that first appeared on your screen when you logged in was the Status window (or box). There are also private chat boxes, DCC connection boxes, and mIRC has some other boxes you can use like the Notify and URL windows. |
|||||||||||||||||||||||||||||||||||||||||||
|
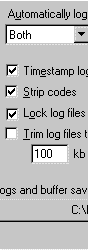
Setting the OptionsIn mIRC you hit the options button (second button from left). You can also reach the Options menu under File || Options or use the keyboard shortcut, Alt+O. Then you activate the little '+' sign next to IRC. It will turn to a '-' sign and show you the other options for IRC. Click on "Logging". On the "Logging" tag you activate everything but "trim logs", and "private chats" if you don't want to log those. And in versions greater than 5.81, you leave the Logging Option of "Both" or "Channels Only". I do both ... but that's personal preference. |
|||||||||||||||||||||||||||||||||||||||||||
'Chatting'There's two main ways of "talking" in IRC: The /me and /say statements. The /say statements are the normal talking stuff which just mean you type and send your comments to the main channel window by pressing the 'Enter' key. The /me statements are the "purple" lines that usually denote action of some kind. /me mrmfs and hides behind her hair will show up as: |
||||||||||||||||||||||||||||||||||||||||||||
 |
Color!Color! is one of the functions of IRC that is the most fun to play with. Changing the color of the text on your screen and the background color of that text can be done in a variety of ways:
For now, we're going to focus on how to use color 'on the fly'. |
|||||||||||||||||||||||||||||||||||||||||||
 |
The Reverse FunctionThe default color scheme (what we normally see) is black text on a white background. The quickest and easiet way to change this is to use the Reverse function. Reverse (or Reverse of Default) is done by using the command Control (CTRL)+R, or more precisely, hitting the CTRL+R buttons at the same time. [Ctrl+R]This is Reversed.[Ctrl+R] would appear as:
|
|||||||||||||||||||||||||||||||||||||||||||
 |
Playing Around With ColorThe Color change function is performed by pressing the Control and 'K' keys at the same time. I usually abbreviate this command with (CK) but others have used ^K, [CTRL+K], and CNTRL+K. So, from now on, when you see (CK) in an instruction that means you perform the action of pressing both the Control (Ctrl) and 'K' keys, at the same time. Now, changing the color of your text is fairly easy. But it can be the most fun to try. To change the color of every word, simply hit (CK) before each word and choose a color ranging from 0-15 (I'd recommend sticking to 1-15 and avoiding 8). To change the color of every letter in a word, simply hit (CK) before each letter, not leaving a space between your chosen color and the letter you type. Word of advice: don't start these adventures with a number. |
|||||||||||||||||||||||||||||||||||||||||||
 |
Background ColorNow, we're going to move on to changing the background color of your 'talking'. The (CK) shortcut is also used to change the background color. To do this you hit (CK) as normal, enter what color you what your text to be (or #1 if you want to leave it black), put a comma, then your background color. So, the command looks something like:
You can, of course, combine changing just the background of a word, as you did for changing the text color. It's more difficult, though. For example this:
You can also change the background of a word, and each letter. That's done by changing the background color of the word's first letter, then just changing the color of each letter. Such as:
To reset the colors at the end of background changes, simply use (CK)1,0. |
|||||||||||||||||||||||||||||||||||||||||||
 |
Spiffy Keyboard ShortcutsThere are Shortcuts that produce neat results!
And you can combine them. To only do a certain word ... hit the command before and after it, except color ... hit the color shortcut again and choose #1 (black). Go ahead and play around with them. |
|||||||||||||||||||||||||||||||||||||||||||
How to Copy in mIRCThe easiest way to copy in mIRC is to simply highlight the text in the main chat box (by holding, then releasing the left mouse button). Then you have it copied. To paste you either use Control+V or Shift+Insert Try copy and pasting now. |
||||||||||||||||||||||||||||||||||||||||||||
 
|
Alias Commands and How to Use ThemAliases are keystrokes you use to avoid having to type/perform the same things over and over again.
We're going to set up two aliases for y'all. A function key for the "GA" action, and a more fun one. Aliases simply start the argument with a forward slash('/index.html'), and follow that by whatever you want to type to use that command. The Alias editor is located five from the left of on the main toobar. It is green and has '/a' on it. (In pIRCh it's grey.) Make sure under the view menu you've got "aliases.ini" active in the editor. You can tell by either choosing "View" and look for the listed item with a check mark. Or at the top or the white editing box it should read either "Editing: aliases.mrc" or "Editing: aliases.ini". From now on, once you're done with the editing box, please click on "OK" to save your changes. It will close the window, don't worry if it "disappears". |
|||||||||||||||||||||||||||||||||||||||||||
 |
"GA" as an Alias to a Function KeyNow, our first alias: Making GA be a function key ... so it's only a single keystroke in class (rather than typing 'GA' and then hitting the return key). Re-open the Alias editor.
Replace the '#' symbol with a number from 1-15. Hit "OK" after pasting and editing, it'll be saved and re-loaded. Now type /remote on in any main box (here or the status box). My alias looks like:
GA All you have to do to use this alias is hit your 'F8' key. |
|||||||||||||||||||||||||||||||||||||||||||
Now, our next alias: a more *fun* one ... so it's a bit more involved than the previous one to activate. This will be the final result:
Re-open the Alias editor.
Performing the action (CK) and deleting the '(CK)' in the editor window. And make sure you've excluded the ' before and after the (CK) stuff. Hit OKay, and come back here. To use this alias simply type /rbow in the channel window.
Re-open the Alias editor.
And make sure you've excluded the ' before and after the (CK) stuff. Hit OKay, and come back here. To use this alias simply type /rbow in the channel window.
Re-open the Alias editor.
Hit OKay, and come back here. To use this alias simply type: /rbow in the channel window. |
||||||||||||||||||||||||||||||||||||||||||||
 
|
Using SoundsSounds are the color! in IRC. In order to "hear" a sound you must have it saved on your hard drive, and named the same as other people. Sounds are reached through Options || Sounds. Check all the boxes on that menu. (Do not check the ones at the bottom of "use internal beep", "use pc speaker" as those are annoying.) Now, re-open the Options menu and click the '+' sign next to "Sounds". This opens the sub-menu "Requests". (In newer versions there's another sub-menu, we don't care.) Check all the boxes here. And specify the directory you normally save WAV and MIDI (and MP3) files to. If you don't have one, leave it alone and it'll save to the default of c:\mirc\sounds. Now, the classes are using a WAV file to grab your attention when the teachers are ready to start. To be able to hear this sound, please take it from wherever you saved it on your hard drive and move it to c:\mirc\sounds (or your default WAV directory as specified in the last step). To play sounds in the channel type: |
|||||||||||||||||||||||||||||||||||||||||||
|
We're done. Thank you for coming to class. Next week we will begin our lessons on using PSP. |
||||||||||||||||||||||||||||||||||||||||||||
