 |
 Home Tutorials
Beginners Classes Home Tutorials
Beginners Classes
09 Deformation, Filters and Screen Captures
|
|
|
Deformation, Filters and Screen Capture
Created by: Charith
Modified by: PSPUG Learning Center
and the Prof
|

|
|
|
In this lesson, we will explore using Deformations and Filters to alter
an image and use the Screen Capture Function.
- Deformations and filters alter an image or a selection to give it
various effects
depending on which Deformation or Filter is used.
Deformations and Filters
require that the image have a color depth of
256 colors or greater.
- Deformations create an effect by moving data pixels from one area
to another
to create a deformed version of the original graphic.
- Filters alter each pixel's colors based on the colors of it's
neighboring pixels.
The results vary greatly determined by the filter used.
- The Screen Capture Function allows one to capture an image, selection,
or an area of the desktop, other applications visible or images from PSP to
use as images in PSP. A number of the images used in this lesson have applied
the Screen Capture Function to illustrate various aspects of using PSP.
The possible images one is able to create using Deformations and Filters is
almost endless. One of the best ways to learn to use these effects is to just
experiment with them, explore them, try out various options and see how they
work. In this lesson we will provide an introduction to ways to explore these effects
with just a couple of illustrations. We will use the image given in the
Download
though you may want to use any image of your choice as long as it has at least
256 colors.
|
|
|
|
Introduction to Deformations and Filters
|
|

|
The easiest way to initially get acquainted with Deformations and Filters
is to use the Browser. The Browser reviews them in a thumbnail of the image
being used to get an idea how the effect will appear. Keep in mind that when
using some effects there are additional options one may choose from to
alter the effect.
PSP5 has a number of Deformations and Filters, while PSP6 & PSP7 have many
more Filters and effects. Some illustrations used in the lesson are only
available in PSP6 & PSP7.
First, Download and unzip
the image from above or use an image of your choice that has at
least 256 colors.
Then DUPLICATE it to preserve the original image.
- Use Windows || Duplicate
- Close the original image
|
|
|
|
Using the Browser:
The Basics:
-
PSP5 & PSP6: There are two browsers, one a Deformation Browser
and the other a Filter Browser.
- Deformation Browser:
Click on Image || Deformations || Deformation Browser
- Filter Browser:
Click on Image || Filter Browser
-
PSP7: PSP 7 uses a single Effects Browser to
preview all Deformations and Effects.
- Effects Browser:
Click on Effects || Effects Browser
|
|

|
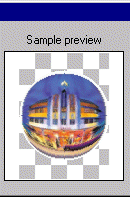
Let's Begin by exploring the Circle Deformation.
- Comment:
- Open the Browser which reviews all the Deformations in Paint
Shop Pro with the Preview window.
- Select a Deformation Name to preview how that effects the image.
- In this illustration, Select the Circle Deformation.
- Explore the Circle:
- Open The Deformation (PSP7: Effects) Browser
- Deformation (Effect) Name = Circle
- The Preview window is illustrated at the left.
|
|
|
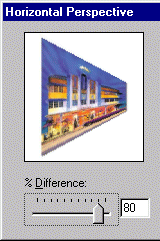
Let's Continue by exploring the Horizontal Deformation.
- Comment:
- First, use the Browser and select Horizontal Perspective.
- Click on the OK (PSP5: Apply) Button.
- In this case you will get a Window to set option(s)
- In this example we set a positive value of 80%
- Then click on OK to set the effect.
- Note:
- The Background Color will be used unless your image is
a layer, in which case a transparent area will be seen.
|
|

|
Let's Explore using a Filter Effect. In this example, PSP5 and PSP6 will
use the Filter Browser. PSP7 will use the Effects Browser. Just locate
the Filter named TRACE CONTOUR and then click on OK to set the Image.
|

|
As one last example, use the FIND HORIZONTAL EDGE Filter.
Comment: As you see from these few examples, there are some very
interesting effects one is able to create using these deformations
and filters. Again, the easiest and useful way to learn how they
work is to explore and experiment.
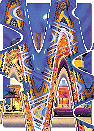
PSP6 and PSP7 offer a variety of additional deformation and filter
options that are most exciting. Here are some examples in thumbnail
of such features:
|
 
|
1. Top Left: Warp with Horizontal & Vertical set to 0, Size = 100 and Strength = -50
2. Top Right: Spiky Halo with Horizontal & Vertical set to 0, Radius = 10, Amplitude = 20 and Frequency = 4
3. Bottom Left: Twirl with Degrees = 150
4. Bottom Right: Wave with Horizontal Amplitude = 40, and rest set to 100
|
|
|
|
Using the Screen Capture Feature
Paint Shop Pro has a built in Screen Capture function. This function
will allow you to copy all or part of images either on your desktop,
in another application, or from an image in PSP. A number of the images
used in this lesson are from Screen Captures of PSP Menu Items and
Options Windows.
- The basics for using this feature:
- Set Up the Screen Capture Option (type of capture)
- Then, Initiate the Capture operation
- And, in some instances define the image/area to capture
- Finally, Capture it for an image in PSP
|
|


|
Setting Up Capture
- PSP5 & PSP6: Capture || Setup
- PSP7: File || Import || Screen Capture || Setup
- The Capture Options:
- Area = Select a rectangular portion of the screen or area wanted in an image
- Full Screen = Copy the entire desktop screen
- Client Area = Copy the input area of an active window
- Window = Copy the entire active window
- Object = Copy a window feature or group of features
|
|

|
- The Activate Capture Options:
- Right mouse Click to activate the capture
- Hot Key used to activate capture
- Delay Timer used to delay the time when capture is initiated and then performed
|
|

|
- Options:
- Include Cursor = whether or not to capture the pointer
- Multiple Captures = whether or not to perform multiple captures before activating PSP again.
- To finish Set up click on OK or CAPTURE NOW button will minimize PSP program and begin the Capture process.
- Note: Once Set up, if using the same options, one may begin capture with Shift+C
|
|

|
Ok, experiment with Capture.
- In Set up, select FULL Screen.
- Then Capture it.
- Either set a Hot Key such as F11 or select the Right Mouse Button To Start
- Click on OK to set your options
- Then, To Capture it either use the Menu Item and click on START button and then the HOT KEY or right mouse button or Use the SHIFT+C keys and the HOT KEY or Right Mouse Button.
- You will see an image in your PSP program representing your Desktop.
The image displayed is from my desktop.
|
|

|
Experiment with capturing an Area
- In Set up, select Area.
- Then Initiate Capture. (Start or Shift+C and then the HOT KEY or Right Mouse Button.)
- Your Cursor changes to a cross-hatch
- Locate the Area you want captured
- Click your cursor on top left and release button and begin to draw a
rectangle of area wanted. Click mouse button again on bottom right to process the area.
- Your image will now appear in your PSP program.
The image displayed is from my Status Bar.
|
|

|
As a final experiment, try Capture using Object
- In Set up, select Object.
- Then Initiate Capture. (Start or Shift+C and Then Hot Key or Right Mouse button)
- Place your cursor over an object to capture.
- A black line will surround that object.
- Click mouse to activate the capture/
- Your image will now appear in your PSP program.
The image displayed is from my Tool Palette.
|
|
|
|
Once you have the image in your PSP program, you are ready to edit
it or enhance it or use it.
-- Enjoy -- :o)
Our next lesson will use the Selection Tool as a way to Edit images.
|