 |
 Home Tutorials
Beginners Classes Home Tutorials
Beginners Classes
10 Editing an image with the Selection Tool
|
|
|
Editing an Image with the Selection Tool
Created by: Charith
Modified by: PSPUG Learning Center
and the Prof
|

|
|
|
In this lesson, we will learn how to edit an image using the Selection Tool and its options as well as using the Magic Wand and its options. Paint Shop Pro comes with many tools that allow one to alter an image in many ways.
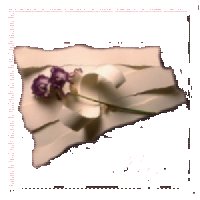
In the following tutorial we will learn how to select areas of an image for editing. Download the 10imgeditdnld.zip file which contains two jpeg files: (1) a flower on a tan background, and (2) the flower on a paper beveled background and signed (courtesy of the prof).
  
In order to edit part of a graphic, you first must select the area to edit. In Paint Shop Pro there are three (3) tools which allow you to select an area of the graphic and edit it:
- The Selection Tool: (Square)

- The Magic Wand: (Wand)

- The Free Hand Tool: (Lasso)

Each of the three tools has a Feather Option which will control the sharpness of a selection's edges. The higher the feathering value the softer are the edges, (which is a technique often used to blend the image into a background.)
The Magic Wand also has a Tolerance Options which sets the similarity of pixels for selection. At low settings the values must be close, while at high settings the tolerance is greater allowing the Magic Wand to select more pixels.
When a selection has been set, there are two very useful features for either Adding To or Subtracting From a Selection. Using the Shift Key, one is able to add a selection area to an existing selection. Using the Control Key one is able to subtract a selection area from the existing selection. This PSP feature allows one to develop some very useful selection shapes beyond the preset shapes provided.
In this tutorial we will use these techniques to create interesting images.
|
|
|
|
The Selection Tool
|
|

|
There are two ways to set a selection: (1) Using the mouse to draw it, (2) Double clicking and inputting the settings wanted.
First, set the Selection Type wanted.
- Click on the SELECTION TOOL
- Selection Type = Rectangle (you have other choices by using the down arrow and selecting one from the drop down menu.)
- Feather = 0
- Antialias = Checked (When antialias is checked, edges of an image are smoothed through a process of setting some pixels transparent. In some ways this feature is similar to feather but more precise.)
- Technique #1: Drawing a Selection
- Place cursor at top left of area wanted.
- Hold mouse button down and drag to bottom right area wanted.
- Release mouse button to set the floating selection.
- Technique #2: Double Click on the Selection Tool
- In the Drop Down Window set values for Left/Right and Top/Bottom. (By using the image size, you can determine what settings you want to have as a centered selection. I am using a selection that leaves a 40 x 40 border around the selection.)
- Left = 40
- Right = Width - 40 (260)
- Top = 40
- Bottom = Height = 40 (163)
|
|


|
Now that you have made a selection, you are able to edit the area within it. There are almost an unlimited number of images you can create using the various deformations and filters provided by PSP.
To Explore some of the basic possibilities, use the BROWSER feature of PSP.
- In PSP5 and PSP6, there are two browsers.
- 1: Deformation Browser
- 2: Filter Browser.
- In PSP7 there is just the Effects Browser which reviews all basic possibilities.
(Each newer version of PSP has many more choices than the previous version.)
- PSP5 amp; PSP6: Image || Deformations || Deformation Browser amp; Image || Filter Browser
- PSP7: Effects || Effects Browser
Take a few moments now to just explore the possible effects by highlighting the deformation/filter and viewing it in the thumbnail window. Use the Down Arrow to move through the options.
In the Netscape Browser, to view examples, right click on the thumbnail on the left and select, View Image. Then click on the BACK button to return here.
|
|
|
Let's REDUCE THE SIZE of the image by Cropping it.
- Click on Image || Crop to Selection
Again, take a few moments to just explore the possible effects by highlighting the deformation/filter and viewing it in the thumbnail window. Use the Down Arrow to move through the options.
- PSP5 amp; PSP6: Image || Deformations || Deformation Browser amp; Image || Filter Browser
- PSP7: Effects || Effects Browser
Let's try some effects on this image now and apply the Emboss filter:
- PSP5 amp; PSP6: Image || Filter Browser
- PSP7: Effects || Effects Browser
- Highlight the EMBOSS filter and click on APPLY
|
|

|
Up to this point, we have been using the inside area of the selection. We can also edit the area outside the selection.
Open up the download image (flowerdnld.jpg). Duplicate it (Windows || Duplicate). Click on the Selection Tool, draw a rectangle in the center area and click on OK to set the selection.
To use the area outside the selection we just invert the selection:
- Use: Selections || Invert
|
|
|

|
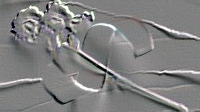
Let's apply the Spiky Halo Effect:
- PSP5 amp; PSP6: Image || Deformations || Spiky Halo
- PSP7: Effects || Geometric Effects || Spiky Halo
- In the Source Settings:
- Horizontal amp; Vertical Offsets = 0
- Radius = 10
- In the Ray Settings
- Amplitude = 100
- Frequency = 10
- Click on OK
- Deselect (Selections || None or Control + D)
At some point, just experiment with other effects to see how you are able to create very interesting borders around a selection. The more you experiment, the more you will learn how various effects work on various images and selections.
|
|
|
Creating a New Image
When you have finished experimenting with the
filters using the rectangle selection tool, start with a
fresh image of the graphic flower.jpg. (Open flowerdnld.jpg
and duplicate it with Window || Duplicate.)
|

|
- Use the Selection Tool
- Selection Type = Circle
- Feather = 0
- Antialias = Checked
- Click on OK
|

|
Then, copy the selection and paste as a New Image
- Edit || Copy
- Edit || Paste as a New Image
Now you have a new image of this selection. Just save it as a JPEG
file: File || Save As FlowerCircle.jpg
|
|
|
|
The Feather Technique
|
|

|
The Feather Option when set will soften the edges of an image. When a selection uses the Feather Option, the image will appear to blend with the background color. There are at least three basic ways to set the feather option.
- Using the Menu Item: Selections
- Set the Selection either with the Selection Tool or with the Magic Wand but in either have Feather = 0
- Then use: Selections || Modify || Feather
- and, Set the Number of Pixels
- Using the Magic Wand:
- Set the Feather Option to the Number of Pixels
- Click outside the image you want for a selection.
- Using the Selection Tool:
- Set the shape wanted.
- Set the Feather Option to the Number of Pixels
- Draw the shape.
In any one of the three ways one may use, you may need to Invert the Selection by using: Selections || Invert. Then use the Delete Key to Create The Feathered Selection.
- Use the FlowerCircle.jpg image.
- Set Background to White
- Duplicate it: Windows || Duplicate
- Use Image || Canvas Size
- Set Width and Height to 200
- Check both Horizontal and Vertical Center settings
- Click on OK
- If you don't have a white background,
use Layers || Merge All
- Let's Feather it, first using Magic Wand.
- The easiest way with the FlowerCircle image is to use the Magic Wand.
- Set Match Mode = RGB Value
- Set Tolerance = 0
- Set Feather = 20
- Click in any white area.
- Then, click on the Delete Key to feather the circle selection.
- If you want more feather effect hit the Delete Key again until you have an image you like.
- You can now save this image if you wish.
- Let's Feather it, using the Selection Tool.
- Begin again with a duplicate of the FlowerCircle.jpg and increase it's size as given above.
- Use the Selection Tool
- Selection Type = Circle
- Feather = 20
- Antialias = Checked.
- Start at coordinates 100 x 100 and draw a circle to just
cover the image.
- When you release mouse button a larger selection is drawn.
- If you click on the Delete Key now, you will delete the circle image, and if you do that, use Edit || Undo (Control + Z) to return.
- Then use: Selections || Invert
- Then Click on the Delete Key to feather the selection.
- If you want more feather effect, hit the Delete Key again until you have an image you like.
- Let's Feather it, using Selections || Modify || Feather.
- Begin again with a duplicate of the FlowerCircle.jpg and increase it's size as given above.
- First, use the Magic Wand with Feather = 0 and click in a white area.
- Use: Selections || Invert to just get a circle selection.
- Then: Selections || Modify || Feather and set feather = 20
- Again: Selections || Invert to feather the outside area of the circle.
- Use the Delete Key to feather. If you want more feather effect, use Delete again until you have an image you like.
Comment: Often you will want to feather a selection on a transparent background so that you can use it on any type of background you want and blend it into that background.
|
|
|
|
Adding to a Selection
To add to a selection, you just use the SHIFT KEY and add a new selection area. There are two tools one can use: The Selection Tool and the Freehand Tool (lasso).
|
|

|
Let's first use the Freehand Tool and just draw a selection around the flower for practice.
- Start with a new copy of the flowerdnld.jpg image.
- Click on the Freehand Tool (lasso)
- Selection type = Freehand
- Feather = 0
- Antialias = Checked
- Then just draw a selection around the flower.
|
|


|
Next, let's experiment with adding selections.
- Start with a new copy of the flowerdnld.jpg image.
- Use the Selection Tool and draw a circle around the Flower head.
- Selection type = Circle
- Feather = 0
- Antialias = Checked.
- Next, in the Selection Tool, set Selection Type = Elipse
- Hold down the Shift Key
- Draw an elipse around the Stem
- Release the Shift Key and the Selection is added.
|
|

|
- Or, Use the Freehand Tool and draw a selection around the stem.
- Remember to hold down the Shift Key while drawing/adding the selection.
|
|
|
|
Subtracting from a Selection
|
|


|
To remove an area from an existing selection, you
would use the CTRL key instead of the SHIFT key,
using the same method as you would when adding
to a selection.
We will combine both the removing of an area with the feather
feature.
- Begin with a new copy of the flowerdnld.jpg image and duplicate it again with window || Duplicate.
- Use the Selection Tool
- Type = Eclipse
- Feather = set to your preference (mine is 15)
- Click and drag on the image making an oval around the rose.
- Use the Freehand Tool and set Feather to same value as in the Selection Tool.
-
Hold Down the Control Key and click outside of the oval selection.
- Hold down the mouse button and drag through the image to a point outside of the selection
- Release the mouse button and then release the Control Key and the selection will be subtracted from the oval.
- If you do not like the result, click on Control+Z (Edit || Undo) and just re-apply again until you have a result you like.
- Then copy the selection and paste it as a new image:
- Edit || Copy
- Edit || Paste as a New Image
- Then you can develop your own background for the image by adding a layer and dragging it to the bottom.
Note: Using the Freehand tool is a bit cumbersome when trying to add or remove an area from a selection. You can Zoom your image and add/subtract small areas at a time until you get the shape you like.
|
|
|
|
Subtracting a Selection Using Magic Wand
Another technique one can use to subtract a selection is to use the Magic Wand which selects areas based upon pixel color. There are three options that may be used to get the best results.
- Match Mode determines which pixels to select based upon RGB value (color values used), Hue (colors related to the color wheel) or Brightness (amount of white in colors), All Opacity (All Pixels that have color) and Opacity (pixels with opacity). The RBG value is most often used.
- Tolerance determines how close the color of a pixel should be to the color of the pixel you select when you click the Magic Wand. Higher numbers will allow the Magic Wand to select more pixels.
- Feather, as above, softens an edge with higher numbers.
|
|

|
Use the Profflowerdnld.jpg for this exercise by loading it into your PSP program. The area we want to capture is the area with the Rose on the tan strips. Since the area we want to delete is the purple areas we will set our Magic Wand to HUE. One may need to experiment with the Tolerance settings to get the best area selected.
|
|

|
- Use the Magic Wand
- Match Mode = Hue
- Tolerance = 75
- Feather = 0
- Sample merged = Unchecked
- Click cursor somewhere on purple area
|
|
|
Not all pixels have been deleted from the background. Now, you can use the Freehand tool with Feather = 0. Just draw around those areas to delete and use your delete key. It may help to Zoom the image to get some of the pixels near the image.
|
|

|
- Then, reset Magic Wand Feather Option = about 4 and Tolerance = 0 and click on a white area.
- Then use the Delete Key a number of times to feather the edges.
- Then, in the Layer Palette, right click on the Background Layer. In the context Menu select Promote to a Layer.
- Click on Delete again to get rid of the White Background.
- Then, add a new layer, drag it to the bottom, add a background color you want and any other features you want and you have created your own unique image.
Use these techniques to develop images from other images when you want to capture an area rather than using the whole image. Consider using photographs.
|
|
|
|
-- Enjoy -- :o)
Our next lesson will make Seamless Backgrounds.
|