 Home Tutorials
Beginners Classes Home Tutorials
Beginners Classes 11 Making Seamless Backgrounds |
|||||
|
|
||||
|
We are going to learn what it takes to make seamless backgrounds using a graphic. It is not always easy to make seamless backgrounds. It takes a lot of time and a lot of painting to make it a true seamless tiled background. Seamless images are often used as backgrounds (wallpaper) for Web Pages and for Rich Email (html email). A good seamless image will be tiled meaning that the image will be repeated over and over creating an appearance of a single image that covers the whole background. A good seamless image will be able to be repeated both vertically and horizontally to make a pattern without seeing any edges. In this tutorial we will explore some PSP features that create seamless images and explore a technique to turn images into seamless tiles.
Below, the Left Image (sandstone.gif) is a good seamless tile. The Right Image (marblewings.gif) is a poor seamless tile.
(Tip: If you know how to use Rich Email and graphics for backgrounds you are able to test out any image as a background image. You may also use the tiles as a background on a web page to see the results.)
(Note: The illustrations are done on a 100 x 100 canvas. You may want to copy them and paste them four times on a new 200 x 200 canvas to see how the image will replicate. Also, you may want to duplicate them on a 300 x 300 canvas to see more of the image.)
|
|||||
| Textured Tiles using PSP Effects | |||||
|
There are a number of PSP Effects that may be used to create simple, quick and effective seamless images that may be used as background tiles. (As a rule, a background tile for a web page or rich text email is usually not very busy and is light in color in order for text to be easily seen.) |
|||||

|
Creating a Sandstone Effect Using NOISE
Note: This tile is the same you downloaded for this tutorial. Also, you now have a basic background tile. You are able to use the Colors || Colorize to create any color tile you want. Just experiment with the values for Hue and Saturation. (Try increasing the Hue by a factor of 16 and you will go through the basic colors of the color wheel.) Also, the larger image illustrated is the image tiled to show a seamless pattern. (This effect is accomplished by creating a new canvas, 200 x 200 and pasting the image as a new layer 4 times and moving each layer so no background color or transparency is showing.) |
||||

|
Using a Sculpture Effect -- Frosted Glass
PSP has a number of Effects (sculptures and textures) which are able to be used to create a seamless tile. (PSP5 does not have these effects.) We will use just a couple of them to illustrate the effects. However, take time to explore them all and find ones you like for your background images.
|
||||

|
Using a Sculpture Effect -- Cement
Let's use one more example with Sculpture. Later, experiment with other sculpture patterns.
|
||||

|
Using a Texture Effect -- Letters
In PSP, using Texture Effects also are able to create some nice simple and easy background images. Take time to also explore these effects.
|
||||

|
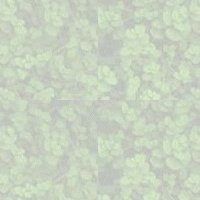
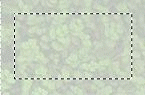
Using a Texture Effect -- Marsh
In this example we will use a green background (R208, G228, B208) with a Marsh Texture.
|
||||
|
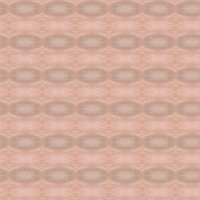
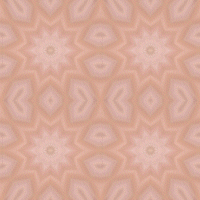
There are an unlimited number of possible seamless tiles one is able to create using Sculpture and Texture Effects. With the Texture Effects, one could also use Colorize to get other colored tiles. Explore them all and you will fine many different ways to create interesting and unique background tiles. Next, we are able to use two additional features of PSP to create interesting background tiles. One is able to take any image and apply either the PATTERN or the KALEIDOSCOPE effects and create interesting background tiles. |
|||||
| Creating Seamless Tiles with the Pattern Effect | |||||
|
In this and the next illustration, use the Marblewing.gif image from the download, or, any image you wish. Just duplicate it first to save the original (Window || Duplicate). Also, make sure the image is a 16M color image. If not, use Colors || Increase Color Depth to 16M Colors. First, notice that this tile is a very poor background image as it stands at this point. By using another PSP feature, Pattern we are able to turn this canvas into a wallpaper type pattern that will make a very nice background image.
Now just experiment with different settings in the Pattern Options window to see how you can create many, many interesting and effective background images from just one canvas. Example: In the settings from above just change both horizontal and vertical offsets to minus 100 ( -100 ) to produce a whiter background with diamond shapes. Then experiment with the horizontal and vertical offsets set to plus 100 ( +100 ) for another pattern. The more you experiment, the more you will find interesting ways to use this PSP Effect. |
||||
| Creating Seamless Tiles with the Kaleidoscope Effect | |||||
|
Another PSP feature, Kaleidoscope, also will turn this canvas into a wallpaper type pattern that will make a very nice background image.
Now just experiment with different settings in the Pattern Options window to see how you can create many, many interesting and effective background images from just one canvas. Example: In the settings from above just change the number of petals = 2 to produce another patterned background. Then experiment with these settings: Offsets = 0, Rotation = 0, Scale Factor = 20, Number of petals and orbits = 4, radial suction = 50. The more you experiment, the more you will find interesting ways to use this PSP Effect. |
||||

|
Creating Seamless Tiles with Flip and Mirror
There is also a technique for making any image seamless. By using Image || Flip and Image || Mirror, one is able to produce a seamless image that is an interesting pattern. By Flipping and Mirroring images and then copying them onto a new canvas one is able to line up the horizontal and vertical edges that will then replicate seamlessly.
The basic technique: (Information)
|
||||
|
Ok, let's use this technique on the MarbleWings.gif image from the download.
|
|||||

|
|
||||

|
|
||||

|
|
||||

|
|
||||

|
Once you are satisfied that no red areas show up just Merge and then save your image.
You are ready to use it as a background image. This technique will create a seamless image on any image. Try it on a picture of a person, or a scene, or anything you choose. Just start with a relatively small image so that when you double the new canvas your final image is not too large. Remember you also are able to resize the final image. |
||||

|
In this case, I made it a border background with a drop shadow on a blue area for the text. Just experiment and have fun with this technique.
|
||||
| Using Selections || Convert to Seamless Pattern | |||||
|
A very powerful feature of PSP is the ability to create a seamless pattern from any image by using Selections || Convert to Seamless Pattern. Although this feature is very easy to use, the skill to develop will be in the image you use and the selection you make for the conversion. First, we will use the 11seamlss-25.gif image you downloaded to learn this conversion technique. The image at the top left is a relatively light image. Although it appears that it might replicate correctly when used as a background for a web page, in fact it will not do so seamlessly. Just study the image at bottom left (/tutorial/html/beginclass/11seamlss_26.gif) created from the Flip-Mirror technique. Basically, the Convert to a Seamless Pattern feature of PSP takes a selection made and makes it seamless by using areas surrounding the selection to eliminate the appearance of seams. The best way to learn this feature is to just use it and in time you will see how to make excellent seamless images from any graphic. |
||||
|
Let's create a Seamless Tile
|
||||
 
|
The result is a seamless image. Although it appears similar to the original image, when you use it as a background, there are no seen edges as the images tiles smoothly. Thus, you are able to use any image. Select an area you want for a background image and then use Convert to Seamless Background. The more you experiment with this feature, the more you will find it a very useful tool to create some fantastic backgrounds. To view all the background images used in the lesson and some extra background, click here for the Prof's Tour on Seamless Patterns. |
||||
|
-- Enjoy -- :o) In our next lesson, we will make Bordered Backgrounds. |
|||||


