|
Snowman |
|||||
|
|
||||
| For some of us the weather is cold and frosty and for some it's pool time. No matter what the temperature, create an adorable snowman and bring everyone into the winter spirit. So, let's get started! | |||||
 |
Set the styles and colors: Foreground Style = Solid Color Foreground Color = white Background Style = Solid Color Background Color = a medium greyish blue (I had Red = 174, Green = 180, Blue = 206, #AEB4CE) Textures = Null Lock = checked |
||||
|
|
Create a new image: This will allow plenty of room to work. |
||||
|
|
Making the Lower BodyCreate a new layer: Go to Layers || New Raster Layer. Name the new layer "lower body". |
||||
|
|
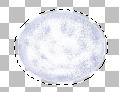
Activate the Preset-Shapes tool and set as follows: Holding down the left mouse button, drag out an ellipse (but not a perfect one) to form the lower body of the snowman. |
||||
|
|
Activate the Magic Wand tool and set as follows: Click inside the ellipse to select it. |
||||

|
Activate the Airbrush tool and set as follows: Spray randomly all over, and more heavily in the center two-thirds of the ellipse. |
||||
|
Now change the background color to a light blue (I had Red = 220, Green = 224, Blue = 238, #DCE0EE). With your right mouse button, spray sparsely over the outer edges. Deselect (Ctrl+D or Selections || Select None) when finished. |
||||
|
|
Blending The Lower Body ColorsActivate the Retouch tool and set as follows: |
||||
 |
Now blend the colors, working the white into the blues. Using a circular motion, work from the inner circle to the edges. Be sure to push the pixels somewhat outside of the "lines". When it looks good to you, copy (Ctrl+C or Edit || Copy) it and paste it as a new layer (Ctrl+L or Edit || Paste || As a New Layer). Do that twice so you have a total of 3 layers with ellipses for the head, body and bottom. Right-click on "Layer2" in your Layer palette and rename it "middle body", then right-click on "Layer3" and rename it "head". Now would be a good time to save your work in .PSP format. |
||||
|
Resizing the Middle Body and the HeadActivate the "middle body" layer in your Layer palette, then click on the Deformation tool and use it to size the middle body proportionately to the lower body. To quit deformation mode, double-click somewhere on your image or click on the "Apply" button in your Tool Options palette. Then click on the "head" layer in your Layer palette and use the Deformation tool again to size it down in proportion to the body. Rotate the head about 15 degrees while in deformation mode so it looks a little different from the other "body parts". |
||||
 |
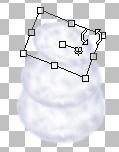
Let's Add a Hat!Activate the Preset-Shapes tool and set as follows: Left-click and hold the mouse button down to drag out the size of the tophat you'd like for your snowman. Use the rotation node while it's still in vector mode to give it a tilt. Right-click on the new vector layer in your Layer palette and convert it to raster layer when finished. Note: Save your work in .psp format so you are able to add more details to the layers later on. |
||||
 
|
That's it!! Decorate, add a background and detail whatever you like. Tip: If you keep an image of the snowman like it is now and work on duplicates (Shift+D or Window || Duplicate) for the details and background you can create different snowmen in various surroundings. :-) To give you an idea of what I did here:
When you're all finished on your creation merge all layers: Go to Layers || Merge || Merge All (Flatten). If needed resize or crop around the snowman and save as a .jpg file: go to File || Export || JPG Optimizer (compression around 5-40). This step does two things: It allows you to save your PSP work image and then save a smaller file size for use on a web page. I'd love to see what you come up with! |
||||
