|
Cross-stitched Valentine's Card |
|||||
|
|
||||
| Using the layer and blend-mode features of Paint Shop Pro, we will create a cross-stitched picture and use it for a Valentine's card. | |||||
|
To follow this tutorial, download the zip file on the left. It's the js-heartbow.tub from Tubes by Jan and the font SF Willamette from ShyFonts Type Foundry. Just unzip them into a folder; they don't need to be installed anywhere, only the file SFWillamette.ttf should be opened when you need the font. |
||||
| First we have to make two "basic" tiles that give us the up and down stitches. Open two new images: Width = 9 Height = 9 Background = transparent Image type = 16.7 Million Colors |
|||||
| Click on the Zoom tool in your tool palette and then several times on your images so you can work with them (I used 16:1). | |||||
|
Click on the Drawing tool in your tool palette: Type = Single line Width = 3 Line style = Default line Antialias = unchecked Create as vector = unchecked Close path = unchecked |
|||||
| Make black your foreground and white your background colour. | |||||
 |
Set your foreground style to Solid Color (click on the little arrow in the Foreground Style box and choose the little brush icon on the left) and your background style to None (click on the little arrow in the Background Style box and choose the icon on the right). Your textures should also be set to None. | ||||
| Check the "Lock" option under your texture style boxes so that we don't have to reset the colours all over. | |||||
 
|
Pressing your Shift key (which makes your line run strictly horizontal, vertical or diagonal), draw a line from the lower left to the upper right corner in one image and from the upper left to the lower right corner in the other one. | ||||
|
Click on the Magic Wand tool in your tool palette: Click into the black line of your first image to select it. |
|||||
|
Click on the Flood-Fill tool in your tool palette: Blend mode = Normal Match mode = None Tolerance = n/a Opacity = 100 Sample merged = unchecked |
|||||
|
Set your foreground style to Gradient (click on the little arrow in the Foreground Style box and choose the second icon from the left). Click right into the foreground style box: Gradient = Foreground-Background Invert gradient = unchecked Horizontal/Vertical = n/a Angle = 315 Repeats = 0 Style = Linear Gradient (icon on top) |
||||
 
|
Click into the selection of your first image to fill it with the gradient, deselect with Ctrl+D (Selections || Select None); then select the black line of the second image with your Magic Wand tool and give it the same gradient fill, deselect. Save these images as "Basic_up.psp" and "Basic_down.psp"; don't close them yet. |
||||
| Now open jd-heartbows.tub from your download; you can open it directly in PSP. Duplicate this image with Shift+D (Window || Duplicate) so you won't overwrite the tube file. | |||||
 |
We now have to resize this image so that we get squares that match our "Basic_up" and "Basic_down" tiles. Go to Image || Resize (Shift+S): Go again to Image || Resize (Shift+S), and change "Percentage of Original" to 900; leave other settings the same. |
||||
 |
Your image should now look like the one on the left. This picture is ideal for our purpose because, as you can see, there are no semi-transparent pixels after resizing, which often occurs with images that were done with the antialias feature. These are, of course, not so good for turning into cross-stitch. Of course you can always pixel-edit which is more of a "square-editing" in this case, for you have to set the Paintbrush or Eraser to "Square" and the size to 9 if you want to do this. This image is now quite big, but we'll wait with resizing till after "stitching". When working with other pictures, you'll have to experiment a bit with the resizing; often a first resize of 50% is not enough with larger originals. On the other hand, the smaller you make them the more details they lose. The last resizing, however, should be 900% so that you get the 9x9 squares. Now go to Image || Canvas Size: |
||||
|
Click on the "New Layer" icon in your layer palette to add a new layer for your text. If you haven't done so yet, open the file "SFWillamette.ttf" from your download with a double-click in your windows explorer; the font will now be available in PSP. |
|||||
| Change your background colour to a red from the heart (I had Red = 255, Green = 90, Blue = 115) | |||||
|
Click on the Text tool in your tool palette: Name = SF Willamette Size = 8 Kerning/Leading = both 0 Auto kern = checked Styles: Stroke = None, Fill = Solid Color Textures: Stroke and Fill = both None Bold, Italic etc. = deactivated Alignment = doesn't matter Create as: Floating = checked Antialias = unchecked |
|||||
|
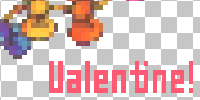
Enter "Be my" and click on OK (don't be shocked that the text is really tiny now!), deselect by right-clicking into the image. Add yet another layer, click into the free space on the right beneath the heart and enter "Valentine!". Deselect. On your image you can now hardly see the text, we have to resize it with 900% again. Go to Image || Resize again, use the settings as before but make sure that "Resize All Layers" is not checked. Do that for both text layers, and move the text to where you like it with the mover tool. I've tried out many fonts for this tutorial and found that most looked awful after resizing. If you want to use your favourite font for this purpose, you may have to "square-edit" after resizing. I have chosen this rather plain font for this tutorial because it was at least legible right away. |
||||
 |
We now have to arrange the picture and text layers so that they will meet our basic tiles when we "stitch". For this purpose, the grid comes in handy. Go to View || Change Grid and Guide Properties. In the "Grid" panel, set: Click OK, then go to View || Grid to display the grid. Zoom in a few times until grid and picture squares meet in size (I had 3:1). Click on the Mover tool in your tool palette and move the picture and the text layers so that they are correctly placed in the grid squares. Now you can get rid of the grid by going to View || Grid again. |
||||
 |
Go to Layers || Merge || Merge Visible to get your three layers in one. Now there are only two more little steps before we can begin to stitch: in the end, we need a small border of cross-stitches to prevent the canvas from fraying, and then a little more empty space around the border where the canvas will be supposed to fray. | ||||
|
Double-click on the Selection tool in your tool palette so that the "Select Area" dialog box opens: Left = 9 Right = 603 (our current image width minus 9) Top = 9 Bottom = 567 (our current image height minus 9) Custom Size and Position = checked Now invert your selection by going to Selections || Invert. |
|||||
| Click on the Flood-Fill tool in your tool palette and right-click into the small selected border around your image to fill it with the red (background) colour. Deselect with Ctrl+D (Selections || Select None). | |||||
 |
Go to Image || Canvas Size: New Width = 648 New Height = 612 Center Image Horizontally = checked Center Image Vertically = checked |
||||
|
Now finally! ;-)) we can begin to stitch. Create a new layer (click on the "New Layer" button in your layer palette), name it "Basic up" and drag it under your merged layer. Double-click on your merged layer and name it "Stitch up". Create another new layer, name it "Basic down". Now right-click on the "Stitch up" layer in your layer palette and choose "Duplicate" from the context menu. Double-click on that layer, name it "Stitch down" and drag it above the "Basic down" layer. |
|||||
 |
You should now have 4 layers (from top to bottom): Stitch down (your image) Basic down (empty) Stitch up (your image) Basic up (empty). Click on the "Basic up" layer to make it the active layer. |
||||
 |
Your Flood-Fill tool should still be active. Change the Foreground Style to "Pattern" (click on the little arrow in the Foreground Style box and choose the second icon from the right), then click right into the Foreground Style box: Click into your image to flood-fill the layer with the basic-up tile that you made in the beginning. |
||||
 |
Click into the Foreground Style box again and choose "Basic_down.psp" from the pattern drop-down box. Click on the "Basic Down" layer in your layer palette to make it the active layer, then click into your image to fill that layer with the basic-down tile. You can now close the two basic tiles that you made in the beginning. |
||||
| Click on your topmost layer ("Stitch down") to make it the active layer. Click on the Magic Wand tool in your tool palette, and press the Shift key while selecting all the transparent spaces around your picture; don't forget the transparent border and the transparent spaces in the "B", the "e"s, the "a" and the "ti" of your text (you may want to zoom in a bit for this). | |||||
| When all the transparent areas are selected, click on the "Basic down" layer in your layer palette, then hit the Delete key. Click on the bottom layer ("Basic up") and hit the Delete key again. Deselect by right-clicking into your image. Now all basic tiles are deleted in the areas that we don't want to stitch, and all you can see right now is your image again with border and text. | |||||
| Click on the little glasses next to the names of the two top layers in your layer palette to make them invisible for now, then click on the bottom layer ("Basic Up") to make it the active layer. | |||||
 |
Your Magic Wand tool is still activated. Click somewhere in the transparent space of your image; thus you select all the transparent areas in your bottom layer. Your image should now be full of "marching ants", pointing from the bottom left to the top right. Click on your "Stitch up" layer, and hit the Delete key (Edit || Clear). Deselect by right-clicking into your image. Now there are only the "basic up" parts of your image sqares left. |
||||
| In the blend-mode list box of the "Stitch up" layer, choose "Overlay" which will bring the light and shadow of your basic tile to the coloured layer. | |||||
 |
Go to Effects || 3D Effects || Drop Shadow: Now our stitching has got a bit depth. |
||||
|
|
Now click on the little glasses for the two bottom layers to make them invisible, make the two top layers visible again by clicking on little glasses next to their name, then click on the "Basic down" layer to make it the active layer. | ||||
 |
Now follow the same procedure as before with those two top layers:
Make your bottom layers visible again; your cross-stitch should now look like in the image on the left. |
||||
 |
We will now resize the image before we create a canvas background (because a resized canvas texture can look really awful!). Go to Image || Resize: I think that with this size, the cross-stitch is still recognizable; with bigger images, you should experiment a bit when resizing. |
||||
| Now, just the other way round than in real life, let's put our cross-stitch on a canvas! Create a new layer, name it "Canvas" and drag it to the bottom in your layer palette. | |||||
| Click on the Flood-Fill tool in your tool palette, and change your Foreground Style to "Solid colour". Click into the Foreground Style box and choose a very light yellow (I had Red = 255, Green = 255, Blue = 235), then click into the image to fill the "Canvas" layer with that colour. | |||||
 |
To give it a canvas texture, go to Effects || Texture Effects || Texture: Texture = Spheres (compare picture on the left) Size (%) = 45 Smoothness = 6 Depth = 3 Ambience = 0 Shininess = 0 Color = white Angle = 315 Intensity = 50 Elevation = 30 |
||||
 |
I applied this twice to get the effect I wanted. (A note regarding the texture size: If you zoom in a bit so you can better see your stitches, you can experiment with the texture size until the canvas matches your stitches.) | ||||
|
If we want to send that picture as a Valentine's card, we have to mount it on a carton. So, first go to Image || Canvas Size: New Width = 376 New Height = 357 Center Image Horizontally/Vertically = both checked |
|||||
| Now create a new layer, name it "Card" and drag it to the bottom of your layer palette. | |||||
| Click on the Flood-Fill tool in your tool palette and right-click into the new layer to fill it with the red that we used for the text and border (Red = 255, Green = 90, Blue = 115). | |||||
 |
To get a really good carton, give it a texture now: Change to a red that's a bit lighter (I had Red = 255, Green = 125, Blue = 143), choose a background texture to your liking (click on the little arrow in your Background Texture box and choose the icon on the left, then click right into the Backgrounds Texture box and choose a texture from the drop-down box; I had a branches texture) and right-click again into the image. If you toggle your "Canvas" layer invisible, you can see the effect better. | ||||
|
One last step for perfectionists: let's fray the canvas a bit outside the red cross-stitch border. For this, click on your "Canvas" layer to make it the active layer, zoom in (I could work well with 7:1), and click on the Eraser tool in your tool palette: Shape = Square Size = 1 Hardness = 100 Opacity = 100 Step = 1 Density = 100 Build Up Brush = unchecked |
|||||
 |
Now begin to erase every third line of the canvas outside the red border; I chose those lines with the darkest pixel in it. But stop! Don't do all that work the whole way round! |
||||
|
Just do it twice, then click on the Selection tool in your tool palette: Selection Type = Rectangle Feather = 0 Antialias = not checked |
|||||
 |
Carefully select the altered part of your canvas edge, beginning the selection with one of the long, bright canvas lines. Now go to Edit || Copy (Ctrl+C), then to Edit || Paste || As New Image (Ctrl+V) to get that little piece of frayed canvas into an image of its own. Deselect by right-clicking into the cross-stitch image. | ||||
 |
Next select the whole edge that shall be altered (in this case the top edge), be sure to select only the height that you have in the new little picture and that your selection begins where the little picture begins. | ||||
| Hit the Delete key to totally delete the edge, then click on the Flood-Fill tool in your tool palette. Change your foreground style to "Pattern" (click on the little arrow in the Foreground Style box and choose the second icon from the right). Then click right into the Foreground Style box and choose the new little picture in the pattern drop-down box. | |||||
 |
Now click into your selection to flood-fill it with the frayed canvas piece. Deselect with Ctrl+D (Selections || Select None). | ||||
 |
Do that for all the four canvas edges (every edge needs its own little picture to fill with!), and fray the corners out completely with the Eraser tool. | ||||
