|
Let's Draw Dragonflies |
|||||
|
|
||||
We're going to draw a dragonfly and create a luminous effect without a filter. |
|||||
|
|
Basic Set-UpCreate a new image: |
||||
| Create a new raster layer and name it 'Background'. | |||||
 |
Set styles and colors: Foreground style = Solid color Foreground color = white Background style = null Foreground and Background textures = None Lock = checked |
||||
| Flood-fill the 'Background' layer with white for now in order to see the initial circles. Later we will flood-fill this layer with black. | |||||
|
|
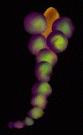
Create the Dragonfly BodyCreate a new raster layer and name it 'Circle One'. Choose the Selection tool, set it to 'Circle' (Antialias = checked) and draw a circle near the center top of your canvas about 27x27 (look at the values in the Status Bar). Now change your foreground color to a dark purple (Red = 64, Green = 0, Blue = 64; #400040) and flood-fill your circle with that color. Then, deselect with Ctrl+D (Selections || Select None). |
||||

|
Duplicate the 'Circle One' layer three times, and label the new layers 'Circle Two', 'Circle Three' and 'Circle Four'. Then use the Mover tool and move the duplicated circles so one is to the right of Circle One with a space between them and the other two beneath Circle One and Circle Two, and touching at their centers. |
||||

|
Create a new raster layer above the 'Circle Four' layer and label it 'Circle Five'. With your Selection tool (settings unchanged), draw a circle about 25x25 and flood-fill it with the purple foreground color. Deselect (Ctrl+D or Selections || Select None). Duplicate the 'Circle Five' layer two more times and label the new layers 'Circle Six' and 'Circle Seven'. Use the Mover tool and move these three circles so they are a single line centered under the first four, curving slightly to the left. |
||||

|
Starting with 'Circle Eight', we will draw five (5) more circles. Each circle will be slightly smaller than the proceeding circle. Draw each circle on its own layer. Make Circle Eight 23x23 and then, for each subsequent circle, reduce the size by 2. Flood-fill each circle with purple. With the Mover tool, place them under the others and curve them much more to the left. Note: The ending image should be like a letter 'Y' that curves to the left. Use the Mover tool to fix the circles to suit your own preference. |
||||
 |
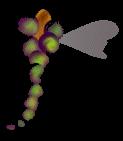
Color the Dragonfly BodyOn the Layer palette, activate layer 'Circle One'. Then, choose the Magic Wand and select the circle. While the circle is selected, choose the Airbrush tool. Set it to: Go to the Color palette and set the foreground color to Pink (Red = 229, Green = 165, Blue = 165; #EFA5A5). Lightly spray the center two thirds of the circle. In the Color palette, change the foreground color to Lime Green (Red = 0, Green = 255, Blue = 0; #00FF00). Spray lightly over the Pink Color. Change the color once more to a Bright Yellow (Red = 255, Green = 255, Blue = 0; #FFFF00) and spray one or two clicks in the center. Now use the Retouch tool set at: Smudge the colors together in the center. Try to avoid the edges. Repeat this for the rest of the circles except the last two. Change the size of the selection as needed to keep the area in the center of the circle. On the second to last one, just add pink and smudge. On the last one, leave it purple. Now, highlight the 'Background' layer in your Layer palette and flood-fill it with black. With the Mover tool, adjust the circles as needed. |
||||
|
|
Create the Dragonfly HeadGo to the Layer palette, and hide the 'Background' layer. Do this by clicking on the eyeglasses. A red x should appear. Check to make sure the circles are in position. Then merge visible layers: Go to Layers || Merge || Merge visible. Now make the 'Background' layer visible again. |
||||

|
Create a new layer and name it 'Head'. Choose the Selection tool and set it to 'Ellipse'. Draw out an oblong ellipse (from top down), about twice as long as Circle One (18 x 54). Change your foreground style to 'Gradient': Click on the arrow in the Foreground-Style box and select the Gradient icon (second from left). Then click into the Foreground-Style box to set as follows: Click on OK and flood-fill the selection with the Flood-Fill tool. Change the foreground style back to 'Solid Color'. Then use the Airbrush tool with the color set to Dark Brown, (Red = 64, Green = 0, Blue = 0; #400000) to darken the image a bit. Now use the Retouch tool (Retouch mode = Smudge) to lightly soften it draw the smudge tool from top to bottom of the selection. Deselect (Ctrl+D or Selections || Select None). |
||||
|
Go the Layer palette and drag the 'Head' layer down, right above the 'Background' layer. Position the head under the top two circles using the Mover tool. Hide the 'Background' layer once more, and merge visible layers (Layers || Merge || Merge visible), then make the background visible again. |
||||

|
Create the WingsCreate a new vector layer (Layers || New Vector Layer) and name it 'Wing One'. Choose the Preset-Shapes tool and select: Set the foreground color to white and draw a heart about 35x66. Choose the Vector-Object Selection tool and click on 'Node Edit' in the Tool palette. On the right side of the heart, click on the middle node and drag it down to flatten that side. Then right-click and choose 'Quit Node Editing' from the popup-menu. Convert this layer to a raster layer: Go to Layers || Convert to Raster Layer. Then use the Magic Wand, click outside of the heart and then go to Selections || Invert to select the heart. Set the foreground color to a dark grey (Red/Green/Blue = all 129; #818181) and the background color to a greyish purple (Red = 116, Green = 104, Blue = 108; #74686C). Set the foreground style to 'Gradient', then click on the Foreground-Style box and select: Choose your Flood-Fill tool and flood-fill your selection. Deselect (Ctrl+D or Selections || Select None). |
||||
|
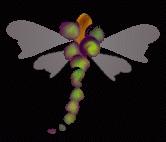
Go to Image || Rotate: Use the Mover tool and position the wing between the top two circles, then go to the Layer palette and drag the 'Wing One' layer down, above the 'Background' layer. |
||||
|
Now copy the wing (Ctrl+C) and paste it as a new layer (Ctrl+L), then go to Image || Mirror. Position that wing on the left side of the dragonfly body. Paste it as a new layer once more (Ctrl+L), use the Deformation tool to make the wing smaller and position it under the right wing using the Mover tool. You may need to use Image || Rotate with a value of about 30 to get the wing positioned correctly. Now copy this wing (Ctrl+C) and paste it as a new layer (Ctrl+L). Then go to Image || Mirror and finally, with the Mover tool, position it on the left side of the body. Go to the Layer palette and choose a wing layer. Move the Opacity slider on the right of the layer's name to 50%, thus reducing the opacity. Repeat this for the rest of the wings. |
||||
 |
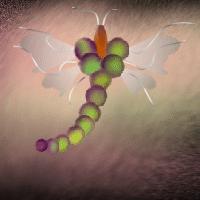
Create the Legs and AntennaCreate a new top layer. Choose the Drawing tool with the following values: The foreground style is already set to 'Gradient', now choose the 'Metallic 2' gradient. Draw one sets of legs and antenna. (There will be three legs on each side. The two top legs will look like an exaggerated 'V'. The bottom leg should curve downward.) Now set your foreground style to 'Solid Color' again and your foreground color to white. Select the 'Background' layer in the Layer palette and, with your Flood-Fill tool, flood-fill the background with white. |
||||
|
Color the BackgroundThen choose the Airbrush tool, set the Size = 200 and Shape = Horizontal. Spray a squiggly line of the pink we used earlier (Red = 229, Green = 165, Blue = 165; #EFA5A5). Spray another squiggly line over the pink using pale yellow (Red = 255, Green = 255, Blue = 192; #FFFFC0). Use the Retouch tool. Set the Size = about 200, Shape = Vertical and change the Opacity = 50%. Lightly smudge these colors together until you are satisfied with the looks. Now, sit back and admire your work. |
||||

|
Finishing TouchesHide the 'Background' layer, select one of the other layers and merge the visible layers (Layers || Merge || Merge visible). Copy (Ctrl+C) and paste the dragonfly as a new layer (Ctrl+L). Use the Deformation tool and resize the second dragonfly so it is smaller, then move it wherever you like with the Mover tool. Mirroring it is a good idea too as is moving this layer beneath the other dragonfly. Make your background visible again. I added drop shadows to the dragonflies, and also used a filter from Flaming Pear called "Aetherize" on the second dragonfly. You can download this filter for free for thirty days at Flaming Pear's site (www.flamingpear.com). You could also colorize the smaller dragonfly with Colors || Colorize or go to Colors || Adjust || Curves and change its color that way as well. Enjoy ... |
||||