|
Teddy Bear with Fonts and Mirrors |
|||||
|
|
||||
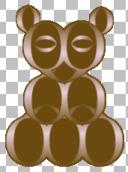
| In this tutorial, we will be working with text, layers, PSP's Rotating-Mirror effect and other PSP features to create a cute little teddy bear from a single letter "Q"! | |||||
|
|
Start with a new image: Width and Height = 350 Pixels Background color = Transparent Image type = 16 million colors |
||||
|
|
Set your colors: Foreground color = Brown (Red=107, Green=74, Blue=16) Background color = Mauve (Red=231, Green=206, Blue=214) |
||||

|
Set your styles: Click into the Background-Style box to open the "Gradient" dialog box: |
||||

|
Click on the Text tool and then into your image to open the "Text Entry" dialog box: Type in the capital letter "Q" and click on OK, then go to Objects || Align || Center in Canvas to center the Q in your image. Right-click on 'Layer2' in your Layer palette and choose 'Convert to Raster Layer' from the pop-up menu. |
||||

|
Now we will form the head and nose of our bear from this Q: Go to Effects || Reflection Effects || Rotating Mirror: With your Mover tool, center the bear's head in your image. Then right-click on 'Layer2' in your Layer palette, choose 'Rename' from the pop-up menu and rename the layer to 'Head'. |
||||
 |
For the top legs, right-click on the 'Head' layer in your Layer palette and choose 'Duplicate' from the pop-up menu. Then go to Image || Flip. Rename the new layer ('Copy of Head') to 'Top Legs' and drag it below the 'Head' layer in your Layer palette. With your Mover tool, center the top legs under the nose so that the rhombus of the lower Qs is covered by the rhombus of the upper Qs. |
||||
 |
For the bottom legs and body, duplicate the layer 'Top Legs' and rename the new layer to 'Bottom Legs'. Then go to Effects || Reflection Effects || Rotating Mirror again and apply the same settings as before. With your Mover tool, center the 'Bottom Legs' layer under the 'Top Legs' layer so that one rhombus reaches into each top leg. Then drag the 'Bottom Legs' layer below the 'Top Legs' layer in your Layer palette. |
||||

|
Now let's make the eyes and ears. Ears first: Duplicate the 'Head' layer and rename the new layer to 'Ear 1'. Then go to Effects || Reflection Effects || Rotating Mirror again: Activate the Deformation tool in your Tool palette, grab the top left node and pull down to a nice perspective, maybe correct a bit with the top center node. Move the ear on its place at the head, then click on "Apply" in the Tool Options palette. Drag the 'Ear 1' layer below the 'Head' layer in your Layer palette, duplicate it and rename the new layer to 'Ear 2', then go to Image || Mirror. If necessary, correct the ears' position a bit with the Mover tool. |
||||

|
Now for his eyes: Duplicate an 'Ear' layer, rename the new layer to 'Eye 1', then go to Image || Rotate and rotate it by 90 degrees to the left or right (make sure 'All layers' is unchecked, you only want to rotate the eye). Resize it to a nice perspective and move it into one of your Qs. When you're happy with it, duplicate the layer, rename the new layer to 'Eye 2' and then go to Image || Mirror. Now place it just right and we're done with mirroring fonts. I waited with merging the layers in case we wanted to play with a particular layer. So now check all the layers/body parts again if they're positioned correctly, then go to Layers || Merge || Merge visible. Then rename this merged layer to 'Qs'. Please remember this has been the objective, using PSP's Rotating Mirror effect to create and design. If you like to play with your PSP, mirrors can be fun and quite surprising. |
||||
|
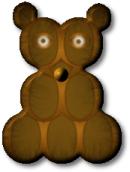
Now we can paint, texturize and clean to our heart's content!
First take the Magic Wand: Click into your image somewhere into the empty space around your bear, then go to Selections || Invert. In your Layer palette, create a new layer and name it 'Bear'. Then activate your Flood-Fill tool, make sure your foreground color is still the brown that you set in the beginning, and flood-fill your selection. Deselect with Selections || Select None (Ctrl+D). Now drag the 'Bear' layer below the 'Qs' layer in your Layer palette. |
||||
 |
Now on the 'Qs' layer in the Layer palette, slide the layer Opacity down until you're satisfied (I stopped at 60). Move over to the Blend Mode and on the drop-down list try "Overlay", but feel free to explore. Now let's add some fur to the 'Bear' layer: Select it in your Layer palette, then go to Effects || Texture Effects || Fur: |
||||

|
Now we can clean up on the 'Qs' layer with the Lasso or Eraser tool. Activate which you like best, then select the 'Qs' layer in your Layer palette and remove those lines in the top paws. Then go to Layers || Merge || Merge visible again. |
||||

|
Now select the Paint-Brush tool: Change your foreground color to White (or any other choice), then go with the mouse cursor to the center of an eye and click. How about a pupil? Same brush, change Size = 9, color to brown and you're set. |
||||
 |
Finally a nose: Create a new layer, then activate the Selection tool: Make a small circle and flood-fill with your brown foreground color.
Then go to Selections || Select None (Ctrl+D), then to Effects || 3D Effects || Inner Bevel: Don't be shy and play with Smoothness, Size, Ambience, and Shininess till you're happy. With your Mover tool, place the nose, then go to Layers || Merge || Merge visible. |
||||
|
To finish off your image, you can add an Inner-Bevel and a Drop-Shadow effect if you wish to. Then crop the image around your bear to a reasonable size. This graphic and tutorial were created for fun and to share my excitement about working with the Rotating-Mirror effect and the Mirror tool. The student shall exceed the teacher, so I would expect your "Q Bear" is looking great! So let me know how you made out. I hope you had some fun! :-)) AndyG |
||||
