|
|
|||||
|
|
||||
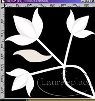
In this tutorial you will use vectors to create a floral image that I call "Triple Tulips". This tutorial is able to be done in PSP v6 as well. |
|||||
|
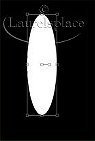
Open a new image 400 x 400, Black background. Next Click on your Preset Shapes, Set it to: Ellipse, Antialias checked, Create as a Vector checked, Background set to White and Foreground set to Null. Draw a tall and narrow ellipse in the center of your image. Use the Right Mouse Button to start ellipse in Center of Canvas. Click on the Vector Object Selection Tool and then in your Tool Palette click on Node Edit. You want to taper the ends of your ellipse. To do this add 2 nodes on either side of the nodes on the top and the bottom. Hold down the control key and bring your mouse over the line where you want your new node to be. When it says ADD click with your mouse to add a node. Do this on each side of the center node. Then grab the center node and pull up (for the top node) and down (for the bottom node). You may need to adjust the rest of the nodes until you get a taper look you like. Convert this layer to a Raster Layer. |
||||
|
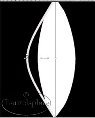
Next set your Foreground to a Light Grey color (192, 192, 192) and Background set to Null. Select your Line Draw tool. Set to a line width of 5, Create as a Vector Checked, and Use the Shift Key and Draw a line down the center of your ellipse from the top tip of ellipse to bottom tip of ellipse. Then click twice off to the left of the ellipse. You want a grey line with a black area between it and the white ellipse. If the center part is more than about 1/4 inch from the center of the ellipse, grab the left middle node and move the line in a bit. Make sure the ends of the line are even with the end of the ellipse. |
||||
 |
Next convert this layer to a raster layer (Layers > Convert to a Raster Layer). Duplicate this layer and then mirror this layer (Image > Mirror). If the right grey line is not centered with the tips touching the left grey line, use the Mover Tool. Turn off the bottom layer. Highlight a top layer. Then go to Layers/Merge Visible and merge the ellipse with the two lines. If you have a color layer to help you see what you are doing make sure you do not merge this layer with your lines. |
||||
|
With your magic wand select the space between the line and the ellipse. Go to Selections > Modify > Expand by 2. Then flood fill with the light grey color. Repeat for the other side of the ellipse to fill that with the light grey. Then select your paintbrush, size set to 1, opacity set to 100, step set to 1 and density set to 100. Fill in any parts the flood fill missed. You may need to zoom your image first. |
||||
|
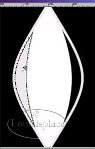
Next form the petals of the tulip. Select the Preset Shapes tool, set to Ellipse, any line width, antialias checked, vector object checked, and background set to white and foreground to null. Right Click your mouse in center of the first ellipse, and Draw an ellipse about the same size of first ellipse you drew above. Then, rotate it to the left by clicking on the middle node until you see a double arrow and drag up. Use the mover tool and position the bottom of this ellipse on the bottom part of the first ellipse. The shape of the petal when finished will have a curve on the right side from the bottom part of the first ellipse to the top tip. The Top tip of the petal will be curved left, down slightly and in a bit. The bottom of the right petal will be curved to the bottom of the first ellipse. Some Grey on the first ellipse should show on the right side of the petal. Click on the Vector Object Selection tool and then click on Node Edit. Add two new nodes, one on the right edge between the middle and bottom node, and one on the left edge between the middle and top node. (Use Control Key and click mouse to add a node.) Click on the Object Selector tool and Node Edit. To shape the petal click on the bottom node, drag it to the bottom of the first ellipse and slightly to the left. Click on the left arrow of that node and rotate it up to smooth out the bottom right side. Click on the right side ball and move it in and up to curve with the grey line on the first ellipse. Click on the right side node (that you added) between the bottom and middle node. Drag it inward to show some of the grey area of the first ellipse. You may need to click on the ends of that node (arrow or ball) and either lengthen or shorten it and rotate it slightly to get the curve along the grey area. Anytime you want to redo a curve, use [Control+Z] and then redo. Click on the top node and bring each end of the node inward to the curve to create a point. Click on the right middle node and position it (move node up and in slightly) to make a smooth curve ending in the top point of the petal. Use the arrow and ball rotating them slightly to get the petal appearance. Click on the left node added between the left middle and top nodes and position it outward and down slightly to get a smoother look to the point. Click on the left node between the middle and bottom nodes and move it out to further smooth out the petal. Now just adjust the nodes to get the petal look. Use the arrow/ball and shorten or lengthen and rotate them slightly to develop the final look. |
||||
 |
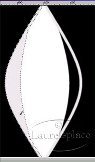
Next convert this layer to a raster layer (Layers > Convert to Raster layer). Then in the Layer Palette, duplicate this layer and mirror it (Image > Mirror). If necessary, use the mover tool to align the right petal correctly with the main flower. Turn off the bottom layer first, and highlight a visible layer. Go to Layers > Merge > Merge Visible to merge the flower parts together. |
||||
 |
Open a new image 400 x 400 (no change in settings). Copy your tulip from the original image [Control+C] to this new image. Highlight the new image and use [Control+L] to duplicate as a new layer. Resize it by around 40%. (Image > Resize with percentage of original check and set to 40 and Resize all layer unchecked.) Then move this flower to the top left corner using the mover tool. Make two duplicate copies of this layer. Move one to the top right corner and the second one to the bottom left corner. When you Rotate the flowers, make sure 'Rotate All Layers' is Unchecked. Rotate the Top Left Flower 45% to the left |
||||
 
|
Set foreground to white and background to null. Then, select the line draw tool set to Bezier Curve, Line Width 10, Antialias checked and Create as a Vector checked. Draw a line from a little above the bottom of the lower left flower to the lower right hand corner. Click twice up near the upper right flower. Your image should now look like a curved line going from the lower left flower up and right, then curving down to the bottom right corner. You may have to adjust the line if it is not coming from the center of the bottom of the flower (click on middle node, hold mouse button, and drag image to position). Once it looks right convert this layer to a raster layer. Duplicate this layer, mirror and rotate it (left about 90 degrees) until it goes from the bottom center of the upper right flower to the lower right hand corner. You may need to use the mover tool to adjust the stems and flowers. The curved line will cross over the first one. |
||||
 |
Next select your line draw tool set to Single Line, Line Width 10, Antialias check and Create as a Vector not checked. Draw a line from the upper left flower to the center of the two stems of the other two flowers. Then, Deselect [Control+D] |
||||
 |
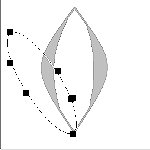
We will now create a leaf. Next open a new image 300 x 300. Select your Preset Shapes tool set to Ellipse, Antialias checked and Create as a Vector checked, and Background set to light grey and Foreground set to null. Draw an ellipse long and narrow in center of canvas. Next click on the Vector Selection tool and node edit. Click on the left node. Rotate the ball end of the arrow counter clockwise to create an upward curve on the bottom left side of the ellipse. Click on the node on the right side and rotate the ball end counter clockwise to create a downward curve on the upper right side of the ellipse. Your image should have a pointed edge on both sides. If you want to redo just use [Control+Z] and then start again. Convert this layer to a raster layer. |
||||
|
Next Hit [Control+C] to copy your leaf. Click on your image with your flowers on it, highlight the top layer and hit [Control+E] to paste your leaf. You will need to resize your leaf and rotate it till it is the size and position you like (tip of leaf just touching the stem). The first leaf should be on the top left flower stem on the left side. Duplicate this layer 3 times (duplicate one at a time and place the leaf on the stem. Rotate and resize as necessary). One leaf will go on the right side of the top left flower, one leaf on the lower side of the bottom left flower and one leaf on the right side of the top flower. When satisfied Promote the Floating Selection to a layer in your Layer Palette. If you want to redo leaves, just click on [Control+Z] and redo them. |
||||
 |
Make sure the bottom layer is turned off. Highlight a top layer and use Layers > Merge > Visible. You are now finished with the basic flower image so Save your Work. Finish off your flowers any way you like. You might just color the various parts of the image as it is at this point, you might want to duplicate the basic flowers and position them at each corner (you will want to resize the basic flower first, or you might find other ways to use this basic triple flower. To color the various parts of the image, just use the magic wand. You may wish to modify a selection by increasing it by 1 or 2 pixels to get the whole area. Enjoy |
||||
