|
Circus Tent |
||||
|
|
|||
| Using Geometric Effects and a few other tricks, you will change some straight, evenly spaced columns into a circus tent. | ||||
|
|
Open a new image in PSP, 300 x 300 Pixels, transparent Raster Background. Create a new raster layer (Layers || New Raster Layer). |
|||
 |
The TentIn your Materials palette, set your Foreground Material to Solid Color = White (#FFFFFF) and flood-fill the new layer. |
|||
 |
Turn on the grid (View || Grid). Then go to View || Change Grid, Guide & Snap Properties. The 'Default settings' don't matter, but for the 'Current image settings' set: Your grid should show only vertical lines, like in the image on the left. Turn on the Snap-to-Grid option (View || Snap To Grid). |
|||

|
Select the Paint Brush tool, reset to default (click on the Presets drop-down list in the Tool Options palette and then on the 'Reset to default' button), then change only the following settings: Change your Foreground Color to a light Blue (Red = 174, Green = 210, Blue = 255; #AED2FF). Now go to the top of the first grid line with your mouse cursor and click once, then press the Shift key, hold it down and click once on the bottom of that grid line, then release the Shift key. (Pressing the Shift key while drawing makes it a straight line.) Go to the 5th grid line and draw another blue stripe, then repeat this for every 4th grid line. Click as near as you can manage with the center of your cursor at the top and bottom edge of your image so that the line can snap there as well. When you're finished drawing the blue lines turn off the grid (View || Grid). You should now have eight blue vertical lines in your image. |
|||

|
Select the Magic Wand tool, reset to default and only change: Click into one of the blue stripes, then go to Selections || Modify || Select Similar: Now all your blue stripes should be selected. First go to Selections || Float (Ctrl+F), you should now see a third "layer" in your Layer palette named "Floating Selection". Then go to Effects || 3D Effects || Cutout and use the following settings: Click on OK and deselect (Selections || Select None or Ctrl+D). |
|||

|
Using your Magic Wand tool again, now select one of the white stripes, go to Selections || Modify || Select Similar again and just click on OK to use the same settings. Again go to Selections || Float and then to Effects || 3D Effects || Cutout – no Shift key this time because we need to change one setting: Click on OK and deselect (Selections || Select None or Ctrl+D). Now go to Effects || Geometric Effects || Pentagon: Click on OK and go to Image || Canvas Size: Use 400 for both Width and Height, click once on the middle down-arrow (which changes Top to 100 and Bottom to 0) and then click on OK. This has increased the canvas size and placed the tent very near to the bottom of the image. |
|||

|
In your Layer palette, activate the 'Raster 1' layer. Set your Foreground Material to Gradient, click into the Foreground Materials box and set: Click on the Flood Fill tool and then into your image to fill the bottom layer with this gradient. |
|||
 |
In your Layer palette, activate the 'Raster 2' (the tent) layer. Go to Effects || 3D Effects || Drop Shadow with the following settings: Click on OK. (Note: In case you prefer to create a perspective shadow for your tent, don't give it a drop shadow now but finish it first, then go to the tutorial linked to at the end of this tut.) |
|||

|
Set your Foreground Material back to Color, change your Foreground Color to Black (#000000) and set your Background Material to Transparent (Null). Select the Pen Tool and choose these options in the Tool Options palette: By clicking along the "pentagon corners" of the white and blue stripes, draw a line around the upper part of the tent where the "roof" meets with the "walls". |
|||

|
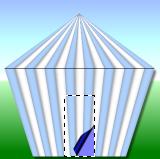
The Tent Flap:Choose the Selection tool on your Tools toolbar with these settings: Make a rectangle selection at the bottom of the tent. Using your status bar for the coordinates, start at the bottom of the tent at about (231, 393) and move the rectangle up and over to the left to about (170, 270). The flap is now outlined with 'marching ants'. |
|||
|
Go to Effects || Image Effects || Page Curl with these settings: Click on OK. Don't yet deselect. |
|||

|
Next go to Effects || 3D Effects || Inner Bevel. Reset to default, then use these settings: Click on OK and deselect (Selections || Select None or Ctrl+D). |
|||

|
The FlagpoleCreate a new raster layer (Layers || New Raster Layer). Your Foreground Color should still be Black (#000000) and your Background Material set to Transparent (Null). Select the Pen tool with these settings: Click where you want the pole to start (at the top of your tent roof) and click again where you want it to finish. You will have a perfectly straight line. Because it is on a layer you can use the Move Tool to put the pole into place if needed. Deselect by clicking on another tool, e.g. the Pan Tool at the top of the Tools toolbar. |
|||

|
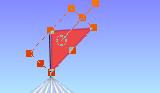
The FlagCreate a new raster layer (Layers || New Raster Layer). On your Materials palette, set your Foreground Color to Red (Red = 186, Green = 4, Blue = 64; #BA0440) and your Background to Color: a lighter Red (Red = 236, Green = 72, Blue = 72; #EC4848). Choose the Preset Shape tools with these settings: Draw a small triangle for the flag. This can be done anywhere on the image as you are working on a new layer and the triangle will be moved in the next step. |
|||
|
Select the Deform tool and, using the handles, turn the flag and place it on the flagpole. Choose the nodes to reshape the flag as you want it. Deselect by clicking on another tool on the Tools toolbar, e.g. the Pan tool. Right-click on the 'Raster 4' layer in your Layer palette and choose "Merge || Merge Down", thus placing the flag and flagpole together on one layer. |
|||
 |
Go to Effects || 3D Effects || Drop Shadow using the same settings as you did for the tent – remember you can hold down the Shift key while going there in the menu bar for applying the last-used settings without opening the dialog. (If you prefer the perspective shadow skip this step and see below.) Finally go to Layers || Merge || Merge All (Flatten). (For a perspective shadow only merge the tent layers: Turn the bottom layer invisible, make one of the other layers active and go to Layers || Merge || Merge Visible.) And, there you are ready for the parade. Thank you for doing this tutorial. Jo |
|||
| If you'd like do create a perspective shadow for your circus tent, here's how to do it: Deformation Tool: Perspective Shadows. |
||||
