|
The Legend of the Dogwood |
||||
|
|
|||
|
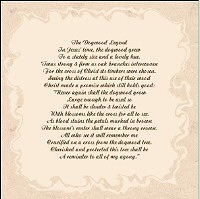
An old and beautiful legend has it that, at the time of the crucifixion, the dogwood was comparable in size to the oak tree and other monarchs of the forest. Because of its firmness and strength it was selected as the timber for the cross, but to be put to such a cruel use greatly distressed the tree. Sensing this, the crucified Jesus in his gentle pity for the sorrow and suffering of all said to it: "Because of your sorrow and pity for My sufferings, never again will the dogwood tree grow large enough to be used as a gibbet. Henceforth it will be slender, bent and twisted and its blossoms will be in the form of a cross – two long and two short petals. In the center of the outer edge of each petal there will be nail prints – brown with rust and stained with red – and in the center of the flower will be a crown of thorns, and all who see this will remember." With this tutorial we will be creating a framed copy of the poem "The Dogwood Legend". We will make use of layers, selections, masks, and borders to frame a copy of the poem with some sprigs of dogwood. We will also create a suitable matte and frame for our finished creation. |
||||
|
If you have not already done so, please unzip your downloaded file and open the images dogwoodlegend.pspimage, dogwoodlarge.pspimage, dogwoodblossom.pspimage, and dogwoodsmall.pspimage into your workspace. Minimize. | |||
Part 1: Creating a Dogwood-Framed PoemIn this portion of the tutorial we will place the copy of the poem on a suitable paper, then frame it with some sprigs of dogwood. If you are ready, let's begin. |
||||
|
|
Step 1: Open a New ImageGo to File || New (Ctrl+N): |
|||
 |
Step 2: Add the Poem to Your ImageMaximize dogwoodlegend.pspimage. Copy the image (Edit || Copy or Ctrl+C), then paste it as a new layer onto your antique white image (Edit || Paste || Paste As New Layer or Ctrl+L). Go to Layers || Merge || Merge visible. Rename this layer 'Poem'. Save your image and close the dogwoodlegend.pspimage file. |
|||
|
|
Step 3: Create the Parchment BackgroundAdd a new layer (Layers || New Raster Layer) and name it 'Background'. Open your Layer palette and drag the 'Background' layer below the 'Poem' layer. Hide the 'Poem' layer. |
|||
 |
In the Materials palette, change the Foreground Material to Pattern, then click into the Foreground Box to bring up the Material dialog. Select: Click on OK and flood-fill the 'Background' layer with this pattern. |
|||
|
Step 4: Combine Your Poem with Your Parchment
|
|||

|
Step 5: Add the Sprigs of DogwoodIn this step we will add the two dogwood images to our poem/parchment. Maximize dogwoodlarge.pspimage. Copy the image (Edit || Copy or Ctrl+C), then paste it as a new layer onto your 'Parchment' layer (Edit || Paste || Paste As New Layer or Ctrl+L). Use the Move tool to position the dogwood in the upper right portion of the image. Try to make the dogwood frame the text of the poem. When you are satisfied with its placement, do the same with dogwoodsmall.pspimage. Place it in the lower left portion of the image. Again, try to make the dogwood sprig frame the text of the poem. When you are satisfied with its placement, merge the layers (Layers || Merge || Merge all). Save your work. You may now close the dogwoodlarge and dogwoodsmall.pspimages. |
|||
Part 2: Creating the Matte and the FrameWe will now create a matte and a frame for our image. |
||||
|
|
Step 6: Set the Color and TextureIn the Materials palette, change your foreground material back to Solid Color. Change the foreground color to the Antique White (#FAEBD7) used previously. Change the background material to a dark brown color (#57432B). Click on the Texture button, then into the Materials Box and select the Evergreen texture: Click on OK. |
|||
 |
Step 7: Create the MatteLet's add a border to our image (Image || Add Border). Use the following settings: Click on OK. We now have our poem framed by a white border. Next we will give our matte some color and texture. |
|||
|
|
Step 8: Color and Texturize the MatteUsing the Magic Wand, select the white border. Flood-fill the border with the foreground color (antique white), then flood-fill with the brown textured background color. Invert the selection (Selections || Invert). |
|||
 |
Step 9: Add Depth to the MatteWe will now add some depth to our matted poem by using the Cutout effect. Go to Effects || 3D Effects || Cutout and use these settings: Click on OK. Repeat the Cutout effect, changing the Vertical and Horizontal values to -10 (minus 10). Deselect (Ctrl+D) and save your work. |
|||
 |
We will now add a frame to our matted poem. You may choose to use a frame in PSP 8's collection of frames (Image || Picture Frame), or to create a frame using the border function in much the same way we created the matte. Step 10: The FrameGo to Image || Add Border and use these settings: Click on OK. |
|||

|
Change your Foreground Material to Gradient, then click in the foreground materials box and use these settings: Click on OK. Using the Magic Wand, select this white border and flood-fill it with this gradient. Do not deselect! Let's apply a bevel: Go to Effects || 3D Effects || Inner Bevel and use these settings: Click on OK. Do not deselect! |
|||
 |
Let's apply a Drop Shadow to our frame: Go to Effects || 3D Effects || Drop Shadow and use these settings: Click on OK and deselect (Ctrl+D). Save your work. |
|||

|
Add another border (Image || Add Border). This time make the Size in Pixels = 30 and change the color to dark brown (#57432B). Using the Magic Wand, select the brown, then go to Effects || Texture Effects || Texture and use these settings: Click on OK and deselect (Ctrl+D). |
|||
 |
Let's add one more gold border to our frame. Add a border of 10 pixels and white color. Using the Magic Wand, select the white border and flood-fill with the metal-brass gradient. Add a Bevel and Drop Shadow with the settings already used. When you are finished, deselect and save your work. | |||

|
Step 11: Final TouchesMaximize the dogwoodblossom.pspimage. Copy the image (Edit || Copy or Ctrl+C), then paste it as a new layer onto your framed image (Edit || Paste || Paste As New Layer or Ctrl+L). Using the Deform tool, rotate the flowers and place them in the lower right corner of your image. Overlap the frame. Merge all layers (Layers || Merge || Merge all (flatten). Save your image. We are now finished with our framed copy of the Dogwood Legend. At this point you may want to add another layer and drag it to the bottom, then floodfill it with the background of the page on which you will place your dogwood legend image. Adding a drop shadow will give your image some dimension. I hope you've enjoyed this tutorial. – drango |
|||
