|
Jack-o'-Lantern |
|||||||||||||||||||||||||||||||||||||||||
|
|
||||||||||||||||||||||||||||||||||||||||
This is a fun character to create and use almost anywhere. There are no plug-ins in this tutorial. We will be using vectors with the Pen tool, and will also use the Preset Shapes tool, the Freehand Selection tool, the Deform tool, and various effects. |
|||||||||||||||||||||||||||||||||||||||||
 |
The colors we will be using in this tutorial are:
|
||||||||||||||||||||||||||||||||||||||||
|
|
Note: I added the Dark Orange and the Light Orange to my swatches in order to be able to change colors easily. However, you can also access the recently used colors by right-clicking on the Color and Material Boxes in the Materials palette. There will be some freehand drawing in this tutorial. You may want to open an extra image to "doodle" on to work out your colors and how you are going to draw. |
||||||||||||||||||||||||||||||||||||||||
|
|
Creating the PumpkinOpen a new image, 250 x 250 pixels, transparent background, and flood-fill with the Dark Orange. |
||||||||||||||||||||||||||||||||||||||||
 |
Go to View || Change Grid, Guide & Snap Properties. On the Grid tab, change the Horizontal and Vertical Grids for the Current Image to 30 pixels. The Snap Influence should be 50 pixels. Now go to View || Grid. You will see that the grid is not exactly even on both sides, but that will give the finished Jack-o'-Lantern more character. |
||||||||||||||||||||||||||||||||||||||||
|
|
Change your Foreground Color to Black, then go to the Pen tool: |
||||||||||||||||||||||||||||||||||||||||
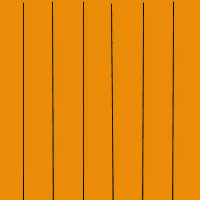 |
Place your cursor at the left-hand top of the first grid line and click once. Place your cursor at the bottom of the same line and double-click to close the line. Move over to the next grid line on the bottom and click once. Then place your cursor at the top of that grid line and double-click to close. Continue these steps until all the grids have vertical lines drawn. Remove the grid (View || Grid) and deselect (Selections || Select None or Ctrl+D). |
||||||||||||||||||||||||||||||||||||||||
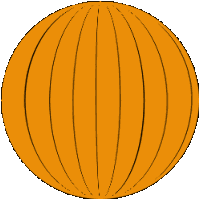 |
Right-click on the 'Vector 1' layer and choose Merge || Merge Visible from the pop-up menu. Next, go to Effects || Geometric Effects || Circle and select: Ah! It looks like a basketball! |
||||||||||||||||||||||||||||||||||||||||
|
|
Choose the Deform tool (D): Click on another tool on the Tools toolbar (e.g. the Pan tool) to apply the deformation. Using the Move tool, move the pumpkin down to the bottom of your image. |
||||||||||||||||||||||||||||||||||||||||
|
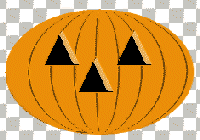
Drawing the Eye and Nose HolesCreate a new raster layer ('Raster 1'). Change your Foreground Color to the Dark Orange and your Background Color to Black. Choose the Preset Shapes tool (P), select the Triangle shape and draw out an eyehole. Choose the Freehand Selection tool and reset to default. Then set: Make a small selection at the right inside of the triangle, then flood- fill with the Light Orange. Now deselect (Selections || Select None or Ctrl+D). Go to Edit || Copy (Ctrl+C), then to Edit || Paste || Paste As New Selection (Ctrl+E) and place this triangle as a nose on the pumpkin. Go again to Edit || Paste || Paste As New Selection (Ctrl+E) and place this triangle as the other eyehole in the pumpkin's face. Then deselect (Ctrl+D). While in this layer you can arrange the eyes and nose as one unit. |
||||||||||||||||||||||||||||||||||||||||
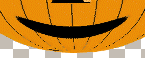 |
Drawing the MouthCreate a new raster layer ('Raster 2'), and set your Background Color to Black and your Foreground Material to Null. Click on your Preset Shapes tool (P) and choose the Ellipse shape. Draw an oval of about 50 x 30 pixels under the nose. Go to Effects || Distortion Effects || Polar Coordinates with these settings: If at this point you do not like the location of the mouth you can use the Move tool (M) and/or Deform tool (D) to rotate it if needed and move it to another place. |
||||||||||||||||||||||||||||||||||||||||

|
Drawing the EyesCreate a new raster layer ('Raster 3') and set your Background Color to White, the Foreground Material remains Null. Choose the Preset Shapes tool (P), the Ellipse shape should still be selected. Draw a white ellipse inside of an eye. Now change your Background Color to Black and draw a smaller black ellipse inside of the white one. Note: If you start the black ellipse at the bottom of the white one it will be easier to do. Change your Foreground Material to Color = White. Choose your Airbrush tool and reset to default, then set: Place one dot on top of the black ellipse, to the left. Then go to Edit || Copy (Ctrl+C) and to Edit || Paste || Paste As New Selection (Ctrl+E). Place the second eyeball into the other eye and then deselect (Ctrl+D). Last go to Layers || Merge || Merge Visible to merge all layers. |
||||||||||||||||||||||||||||||||||||||||

|
Tongue and TeethSet the Background Color to the Red (#C13D2F), the Foreground Material to Null. Select the Pen Tool (V) and set: Now draw a tongue inside the mouth over to the right hand side. Then right-click on the 'Vector 1' layer and choose Convert to Raster Layer from the pop-up menu. |
||||||||||||||||||||||||||||||||||||||||
|
|
Add a new raster layer ('Raster 2'). Set the Background Color to the Dark Orange, the Foreground Material remains Null. Choose the Preset Shapes tool (P) and select the Triangle shape. Note: If the triangle is drawn from top to bottom it will have its point on the top. If it is drawn from bottom to top, the point will be on the bottom. With that in mind make one tooth on the top and a second tooth on the bottom on the opposite side. Now choose the Freehand Selection tool and in the Tool Options palette change: |
||||||||||||||||||||||||||||||||||||||||
|
|
Drawing the StemSet your Foreground Color to the Dark Brown (#6A5F46) and your Background Color to the Light Brown (#B08D3A). Create a new raster layer ('Raster 1'). The stem can be drawn either by freehand or by using presets and effects. These are the steps I used: Choose your Preset Shapes tool (P), select the Pentagon shape and draw a long, thin pentagon (about 20 x 60 pixels) on top of the pumpkin. Center it on the pumpkin's head with the Move tool if needed. Then go to Effects || Distortion Effects || Warp: Use the Freehand Selection tool to cut the stem to the size you need it. Move it into place. Select the Airbrush tool, Size = 2, and paint a stripe up the side of the stem with the Dark Brown. Now use the Soften tool to smooth it out, then set the Blend Mode for the 'Raster 1' layer to "Soft Light". |
||||||||||||||||||||||||||||||||||||||||
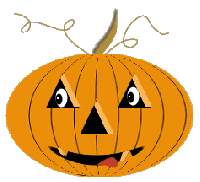 |
The vines will have to be done by freehand. Set the Foreground Color to the Light Brown and the Background Material to Null, then choose the Pen tool (V) and draw in the curlicues. After each one, deselect (Ctrl+D). Finally, go to Layers || Merge || Merge Visible. That's a lot of work but you have your Jack-o'-Lantern in time for Halloween. |
||||||||||||||||||||||||||||||||||||||||
