|
Tutorial no. 1 of Prof's PSP 9 Art Media Tutorials > Art Media Background, Layer and Mixer Palette |
|||||||||||||||||
|
|
||||||||||||||||
|
In this series of tutorials I will explore the new Art Media tools and features of PSP 9. We will explore both the palettes and tools and some techniques for painting pictures. In this tutorial, we will explore the new Art Media Background, the Art Media Layer and the new Mixer Palette. In tutorials to follow, we will explore the Art Media Tools and then create a landscape of a sky scape, mountains, lake and land using various tools. |
|||||||||||||||||
IntroductionThe Mixer Palette and the Art Media Tools are one of the newest features of Paintshop Pro. The development of Art Media allows one to paint in more realistic ways. In essence it is as if one has a palette upon which one mixes the oil colors and then uses the various tools (brushes, drawing tools, knife and eraser) and paints a picture on a canvas. Not only are the Mixer Palette and the Art Media Tools new, the Layer Palette will also now have a new Art Media Layer. Thus, we now have a new and exciting way to create and paint. |
|||||||||||||||||
 |
The Art Media BackgroundIn creating a new image, we now have a third background – the Art Media Background. The previous version(s) of PSP had just two backgrounds, the Raster Background and the Vector Background. The new feature is the Art Media Background. Also, the Color Depth options are the same as is the ability to create a solid or transparent background. Though the New Image dialog looks much the same and does in fact have the same presets and options as in PSP 8, Units now can be set to Millimeters in addition to Pixels, Inches and Centimeters. There are no changes to the Resolution option. For the Raster and Vector Backgrounds, the Color Depth is the same as in PSP 8. The new option for a new image is the Art Media Background which automatically uses the highest color depth and adds the options for Canvas Textures. |
||||||||||||||||
|
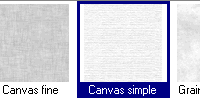
The Canvas Texture as a background allows for different-looking paintings just as a different canvas texture for oil paintings produces different outcomes. There are 20 different canvas textures one may choose from. Three are illustrated on the left with 'Canvas Simple' being selected. The canvas texture is selected by first clicking on the down-arrow in the Canvas Texture box. Then, in the 20 canvas textures displayed select one to use and when clicking on it that texture will become the background. As in previous versions, one may start with a transparent background or a color background. My own personal preference is to start with a white background as in actual oil paintings the canvas is white. For our tutorial, I am using a 300 x 300 pixel image at a Resolution of 300, with Art Media Background and the Background Color (Fill Color) set to White. |
||||||||||||||||
|
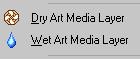
The Art Media LayerThe Layer palette now has the Art Media Layer as one of three types of layers as mentioned above. Manipulating the layers is done in the same fashion as in previous versions. One just right-clicks on a layer in the Layer palette for the context-menu items. However, there are two new options available for the Art Media Layer: The 'Dry Art Media Layer' and the 'Wet Art Media Layer'. Though we will explore these two options in another tutorial, briefly, they set whether or not the painting on the canvas is "dry" (meaning you can paint over it without smudging the original) or "wet" (meaning that painting over it will also smudge into the original). |
||||||||||||||||
|
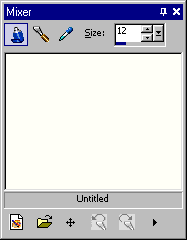
The Mixer PaletteThe Mixer Palette is also new and is the palette used to mix the colors (paints). The following options are used to mix colors on this palette:
|
||||||||||||||||
Final CommentsAt this point, take a little time to explore in more detail using the various options for creating a new image and for mixing colors. Check out various canvas textures as well as how to save and load Mixer palettes you created. Although we will explore these features in future tutorials, it is always useful to use them on your own as well. In the next tutorial, we will review the various painting tools that one may use to paint pictures. More detailed description of using these tools will also be included in additional tutorials as we move toward creating a mountain landscape painting. Enjoy! – Prof – |
|||||||||||||||||
