|
Learning PSP 9, Lesson 11: > Tools: The Eraser Tools |
||||
|
|
|||
| This series of tutorials is oriented toward helping those new users of PSP 9 to learn the basics of this great graphic program. The tutorials are written to introduce the basic features, tools and palettes and build upon one another. Also, the tutorials may be used as a reference for using particular tools, palettes and features of PSP. | ||||
The Eraser ToolsThe two Eraser tools are used to erase sections or areas of a graphic or photograph. The Eraser tool will erase all pixels covered by the brush tip. The Background Eraser erases pixels that match the pixel color below the brush tip. The Background Eraser is often used to remove a background from a photograph in order to either just have the object showing or to create a new background. Purpose and Goal of this Tutorial:Both Eraser tools are quite easy to use. However, the techniques one can use with these tools give both great flexibility in their erasing of areas.
|
||||
|
The download file on the left is the same one we used in Lesson 7. We will be using this file again in subsequent lessons so, after you unzip the file, duplicate the original to preserve it and work only on a duplicated copy. Also, when you save your work, first save it as a .pspimage or .psp file and only save a final JPG file when done. (Jpeg files are a lossy compression and there is a small loss of quality each time a JPG is saved.) We will also be using the flag from this picture in a later tutorial. | |||
|
|
The Eraser ToolThe Eraser tool options (Shape, Size, Hardness, Step, Density, Thickness, Rotation, Opacity) are the same options used in most tools. The default options will most often serve one's purposes. One will use the Eraser tool when specific areas need to be completely erased as all pixels below the brush tip will be erased. One can vary how these pixels get erased by using various option values which we will explore later. |
|||
|
|
The Background Eraser ToolThe Background Eraser tool has the same options as the Eraser tool with these additional options: Tolerance, Sharpness, Sampling, Limits, Auto Tolerance, Sample Merged and Ignore Lightness. The Background Eraser tool erases the pixels with matching colors to the pixel under the brush tip. The Background Eraser tool is often used to more easily remove the background around an object without erasing parts of the object. To get the tool to work well, one will need some practice particularly in using the options. However, once having a good grasp of how this tool works, erasing backgrounds is a fairly easy task. |
|||
Hints and Tips
|
||||
|
|
Basic Features of the Eraser ToolsFor this set of illustrations where we will just explore the basic options of using the tools we'll use the flag picture from your download. Just open the original in your PSP, duplicate it with Shift+D (Window || Duplicate) and work with the duplicated image. For initially exploring both tools:
|
|||
 |
First, with default settings, use the Eraser tool and in the flag picture erase in a straight line near the top. Then, using the Background Eraser with default settings, erase in a straight line just below the eraser line. With the Background Eraser make sure you are in a blue sky area initially. For both, click on the canvas and then drag the brush straight to the right. You will notice that the Eraser tool erases a much larger and consistent area. The Background Eraser erases only portions of the area. The Background Eraser is picking up a pixel color (default options being used) and only erasing those contiguous pixels that match. Thus what is erased for the most part will be the blue sky. |
|||

|
Image Zoomed to 500%First, zoom your image to about 500% (if you have a wheel mouse, place mouse cursor in the image and roll it to either increase or decrease zoom. Otherwise go to View || Zoom || Zoom in/out. Also, you can click on the Zoom tool and left-click to zoom in (increase) or right-click to zoom out (decrease) the size of the canvas.) Notice in the illustration that there can be seen varied blue hues as well as zagged edges both for the lines and the flag portion. |
|||
 Eraser: Hardness = 50% 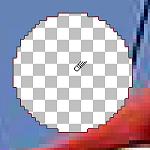 Eraser: Hardness = 100%  Eraser: Hardness = 50%  Background Eraser: default settings |
Eraser Tools at 500% ZoomedUsing the default settings, notice that for the Eraser the Hardness value is set at 50%. If you place your cursor so just the bottom edge fits into the jagged edges of the flag and then click once, you will erase a smaller circle which fades into the blue toward its edges. If you set the Hardness value to 100% and erase a similar area you will erase everything under the brush tip outline as seen in the second illustration on the left. However, as in the third illustration on the left, if you keep the Hardness set to 50% and position the cursor so it overlaps the flag edge and click once or twice you can erase to the flag's edge with just very transparent blue areas showing around the flag edge. In the fourth illustration on the left, if you use the Background Eraser at default values and overlap the flag (amount does not really matter though the brush tip must be on a color you want to erase), and click once you erase all the blue with just a few transparent blue pixels remaining. The edge of the flag is preserved. This set of illustrations shows how one can use either the Eraser to remove all pixels or – if Hardness is set lower than 100% – most pixels, and how using the Background Eraser erases all pixels of matching color to the point of the brush tip. If a background color is not overly complex and contrasts with the edges of the object that one wants to preserve (such as the flag) the Background Eraser is best used. By making sure the brush tip is in the color to be removed one can erase quite well and preserve edges. On the other hand, there will be times when the Background Eraser is not going to work as well as using just the Eraser. Though one could use the Eraser with Hardness set to 100%, the edge of the object will be very sharply defined. Thus, it often helps to set the Hardness value to a lower value, usually around 50%. |
|||
|
|
Erasing the Background – ExerciseFrom this point on, we will erase the background of our picture to leave only the flag on a transparent background. We ultimately will use both Eraser tools and will explore a couple of options when using the Background Eraser. We will begin with the Background Eraser at default settings except we will reset its Size to 270. |
|||
 |
Because our background is made up of various lines (boat lines), when we use the Background Eraser and put the tip in a blue area it erases only those contiguous blue matching pixels and only erases a small area because of the lines. Although we can overlap the flag and the background eraser can erase to the flag's edge as seen in the above illustrations, this contiguous limit would not be practical in trying to erase the whole background. |
|||
 |
Fortunately, one of the Background Eraser's options is 'Limits' (Discontiguous, Contiguous and Find Edges). If we set this option to Discontiguous, then all pixels that match the tip pixel within the brush size will be erased. The illustration on the left shows how this option works. Thus, we could erase a good portion of the blue sky and preserve the flag. However, we would also preserve the ship with its ropes and masts. If we wanted that preserved then the Background Eraser would do a fine job for the most part. |
|||
|
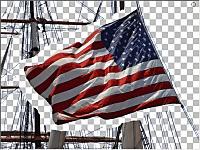
In the illustration on the left, I first used the Background Eraser to remove the blue from the background. For the most part I used the default settings and did not drag the cursor (as it would erase the lines) but placed the cursor where I wanted and then clicked the mouse once. However, going around the blue/stars of the flag I reset the Sharpness value to somewhere between 85 and 95 in order to not remove any of the blue area of the blue/stars of the flag. I also used the Discontiguous option. I then used the Eraser tool with Hardness to about 90% and Size to about 20. I erased around the flag to remove the boat lines and poles. Keep in mind that when erasing the background the image is best zoomed so your work can be more precise. Also, you will find you need to try different settings for Hardness (Eraser) and for Sharpness (Background Eraser). And, remember, your best friend will be the Undo command (Ctrl+Z). Thus with the image zoomed you can see if you need to undo an erase. Finally, I found that one of the best ways to erase is to click the mouse rather than drag it. One has more control at the edges of the object being preserved (the flag in this illustration). |
|||
 |
Some Tips and Hints
Using this technique of a very thin brush one can erase safely from the object edge to the edge of the picture. One just has to set the Rotation to make the brush parallel to the flag edge. |
|||

|
Final TouchesWhen you think you have erased the background, another important step is to make sure you have erased small areas. One way to check this out is to use the Magic Wand and click in a transparent area. If there are small areas still needing to be erased you will see the marching ants from the selection. Just deselect (Ctrl+D) and erase those areas. You may have to zoom into the image and use the Magic Wand a number of times to find all those small areas. Another technique is to create a new layer below the object and flood fill it with a contrasting color such as white or black and see if areas show up that need to be erased. A third technique is to use just the Eraser tool, set its Size as large as possible and use the Square Shape, and erase the transparent areas again to remove any spots. Just keep the tool from touching the flag. Once you have erased your background you are ready to add another background (as the one in this illustration which is the 'Duotone light blue' gradient). |
|||
Final CommentsSave this image as a .pspimage or .psp file to preserve the various layers, in particular the flag layer with the background erased. We will be using this flag again in another tutorial. The Eraser tools are versatile and can be used to remove areas or complete backgrounds of pictures. The Eraser tool will erase all pixels below the brush tip. One can set its options to get various types of erasing such as changing the Hardness (brush edge sharpness) to its opacity. One could lower Opacity and just erase areas of a layer above a main picture to reveal sections of the main picture as if through a veil. The Background Eraser erases contiguous or discontiguous pixels of the color in the picture and is often used to erase around an object. There are times when one will need to use both Eraser Tools to remove a background completely. Try these tools out on various pictures to see how they work. You will find your own technique for erasing areas and backgrounds that works best for you. Enjoy. |
||||
