|
User Defined Filters |
||||
|
|
|||
|
User-Defined Filters was part of the PSP Progression Page and is donated to the PSP-Users Group. The user-defined filters are very handy when you can't find the exact filter in Paint Shop Pro itself. For instance, when you want a blur filter which blurs with increasing intensity, you need to work your way around that problem. |
||||
Introduction to user defined filters
|
Let's get something straight before I start explaining all about user-defined filters I know. It's impossible to create exotic effects like the hot-wax coating or the noise filter. These filters have some kind of conditional or random process which can't be made with user-defined filters. The user-defined filters are based on matrix-calculation only. This doesn't have to spoil your fun with this type of filters! They are really worth understanding and looking at, and can add some powerful functions to PSP when you know how to use it. |
|||
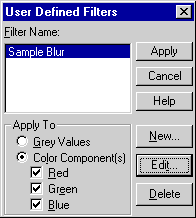 |
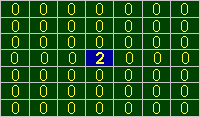
IntroductionWhat's a user defined filter? You can find this option in the "Effects" menu at the bottom, called "User defined filters...". When you click on it, you see the screen shown on the left. With this screen you can manipulate your own filters or apply them to your image in the desired color values (red, green, blue). Unfortunately, the user-defined filters can't be copied by placing them in the Paint Shop Pro directory, because all filters are stored in the file PSPUD.FLT located in the Paint Shop Pro directory. Sure, you can change the file by overwriting it, but you'll lose your own made filters. |
|||
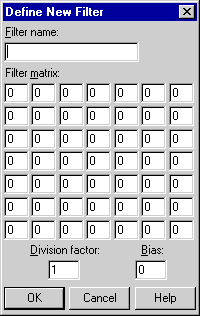 |
We press new to start a new filter, and behold! The wonders of filter creation. This is where it's all about. All options are described below. The "Filter name" speaks for itself. Fill in your own description which matches the filter you are going to design. The "Filter matrix" is a calculation array in which you set the relations to the pixels surrounding your pixel (how the surrounding points affect your pixel). More about that later. The "Division factor" is used to divide the result obtained by the matrix calculation. This is useful whenever you want to use floating-point values which are not supported. For instance, when you want to use 0.1 as a multiplication value for a matrix cell, just multiply all values used by 10, and set the value 1 in the cell where you wanted to place the 0.1 and change all other values too. Set the division factor to 10, so the result is divided again by 10 at the end. If you don't, your picture will get very intense! The "Bias" value is added to the final result of the calculation for your pixel. |
|||
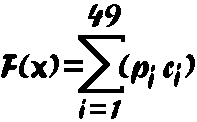 |
How do they work?Are filters that difficult to understand? Do I really need math and knowledge of matrix calculations? Not at all. Before you run away screaming, let me explain the formula on the left: All what this formula does is multiplying the matrix cell with the corresponding pixel. There are 49 pixels in total (7x7 matrix). All the multiplications are summarized and stored in the centered pixel position in the matrix. So what this formula does is giving the pixel in the middle the value of all summarized calculations. This will result in a new pixel which is calculated from the relation of the neighboring pixels towards the centered pixel. You can forget this formula, only understand that it doesn't anything more than multiplying the matrix with the 7x7-pixel field that it's currently processing. Let's see an example for this matrix-calculation formula: |
|||
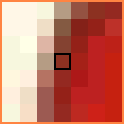 |
This is a highly enlarged area of 7x7 pixels. As you can see, the center pixel is the current pixel processed. The 7x7-filter matrix describes the relation of the surrounding pixels towards the center pixel. The value of the matrix cell (Ci in formula) is multiplied with the corresponding pixel (Pi in formula). All the pixels are summarized, and the center pixel will get this value. This is the entire filter process together with the division factor and the bias offset. |
|||
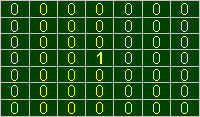 |
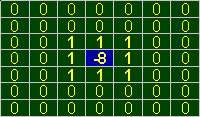
The matrix shown on the left does nothing. The only relation the centered pixel has towards the other pixels is with itself. The centered value "1" is the only value multiplied, and stored again in the centered pixel. So, nothing will change. However, when we change the "1" into a "2", the picture will be come twice as bright, because the pixel will get two times its original value. |
|||
 |
Let's take a matrix with a centered pixel with the value "2". We now know that the original (centered) pixel will get twice its original value. But ... Wait a minute! How is it possible to calculate all pixels in the picture without interference from one another? If on screen, pixel (0,0) is calculated, pixel (1,0) is calculated incorrectly, because the first pixel is already changed by the filter!! That's why filters are so slow ... Every pixel is calculated and stored in a separate array, so the new pixels won't interfere with the calculation of the neighbor pixels. Just imagine, for every pixel a complete 7x7-matrix is calculated, the result is stored in a separate array, and when finished, the complete image is stored into the original image to make the result visible.. When we take a 400x400 image this means roughly 7,840,000 multiplications! Now do you still think filters are slow?? |
|||
Some filter characteristicsYeah, I can hear you think, "All this info is great! But what exactly can I do with a filter?" Let's look at this matrix: |
||||
|
OverexposureI think you've already tried to make a filter of your own, by placing some values in the matrix, and see what happens. Most of the time the picture turns up to be a bright, overexposed picture. This filter on the left isn't much different. What do you expect? Just look at the calculation: 1*p17 + 1*p18 + 1*p19 + 1*p24 + 1*p26 + 1*p31 + 1*p32 + 1*p33 The pixels on the screen which currently match a cell containing a "1" are added up, and the pixel in the middle will receive the result. So, if you have a picture with an average red-color intensity of 123, the result will be about 8*123 = 984, and 255 is the maximum (red/green/blue values can't exceed the 255). This will result into a bright overexposed picture, because the pixel in the middle will receive a very high value. Basically this means that all pixels with a color other than black will become very bright. Whenever a large area of black pixels is processed, nothing happens because all color intensities are 0. This filter has a dilation effect on black and white images, and a brightening effect on colored images. See the examples below that were made with this filter (original images always on the left, new ones always on the right): |
|||
 
|
As you can see, the gradient picture lost a great deal of its colors because the average intensity on the right side of the area was too high. |
|||
 
|
Black and white pictures only have two colors (maximum or minimum intensity), and if only one pixel in the matrix is white, the resulting pixel becomes white. This is a dilation. |
|||
|
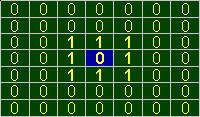
Taking an average (blur)You can compensate the overexposed part by dividing through the total amount of times you multiply. This means that you have to summarize all numbers and divide through the total amount. The matrix on the left has a division factor of 8, and this compensates the overexposure. If you apply this filter, you divide the summarized amount through the times you multiply. This compensates the result, and gives the pixel an average of the eight pixels surrounding the centered pixel. |
|||

|
This effect looks like a blur filter. The edges are soft, because the average of black and white is taken: (white + black) / 2 = medium gray. |
|||
|
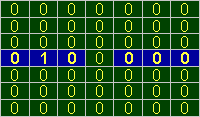
Shifting your imageAlso another nice part of filter creation is shifting your image. When you want to shift your selection or image to the right, you let the value of the center pixel completely depend on the pixel on the left of it, thereby dragging it to the right. You can shift your image horizontally by placing a "1" on the horizontal centered (blue colored and bold) row. The matrix on the left shifts your image (or selection) two pixels to the right. See the example below for the result. |
|||

|
As you can see, the filter is applied to the selection only. When you place a "1" on the left side, the image shifts to the right, because the left pixel becomes the centered pixel, and therefore it's moving to the right position. Frustrating isn't it ?? ;-) You can do the same for shifting up and down. Just place your pixel on the vertical line with the centered pixel as middle position. A combination is also possible. When you place a "1" in the top left corner the complete image shifts 3 pixels to the right, and 3 pixels down. Just experiment, and you'll see! |
|||
|
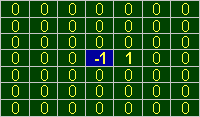
Edge detectionThe edge detection isn't that hard to understand. Just think about it: What we want to do is keep the edges and make all other large areas disappear (i.e. black). If we look at the matrix again, you can see that this can be done by setting a "1" in the cell to the right of the centered pixel, and a "-1" in the centered cell. Once you process a large area of only one color, the result will be black, because when you have the color intensity 123, and you multiply it with 1, and also with "-1", the result will be |
|||

|
Look at the example on the left: The left edge of a black and white image will stay visible, and the rest will be black. |
|||
 Division factor = 1 / Bias = 0 |
A real edge detection isn't very far away from this example ... The key to this filter is to keep large areas black, and the color change from black to white or white to black must remain visible. So, when you place "1"s all around the centered pixel, and make the centered pixel a negative value of all "1"s summarized, the resulting value will always be black on a large area of one color. Now look at the examples below to see what this simple filter can do! |
|||

|
Like I said, the edges are all this filter leaves of the original. |
|||
 
|
Also multiple colors are possible! |
|||
|
Emboss effectIf you've seen the edge detection, it's very easy to understand the emboss effect. In a way it's just as simple as edge detection, and the filter matrices are almost the same. The only difference is the shadow effect on the other side. Let's take a look at the matrix. But ... This is the same matrix as the edge detection! The only difference is the bias of 128. This bias factor adds the value 128 at the end of the calculation of the center pixel. So, if this pixel is black, it becomes gray. What about the black edge at the right? Look at the example displayed below, and I'll explain exactly what happens ... |
|||

|
What happens at the edges is already known. The left side of the "A" will be white because the white pixel is multiplied with 1, and the black pixel is multiplied with -1. And the result becomes 1*255+(-1)*0+128=383=255 (maximum is 255, that's white). But what about the black edge? The bias offset is making a gray pixel from black, isn't it? Not really. If the result is exactly 0 (equal colors), the result will be 128. At the right edge of the "A", something else is going on. If you look at the calculation of the pixel, it's (-1)*255+1*0+128=-128=0 (minimum is 0, that's black). So only the right edge will stay black. That wasn't that hard! |
|||
 Division factor = 1 / Bias = 128 |
That's the basic emboss effect. It's almost the same as the edge-detection filter, only now you'll see that the right edge stays black because its calculated result is -255. You can also create a vertical and horizontal edge-detection filter, and add a bias of 128. Let's do this. You'll see that this filter almost looks like the original emboss filter! |
|||

|
Now we see that the "1" is placed on the upper right side. This gives the result like we know of the original emboss effect. Look at the example on the left ... |
|||