 |
Digital Painting: A Party Invitation |
||||
|
|
||||
| This tutorial will show you how to digitally paint a party invitation and will give you practice using several of the Paint Shop Pro tools. The finished invitation can be printed on a blank greeting card or saved as a JPG image and sent over the internet by email. | |||||
 |
Material Needed (for printed invitation):Inkjet printer; |
||||
 |
General Tips:You can change the size of any brush or tool as needed. The controls are in the Tool Options palette. When working on a small area or a small image, zoom in with the Zoom tool or go to View || Zoom In By for a closer view. If you want to remove what you have done previously, click on the Undo button in the top (Standard) toolbar. This can be done repeatedly to remove several steps in reverse sequence. |
||||
|
|
Step 1: Set Up Your WorkspaceJust as for traditional painting, you need to set up your digital palettes, brushes and tools before you begin to paint. Tool Options palette: If the Tool Options palette is not visible, either click on the Tool Options Palette toggle button in the Standard toolbar or go to View || Toolbars to open the 'Toolbars' dialog box. Check the box next to 'Tool Options Palette'. Then click on 'Close'. |
||||
   |
Styles and Textures Boxes: You will find the Styles and Textures boxes on the right side of the workspace. We will be working mostly with the Foreground and Background Style boxes (the top two boxes). First click on the small arrow on the top box. Choose the 'Solid' option from the pop-up list (that's the icon on the left). Set the other three boxes to Null. Then lock the settings by selecting (checking) the small check box next to 'Lock'. Styles: Textures: Lock = checked |
||||

|
Foreground Solid Color: Click on the Foreground Solid-Color box (left box) to open the 'Color' dialog box. Set the HTML color code to #C0C0FF. You will find the input box for the HTML color code at the bottom of the window. Another way to select this color is to click on the color square in the 'Basic Colors' box (row 5, column 7). |
||||

|
Start a new project: Either click on the 'New Image' button in the Standard toolbar, or go to File || New in the top menu. Set the following values in the 'New Image' dialog box and then click on OK to open a new image in the workspace: |
||||
|
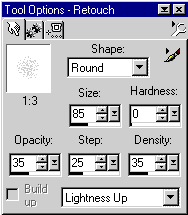
Step 2: Paint the Clouds in the SkyWe will use the Retouch tool to paint the clouds. Click on the icon for the Retouch tool and set the Tool Options palette as follows: Retouch mode = Lightness Up (set this first!) |
||||

|
Paint the clouds: Repeatedly move and click your mouse over the sky where you want to paint a cloud. Paint as many clouds as you want. Now is a good time to stop and save your work. Go to File || Save As. In the 'Save As' dialog box set the name of the image to "PartyInvitation" and save the file as a Paint Shop Pro Image (.psp). We are now ready to paint the balloons. |
||||
|
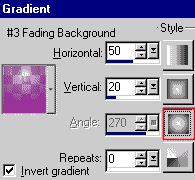
Step 3: Painting with GradientsWe will use a gradient to paint the balloons. This will give the balloons a semi-transparent appearance. Set the gradient option: First we need to change the Foreground and Background Style boxes (the top two style boxes) to the Gradient option. Click on the small arrow on the Foreground-Style box (top box) and choose the Gradient option from the pop up list (the second icon from the left). Repeat this for the Background-Style box (second box). Set the gradient style: Now click on the Foreground-Style box itself (not the small arrow) to open the 'Gradient' dialog box. Choose Gradient No. 3 (Fading Background) from the drop down list and set the rest of the values to the following: Repeat this for the Background-Style box (second box). |
||||

|
Step 4: Choose a Color for the BalloonWe need to change the paint color from the sky blue we were using to the color for the first balloon. Set the foreground and background color: Click on the Foreground Solid-Color box (left box) to open the 'Color' dialog box. Type in the HTML color code for the first balloon (suggested color #C000C0, bottom row, column 4). Repeat this for the Background Solid-Color box (right box) using the same color code for both. |
||||
|
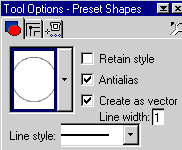
Step 5: Draw a BalloonWe will be using the Ellipse Preset Shape to draw the balloon. Click on the icon for the Preset Shapes tool and choose the Ellipse option from the drop down list in the Tool Options palette. Now set the other values as follows: Retain style = unchecked |
||||
 |
Draw an oval: Now choose an area of the sky for your first balloon. Place your mouse pointer at the top left corner of this area. Click and drag to the lower right corner to draw an oval. |
||||

|
Rotate the oval: The balloons will look more realistic if they are not pointing directly upward. We are going to rotate the oval. Move your mouse pointer over the oval, to the handle at the right of the center, until you see the two arrows appear. Click your mouse button and drag up or down with your mouse to rotate the oval to the angle of your liking. |
||||
 
|
Step 6: Shape the Oval into a BalloonUsing the node-editing feature, we will pull on one end of the oval to shape it into a balloon. Click on the icon for the Object Selection tool. Now go to the Tool Options palette and click on the 'Node Edit' button. You will now have four editing nodes (small squares). We need to add two more nodes. |
||||
 |
To add a second node, move your mouse pointer next to the node on the lower end of the oval. Hold down the Ctrl key on your keyboard until you see the word "Add". Click once. Now click on an area of the sky away from the balloon. Add the third node. Move your mouse pointer back to those two nodes and add another node next to them. Click on the sky away from the balloon again. Release the Ctrl key. You now have three nodes very close together. |
||||
 
|
To shape the balloon, place your mouse pointer over the middle node of the three nodes. Click and drag the node away from the group. When you are happy with the shape of the balloon, release the mouse button. Go to Selections || Select None on the top menu. Now save the work you have done so far: Go to File || Save. |
||||


|
Step 7: Draw the String from the BalloonFirst set the Background-Style box (second box) back to Null. Now click on the icon for the Drawing tool and set the Tool Options palette to the following: Type = Freehand Line |
||||
 |
You are ready to draw the string. Hold down your mouse button and draw a line outward from the end of the balloon. Now is a good time to save your work again: Go to File || Save. |
||||

|
Step 8: Paint More BalloonsSet the Background-Style box (second box) back to the previous 'Gradient' setting. Repeat Steps 4 through 7 for each balloon. Paint as many balloons in as many sizes and colors as you like. Other suggested balloon colors are #008080 (row 4, column 3) and #0000FF (row 5, column 1). |
||||
|
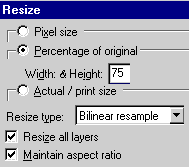
Step 9: Resize the ImageIf you will be printing your invitation onto a blank greeting card, you will skip this step. If you will be emailing your invitation, you need to reduce the size of your picture so that it will download faster. Go to Image || Resize. Set the following values in the 'Resize' dialog box: |
||||
|
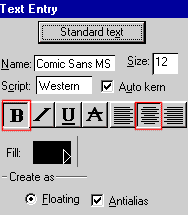
Step 10: Add Your MessageClick on the icon for the Text tool. Place your mouse pointer over the area you wish your message to be and click once to open the 'Text Entry' dialog box. Click on the 'Standard Text' button in this box. Now click on the small color box (Fill) to open the 'Color' dialog box. Type in the HTML color code for the text color (suggested color #800080, bottom row, column 3). Set the rest of the values in the 'Text Entry' dialog box as follows: Type in your message and click on OK. The message will be floating over the image. Click and drag the message into place. Go to Selections || Select None. Finally, go to Layers || Merge || Merge All (Flatten). |
||||
|
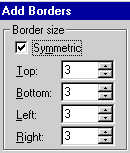
Step 11: Add the BorderClick on the Background Solid-Color box (right box) to open the 'Color' dialog box. Type in the HTML color code for the color of your choice (suggested #008080, row 4, column 3). On the top menu, go to Image || Add Borders to open the 'Add Borders' dialog box. Check the box next to the word 'Symmetric' and set the border size to 3. Click on OK. Save your work again: Go to File || Save. |
||||
|
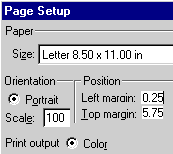
Step 12: Send the InvitationYou are now ready to print your invitation onto a blank greeting card or send it over the internet by email. Print: Because printers vary greatly, you will want to print a test copy first. After you are happy with the test copy, you will print the final card. On the top menu, go to File || Page Setup. Set the following values in the 'Page Setup' dialog box: To print a test copy, go to File || Print to open the 'Print' dialog box. Set the print quality to 'Draft/Grayscale' and click on OK. To print the final card, go to File || Print to open the 'Print' dialog box. Set the print quality to 'Standard/Maximum color' and click on OK. |
||||

|
Email: You can save a lot of postage cost if you email your invitation to those on your guest list that have an email account. But first you need to save your work in a format for email. Change the image format: Go to File || Save As to open the 'Save As' dialog box. Keep the name "PartInvitation" and save the image as a JPEG image (.jpg). Send the email: Follow the steps you usually do to send an email. But this time you will send the image instead of a message. Find the "Insert A Picture" button on the menu bar. Click on this button to open the 'Open' dialog box. Double-click on the image file "/tutorial/html/tutbasic/PartyInvitation.jpg" to add it into the email. Send your email as usual. |
||||