|
Vectors: Node Types |
|||||
|
|
||||
| With the vector feature of Paint Shop Pro came the nodes with which you can edit a vector line or shape. This tutorial is about the different node types and what you can do with them. | |||||
| Begin with a new picture, big enough so we can play around a bit: Width and Height = at least 200 x 200 Background = white Image type = 16.7 Million Colors |
|||||
|
|
Let's first see what we can do with a circle! Click on the Preset-Shapes tool in your tool palette: Hold the Shift key pressed (so the ellipse will be a circle) and draw a circle into your image. Then go to Objects || Align || Center in Canvas to center your circle in your image. |
||||
|
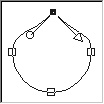
Click on the Vector-Object Selection tool in your tool palette, then either right-click into your image and choose "Node Edit" from the pop-up menu or click on the "Node Edit" button in the Tool Options palette. Now you see a circle with four so-called nodes, at the top/bottom and right/left of the circle. At the moment, these nodes are transparent, which means that no node is selected. Now click on the top node. You see that the node turns black which means it is selected and can be edited. You also see the so-called node handles, an arrow through the node with a circle at the back end. You can take each of the handles (the circle and the arrow) and drag them with your mouse. Just try it out a bit. If you hold the Shift key pressed, you can drag them straight horizontally, vertically or diagonally. If you drag them diagonally downwards like in the image on the left, you get a nice 90-degree corner. When you've finished trying to move the handles, right-click and go to Edit || Undo (Ctrl+Z) in the pop-up menu to get your circle with the nodes again. |
||||
|
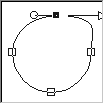
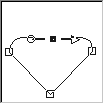
The fact that you could move the two handles totally independently, and that you get a corner when moving both handles up or down, indicates that this node is a cusp (funny with a circle, isn't it?). Click on the top node again, then right-click and go to "Node Type" in the context menu. For the four types at the top of the sub-menu, "Cusp" is the only one that's greyed out which means that your node is a cusp so you can't choose that node type. Now let's try out the symmetric node: choose "Symmetric" from the sub-menu. First, you won't see a difference, you still see the black node with its handles. Now try to move the handles; you'll notice that if you move one handle the other one is moved at the same time. If you draw the arrow handle to the right, for example (remember you can do that perfectly horizontally by holding the Shift key), the circle handle moves the same distance to the left. If you move one handle up, the other handle moves the same way down; they behave symmetrically. Right-click and go to Edit || Undo (Ctrl+Z) to undo your changes. Let's now try out the asymmetric node: Right-click again and go to Node Type || Asymmetric. Again, no immediate change. Now try to move the handles: If you move the arrow handle horizontally to the right, the circle handle stays at its place. If you move one handle up, however, the other handle will move down, but not the same distance as the other handle is moved. They behave asymmetrically. |
||||
 |
Right-click again and go to Edit || Undo (Ctrl+Z) to undo the changes and get your circle back. Then select the node on the right. Right-click and go to Node Type || Line After. See what happened with your node! The curve after your node (the arrow handle indicates the direction of your curve) has been changed to a straight line, and your arrow handle has gone. |
||||
|
|
Now move to the left node. A tip for moving between nodes: If you have one node selected, you can move to the next or previous node by holding the Shift key down and pressing the arrow keys just try it out: Hold your Shift key and press the Arrow key to the left two times to select the left node! I find this much more handy than clicking on the nodes, since I for one mostly move them a bit when clicking on them ... |
||||
 |
For this node, right-click and go to Node Type || Line Before. Not too big a surprise now the curve before your node has changed into a straight line, and the circle handle has gone. |
||||
 |
Move one step back to the bottom node (hold your Shift key and press the Arrow key to the right once), right-click and this time go to Node Type || Convert to Line in the pop-up menu. This time, both the curve before and after your node have been changed into a straight line, they form a nice 90-degree corner, and both your handles have gone. |
||||
|
Now let's see what we can do with that shape! Move to the top node, we will move that node downwards. A tip on moving nodes: If you want to move a node straight up, down, to the left or to the right, you can do that by holding the Ctrl key down and pressing the Arrow keys. To move them in steps of 10 pixels, hold the Ctrl key down and press the PgUp and PgDn keys for up and down or the Home and End keys for left and right. Try it out: Hold your Ctrl key down and press the PgDn key a few times, just twice or three times. |
||||
 |
Now take the handles of your top node, hold your Shift key pressed and move them upwards in a 45-degree angle. See what we get? However, the curve running through the left and right nodes isn't really smooth yet because the curves before/after the nodes have been changed into lines before. |
||||
 |
So, move to the right node, hold the Shift key down, take the handle and move it one 45-degree step to the right so that it forms one line with the line after the node. Do the same for the left node: Hold the Shift key down, take the handle and move it one 45-degree step to the left so that it forms one line with the line before the node. Don't worry if you don't see the handles anymore; if you wish to get them back just enlarge your canvas with Image || Canvas Size. |
||||
 |
Adjust the top node a bit upwards or downwards if you wish, and when you're finished, click somewhere into the PSP workspace outside of the image to quit node-editing mode. You just made a heart out of a circle! Save it as a .psp file (so that the vector layer is preserved) in a folder for your own vector clipart. You can also save this shape as a preset shape: Just go to File || Export || Shape and call it "Heart". You'll now have it available any time with your Preset-Shapes tool! |
||||
| Now let's see what we can do with an angled shape! Begin again with a new image, with the same settings as before (just go to File || New or click on the "New Image" button in your toolbar and click on OK). | |||||
|
|
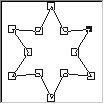
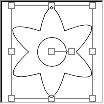
Click on the Preset-Shapes tool in your tool palette again and just change the shape to the six-pointed star, leave all other settings the same as before. Hold the Shift key down (so that the star will be symmetrical) and draw a star into your image. Then go to Objects || Align || Center in Canvas to center your star in your image. |
||||
|
Click on the Vector-Object Selection tool in your tool palette, then either right-click into your image and choose "Node Edit" from the pop-up menu or click on the "Node Edit" button in the Tool Options palette. You now see the star with a whole lot of nodes. If you select a node you notice that there are no handles at the nodes. That's because there are no curves but only lines going through the nodes (remember, with our circle, that the handles disappeared when we changed the curves before and after the nodes to lines). |
||||
 |
Click on one of the outer nodes, right-click and go to Node Type || Curve Before, right-click again and go to Node Type || Curve After in the pop-up menu. You see that you've now got both node handles. You also see that they're both pointing inwards which means that the node is a cusp, and that nothing has changed regarding the shape of our star. Do the same for the remaining outer nodes: Select them (first select one of the nodes, then press the Shift key and click on the other remaining nodes to select them all), right-click and go to Node Type || Curve Before, right-click again and go to Node Type || Curve After. You won't see the handles now since you have more than one node selected, but when you click somewhere into the image to deselect and select one single node you can see them. |
||||
 |
If you have deselected the outer nodes, select them again, right-click and this time go to Node Type || Symmetric. See how nicely rounded the former star points are now! Click somewhere outside the image to quit node-editing mode. |
||||
|
Now click on your Preset-Shapes tool again, and change the shape to Ellipse. Hold your Shift key down and draw a small circle, about 55x55 (watch the figures in the third brackets in your status bar for the size of the circle). Then click on the Vector-Object Selection tool, right-click and choose "Select All" from the pop-up menu. Go to Objects || Align || Center in Canvas to center your circle in the former star. Click somewhere into the image to deselect. |
||||
 |
Click on the (former) star shape to select it (or click on the Star sub-layer in the vector layer in your layer palette to select it) and either right-click and choose "Node Edit" from the pop-up menu or click on the "Node Edit" button in the Tool Options palette. Now take the inner nodes with your mouse, one after the other, and move them towards the circle. Then click somewhere outside the image to quit node-editing mode. |
||||
 |
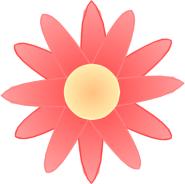
Your star shape is still selected. Right-click and choose "Copy" from the pop-up menu, right-click again and choose "Paste New Vector Selection". Move the new star shape over the old one, then take the right center handle with your mouse and rotate it so that its petals are positioned between the petals of the first star shape. Then right-click and choose "Properties" from the pop-up menu (or click on the "Properties" button in the Tool Options palette) and change the Fill to Solid Color, white. Now right-click again and choose "Select All" from the pop-up menu, then go to Objects || Align || Center in Canvas to make sure that all your shapes are centered in your image. In your layer palette, take the Ellipse sub-layer in your vector layer and drag it with your mouse above the Star layers, to the top of the vector layer. |
||||
|
You've just made a flower out of a star! Don't forget to save it into your vector clipart folder! Of course you can also give it a bit colour now. For my flower, I first set foreground and background colour to two shades of red (foreground: Red = 255, Green = 64, Blue = 64; background: Red = 255, Green = 192, Blue = 192). Then I selected the lower star layer in the layer palette, right-clicked into the image and chose "Properties" from the pop-up menu. Here I changed the Fill to Gradient (Foreground-Background, Sunburst) and the Stroke to the darker of the red colours. Now I selected the upper star layer in the layer palette, went again to "Properties", changed the Fill to the same gradient as before and the Stroke to a red between the fore- and background red (Red = 255, Green = 128, Blue = 128). For the circle, I first changed my foreground colour to a light orange (Red = 255, Green = 192, Blue = 128) and my background colour to a light yellow (Red = 255, Green = 255, Blue = 192), went to "Properties" again and chose the same Foreground-Background gradient as before for the Fill and the lighter yellow for the Stroke. |
||||
| Well, I hope you enjoyed this tutorial and I could show you some differences between the various node types and what you can do with them to alter a shape and how you can create new shapes by just changing the type of a node and just a little bit of node-editing! :-)) | |||||
