|
Creating Your
Card
|
|
| |
|
|
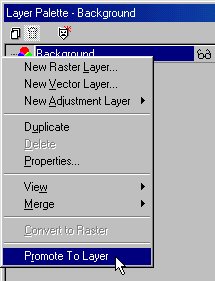
1. Open the card image
and promote it to a layer by opening the layer palette and right clicking
on background. Choose "Promote to layer". |
| |
|

|
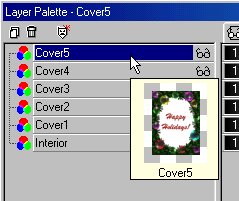
2. Your layer palette
should now have one layer called "Layer One". To avoid confusion, I renamed
the layer to "Cover1" by right clicking on Layer 1 in the layer
Palette, choosing "Properties" and renaming the layer in the Name box. |
| |
|
|
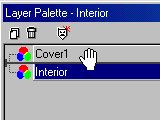
3. Press on the "Create
layer" button at the top left hand side of the Layer Palette and name the
layer "Interior". Move it under the Cover1 layer by pressing on the "Interior"
layer and dragging it under the Cover1 layer in the Layer Palette. Hide
the Cover1 layer from view by clicking the little glasses to the right
of Cover1 in the Layer Palette. You should now only see the transparent
Interior layer. |
| |
|
|
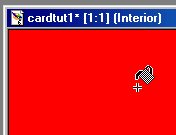
4. It's time to decide
the color you want for the interior of the card. I chose red but you can
decide on whatever you want. A nice idea may be to copy a family photo
and place it on the layer as a selection. At any rate, I've decided to
make my interior red with white lettering, so I opened the color palette
and chose the bright red in the top left hand corner. Now choose the flood
fill tool, fill style: Solid color and fill the Interior layer with red.
(Of course you can embellish your interior any way you'd like!) |
| |
|
|
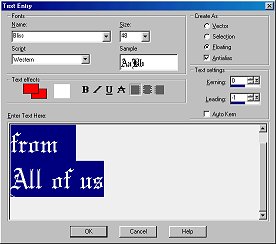
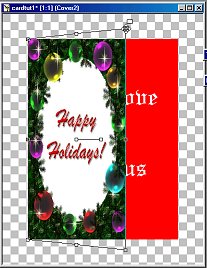
5. Click on the text
tool and choose the font you'd like for the interior of your card. Make
sure that Floating and Antialias are selected as well as the color you'd
like for the font. Then click on "Ok". My lettering says, "With love from
all of us". |
| |
|
 |
6. In the layer palette,
click on the glasses next to your Cover1 layer so that the layer becomes
visible again and make sure that the Cover1 layer is selected in the layer
palette. Now we're going to resize the image so that we can work on "opening"
the card. Go to Image/Canvas Size and set the size to New Width: 400, New
Height: 500. Check both Center Image Horizontally and Vertically in Image
placement. |
| |
|
|
7.In the Layer Palette,
right
click on the Cover1 layer and select duplicate. Rename the new "Copy
of Cover1" layer to "Cover2" by right clicking on that layer and renaming
it in the properties dialogue box as we did in steps 1 and 2 above. Repeat
this step 3 times, renaming each "cover" layer with the corresponding number.
You should now have 5 layers in your layer palette, the "Interior" layer
and 4 "Cover" layers labeled Cover1, Cover 2, Cover3 and Cover4. |
| |
|
|
8. Hide the Cover1, Cover3
and Cover4 layers by pressing on the glasses next to the corresponding
layers and select your "Cover2" layer. Now press on the deformation tool.
Your card cover should be outlined with the deformation boundary. Place
your cursor on the square in the middle of the right hand side of the boundary
and drag the layer to the left about a third of the way across. Now, place
your cursor on the top right hand square of the boundary and while pressing
on the "ctrl" key on your keyboard, drag the square up about 1/3 of an
inch. Click on "yes" in the Apply Deformation dialogue box. |
| |
|
 |
9. Now, hide your Cover2
layer in the Layer Palette, press on the glasses next to your "Cover3"
layer and make sure that layer is selected. Click on the deformation tool
again slide the right hand middle square to the right about 2/3 of the
way across. Place your cursor on the top right hand square and drag it
up about 2/3 of an inch while pressing on your keyboard's "ctrl" key. |
| |
|
|
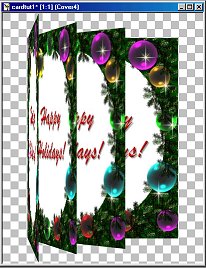
10. Repeat the above
step for Cover4 but this time, drag the deformation to the left so that
the cover is only about a half an inch wide and up almost to the top of
the image. Make sure you don't "cut off" the top and bottom edges of your
card cover and that your lettering can be seen entirely once the card is
"opened". When you're finished, you should have something that looks like
this when all the layers are visible. Of course, you can't see the Interior
layer as it is hidden by the Cover1 layer. |
| |
|
|
11. In the layer palette, hide
the Cover2, Cover3 and Cover4 layers by clicking on the glasses next to
them so that your Card1 and Interior layers are "visible". (Remember you
won't see the Interior layer here as it is hidden by the Cover1 layer,
but you will see it in the next images we will save.) Go to File/Save As
and name the image: card1. In the "save as type" box, select Gif(RD). PSP
will notify you that the image will be saved as a single layer. Press "yes".
In the Gif Save Options box choose "Version 89a" and leave the interlaced
box unchecked. Press okay. |
| |
|
|
12. Save the next images as above
in the corresponding manner:
card2: Only Interior and Cover2
layers are visible
card3: Only Interior and Cover3
layers are visible
card4: Only Interior and Cover4
layers are visible
You should have 4 images saved.
Now we'll convert our images into
an animated card.
|
| |
|
|
Animating Your
Card
|
| |
|
|
1. Run Animation shop and go to
File/Animation Wizard
In the first box select "Same size
as the first image frame". Press "Next"
The second box will ask you about
transparencies and doesn't matter as our animation has no transparencies,
so press "Next".
In the next box, leave the defaults,
"Upper left corner of the frame" and "With canvas color" checked. Press
"Next".
"Do you want the animation to be
looped?" is up to you. Looping means the animation will be repeated indefinitely
as mine is. You can choose to have your own animation shown once, or repeated
as many times as you want here.
For the length of the animations,
I chose 30 but certain elements of that will be modified later. For now,
change the number to 30 and press Next.
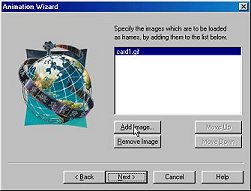
In the next box, press "add Image"
and browse to the folder where you saved your Card gifs.
Select "card1" and press "open".
Press "add image" again and select
your card2 gif.
Repeat this until your 4 card gifs
are in the box.
Then press "Next" and "Finish".
This will show you the animation in 4 separate frames labeled F1, F2, etc.
|
| |
|
|
2. You can view your animation
if you'd like, by clicking on the "View Animation" button which is the
second button from the right at the top of the screen. As you can see,
your card opens but I think we should make some changes to it as the first
and last frames go a bit too fast for people to see properly. |
| |
|
|
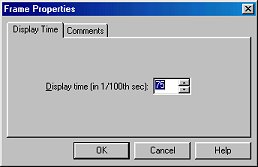
3.Press on the "View Animation"
button again to stop it. Select the first frame in the Frames box named
"F1" by clicking on it. Now press with the right mouse button and
select "Properties". Change the Display time to 75 and press Ok. This will
leave the card closed a bit longer so people can see the cover better. |
| |
|
|
4. Now scroll over to frame F4
and change the display time to 200. This will make the last frame stay
open for 2 seconds which gives people time to read your message! Of course
you can modify the display times as you see fit for your own animated creation. |
| |
|
|
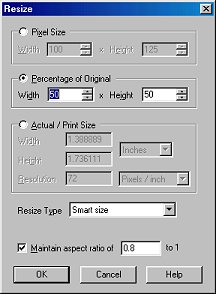
5. If you're sending the animation
to friends and family via e-mail you can leave it as it is, but if you
want to publish it, I urge you to make it smaller so that download time
becomes reasonable. If you'd like to resize it, go to Animation/Resize
Animation and resize it to 75 or 50%. Press OK. |
| |
|
|
6. Now go to Image/Save and name
your animation in the resulting box, then press Save. This will prompt
the Animation Quality vs. Output Size box to open. If you're keeping the
image large, you don't really have to fiddle with this but it is good to
understand for future use. The lower you slide the arrow, the smaller the
file size and download time but fewer colors are used also. Press next
and the optimization process will work on saving your animation to different
optimization sizes. This way you can choose the best optimization to publish.
Try saving to two or three different settings by returning from the Optimization
Results box to the Animation Quality vs. Output Size box. That way
you can choose the ideal one to publish. (Don't forget to rename the animation
each time you save so you don't overwrite a previously saved one). |
| |
|
|
And that's it, your card is
finished! Have fun making your own custom cards for different people this
holiday season.
Happy Holidays to you!!!
|
| |
|