
This section is where
you will find techniques to create great graphics using Paint Shop Pro.
If you have a question
or a tutorial you would like to share E-Mail
us and let us know!
©2001
This tutorial created
by CarolynR

Click here
to download a zip file containing all the selections and also the basket
pattern you will need to complete this tutorial.
Version 6
users, click here to download the
zip file for the version 6 steps that are in blue.
Place mybasket.bmp in pattern directory
and place all selections in the PSP7 Selection directory. When loading
selections, do not move them in your graphic area unless instructed.
They will load in the correct positions and need very little tweaking,
for the most part.
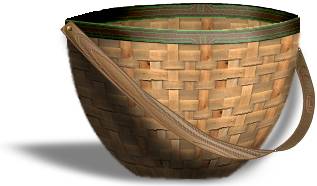
Begin by create a new drawing 400
x 400 pixels, transparent. Although I won't be repeating this, it is important
to keep saving as you go through this tutorial.
|
Fill the background
layer with mybasket pattern by clicking on the foreground color and selecting
pattern, select mybasket, set the scale to 100 and fill. Go to Effects
|| Geometric || Circle. Load Basketshape selection from disk by clicking
Selections || Load from Disk and choosing "Basketshape". After it
has been loaded, again go to Selections || Promote to layer and name this
layer "basket".
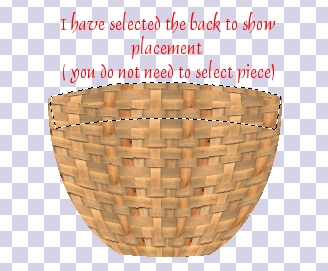
In the layer's palette, click on
the background layer and load the basketback selection. Click Selections
|| Promote to layer, name this layer basketback. Deselect. In the layer's
palette again, go back to your background layer and clear the background
(Edit ||Clear).
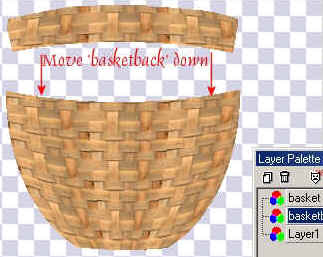
You will be left with the two pieces
of the basket, each on their own layer. Move the upper basketback
piece down with the move tool so that it creates the illusion of being
the inside back of the basket. We will give more definition with the next
instructions. See diagrams on the left:
|
| |
|
|
Click on the basket
layer to activate it and go to Selections || Select All, then Selections
|| Float. Your basket is selected on a floating layer.
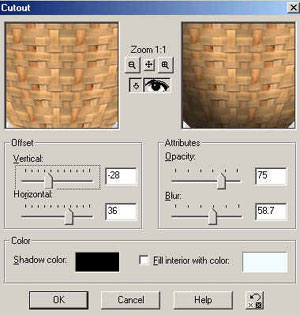
Go to Effects || 3D Effects || Cutout.
Use the following settings:
Opacity = 75
Blur = 58.7
Vertical = - 28
Horizontal = 36
Shadow color = Black
Fill interior with color = unchecked.
Click ok. Click Effects || Sharpen
and then deselect.
|
| |
|
|
Using your smudge tool
set to soften (click on the tab in the middle of the tool options palette
and select "soften") Use the following settings:
Sample merged = unchecked
Shape = round
Size = 4
Hardness = 0
Opacity = 25
Step = 25
Density = 100
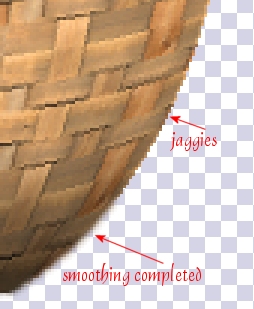
Very carefully touch the pixels
around the outer edge of the basket to very, very slightly blend away the
jaggies. You may also wish to magnify your viewing area so you only get
the very edge. You do not want to create a very blurred edge, so
be gentle.
|
| |
|
|
Now click
on the basketback layer to activate it and go to Selections || Select All,
then, Selections || Float. The back piece is now selected on a floating
layer. Use the cutout filter again, changing the settings to:
Opacity = 70
Blur = 48.7
Vertical = 6
Horizontal = 51
Press ok and then sharpen and deselect.
Click on the Basket layer to activate
it and then create a new layer called "edge" and load the basketedge selection.
Fill this selection with a dark brown color #634B30. Go to Effects || Artistic
Effects || Contours with the following settings:
Luminance = 23
Blur = 15
Detail = 24
Intensity = 41
Color = #57B757
This creates an interesting design
on this layer.
|
| |
|
|
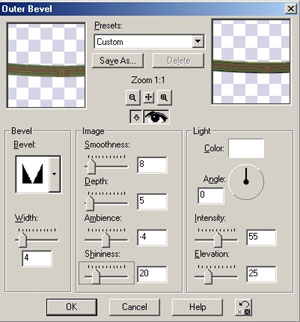
Next Go to Effects
|| 3D Effects || Outer Bevel. Using the last shape selection in the second
row as your bevel with the settings of
Width = 4
Smoothness = 8
Depth = 5
Shininess = 20
Angle = 0
Intensity = 55
Elevation = 25
Press ok.
|
| |
|
|
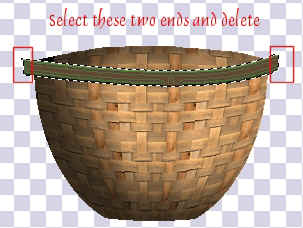
While image is still
selected, using your selection tool set to rectangle, press the control
key and select the ends which extend past the basket sides. These have
a beveled edge which we do not want, so they get removed at this time.
Invert the selection and press delete. The ends of the edge piece are now
even with the basket edge. |
| |
|
|
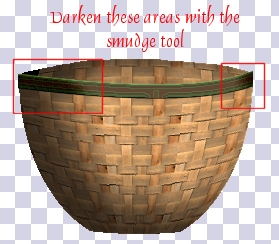
Invert the selection
again so you have your edge re-selected. To make the edge curve we will
use the smudge tool. Set the shape of the tool to round, size 29, Hardness
0, Opacity 15, Step 1, Density 50, click on the center tab of the tool
option palette and choose Darken RGB. Lightly go over the left side of
the basket edge matching the shadow of the basket, to give it its own shadow
and, very slightly, go over the right edge. See diagram at left. |
| |
|

|
Then change the smudge
tool's center tab to the Lighten RGB setting and make sure that the size
and other settings are the same. Lightly go over the center of the basket
to highlight the middle of the rim. Deselect edge. You've now curved the
front edge of the rim. See diagram at right. |
| |
|
|
Create
a new layer below the basket layer. Load the Basketedgeback selection and
fill with the same brown color #634B30 and use the the Artistic Effects
|| Contours with the same settings. Repeat the outer bevel and use the
smudge tool again to darken the outer edges and lightly lighten the center
portion. Right click in the layers palette and choose View || Current only,
click on the "X" to also view the basketback layer and you are going to
merge these two layers by right clicking again and selecting Merge Visible.
Turn on all layers again.
Create a new layer "handle" and
load the baskethandle selection. Fill with the dark brown (#634B30) we
used earlier, contract selection by 1 and fill the front section with light
brown, color #D4A374. Before you click to fill the back part of the selection
reduce the opacity in the tool options palette to 45 (tolerance can be
200, sample merged is unchecked) Next go to Effects || Artistic Effects
|| Enamel and set the
Blur = 63
Detail = 100
Density = 12
Angle = 45
Color = white
Press ok. Deselect. This gives a
nice wood textured effect.
|
| |
|
|
We can't get the proper
shadow by just using a drop shadow. I am using another way of getting a
shadow which you can manipulate to any shape and direction, even after
you have added it because it is on its own layer.
In the layer's palette, right click
and duplicate the handle layer.
On the duplicate layer, go to colors
|| adjust ||brightness/contrast and set the brightness to - 255, make it
completely black.
Next go to effects || blur || gaussian
blur set to 4.0. Now use the deform tool to shift the shadow down and back,
see diagram for visual.
I usually deform first before I
move the layer below the one it is shadowing because I can easily select
the shadow when it is on top of the layer. Once I have deformed it
slightly, it is easier to select with the move tool and I can move the
layer to the proper position in the layer's palette and easily adjust it
further.
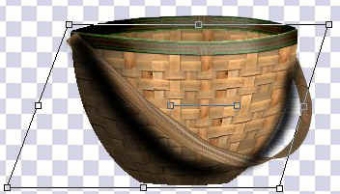
Try to keep the handle's shadow
even with the handle's top edges so that shadow comes down from there and
rests on the basket. Use the shift and control keys to help you skew the
shadow's angle.
|
| |
|
|
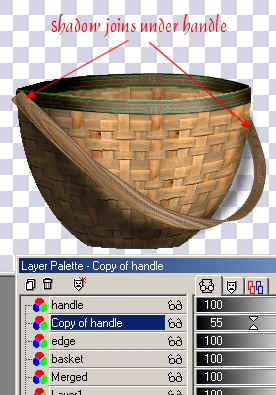
Click on the duplicate
layer in the layer's palette and drag the layer below the handle layer.
Sometimes viewing it in the proper
position can help you decide if the angle is correct. Reduce the opacity
for the shadow layer to 50% or more. Remember nothing is final. If you
don't like your angle, press Control Z or undo and try again.
|
| |
|
|
Click to
activate the handle again and magnify the portion where the left side joins
the basket. Using the selection tool set to circle, make a small circular
selection which will be the screw for holding the handle onto the basket.
Fill the selection with a shade
of orange (your choice) and then use Effect || Texture Effects || Sculpture.
Use the gold preset but change the shininess to 33 and elevation to 38,
click ok.
The last addition is the basket
shadow. You could repeat the shadow in the same way as the handle but I
have already created a selection for you to use. Create a new layer
called "shadow" and load the basketshadow selection. Make sure that your
opacity is set back to 100 and fill with Black. Only click once in the
center of the selection. I have already feathered the edges of the
selection so the shape is soft. Deselect. Use the deform tool to
skew the angle of the shadow, you need to have it should fall back and
down and skew to the left. Remember that holding the shift causes an angular
direction and the control key will cause two edges to move further or farther
apart to create a perspective view. After you have the shadow in the alignment
you like, press ok.
|
| |
|
|
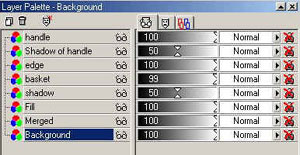
In the layer's palette
drag this layer just below the basket layer so it is behind the basket
and reduce the opacity to 50 percent. The following is the correct
layer order including a "fill" layer for putting things into your basket. |
| |
|
If you
wish to fill the basket, add a new layer above merged layer so that the
back of the basket will be behind your fill. If you like, you can
link the layers by clicking on the link tab (it's the third tab on the
right half of the layers palette  )
and click the word "none". You will get a number "1" and if
you click on each layer, except the background, and change each to "1"
and go back to your graphic and move it with the move tool, the entire
graphic will move even though each is on its own layer. They are
now linked and you can also unlink them at any time. Choose a background
and you're all set. )
and click the word "none". You will get a number "1" and if
you click on each layer, except the background, and change each to "1"
and go back to your graphic and move it with the move tool, the entire
graphic will move even though each is on its own layer. They are
now linked and you can also unlink them at any time. Choose a background
and you're all set. |
When you are finished
viewing this page,
close this window to
go back to the Tutorials index.
|