
This section is where
you will find techniques to create great graphics using Paint Shop Pro.
If you have a question
or a tutorial you would like to share E-Mail
us and let us know!
|
A
Sculptured Lace Side Background for Easter
|
©2001
This tutorial created
by kiss~

I created the above picture
tube from a wonderful tutorial found at Skledale
House Treasures.
Learn how to create a
sculptured lace background to tile your web page for Easter or any other
occasion!

This tutorial was made
in Paint Shop Pro 6. I have added notes below where the instructions differ
for those who are working in Paint Shop Pro 7.
To use this tutorial you
will need the Foreground Fading 02 gradient which comes with Paint
Shop Pro 7 as well as my Black Lace picture tube. To download them, click
here.
Note:
To install this tube in Paint Shop Pro, unzip it to your hard drive, then
open Paint Shop Pro. Choose File || Open and browse to where you placed
the tube on your hard drive, then click on it so it opens in Paint Shop
Pro. Once the tube is opened in PSP, go to File || Export || Picture Tube.
In the Cell Arrangement Box, press OK. Your tube should now be installed.
PSP 6 users can install
the Fading Foreground 02 gradient by pasting it into the Gradients folder
located in their Paint Shop Pro 6 folder.
PSP7
users probably already have this gradient. But if you can't find it you
can paste the one downloaded from here into your Paint Shop Pro 7 Gradients
folder which is located in the Jasc Software Inc folder, situated in Program
Files. PSP 7 users steps are in blue.
|
1. Open an image 400X400
with a white background. Push the selection tool button and in the selection
tool pallet, make sure the type of selection is "Rectangle". Feather should
be set to "0". In the image, make a rectangular selection which covers
approximately the left half side of your image. If in using the selection
tool, you can't seem to cover the area, go to Selections || Modify || Expand
and expand your selection by one or two pixels so the left hand edge of
the image is entirely covered. |
| |
|
|
2. Go to the right
of your screen and choose your colors for the gradient. Click in the top
rectangle to choose the foreground color. I chose the second lightest pink
color for the foreground, (Red = 255, Green = 128, Blue = 128, Hue = 0,
Saturation = 255, Light = 192). Press OK.
For the background, I
chose the second lightest blue. Click on the bottom rectangle to choose
your background color. The current color should have these coordinates:
Red = 128, Green = 128, Blue = 255, Hue = 170, Sat = 255, Light = 192).
Press OK.
Note
to PSP7 users: Make sure that Unified Color is selected for both
the foreground and background colors by clicking on the little arrow in
the color rectangle and selecting the paintbrush on the left.
|
| |
|
|
3. Click on the
Flood Fill button and in the Toggle Tool Pallet, set the fill style to
Linear Gradient. Press on the little arrow next to the Gradient Box and
scroll down until you find the Foreground Fading 02 gradient. Set the angle
to 90 and the Repeats to "0'. Now flood fill the selection in your image.
Deselect by going to Selections || Select None.
Note
to PSP7 users: The angle is not the same as in PSP 6! After clicking on
the Flood Fill tool, return to the foreground (Style) color rectangle on
the right and click on the little arrow. Choose the Gradient style (the
second button from the left). Click in the rectangle and scroll down the
Gradient dialogue box until you find the Foreground Fading 02 gradient.
Set the fill style to Linear Gradient by clicking on the top style button.
Use these settings: Angle = 270, Repeats = 0. Press OK. Now flood fill
the selection in your image. Deselect by going to selections || Select
None.
|
| |
|
|
4. Go to Layers
|| New Raster Layer. In the Layer Properties box, you can rename the layer
"Lace" if you'd like. It's not necessary to change anything else. Press
OK |
| |
|

|
5. Press on the Picture
Tube button and in the Tool Options Pallet, scroll down the list until
you come to the Black Lace tube and choose it. Click on the image and your
lace should appear. Now click on the Mover and position your lace so that
it's about 1/4th inch from the right hand side.
Note
to PSP 7 Users: To select your Picture Tube, press on the Tool Options
Pallet button after pressing on the Picture Tube button.
|
| |
|
|
6. Before we sculpture
the lace, we'll have to make it white, so go to Colors || Adjust... ||
Brightness/Contrast and slide the brightness arrow all the way to the right
to 255. Don't worry about the contrast settings and press OK. Your lace
should now be white.
Now we'll sculpture the
lace. Go to Image || Effects || Sculpture and in the Pattern box, choose
the plain gray pattern at the top. Please use the following settings:
Size = 100%, Smoothness
= 6, Depth = 2, Ambience = 54, Shininess = 46, Light Color = White,
Angle = 315, Intensity = 30, Elevation = 56
Press OK.
Note
to PSP 7 Users: To sculpture the lace, go to Effects || Texture Effects
|| Sculpture and choose the gray box labeled #2.
|
| |
|
|
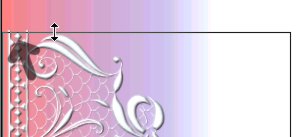
7. Now we're going
to crop the image so it will make a proper seamless side background. Press
on the crop tool and draw a rectangle around the lace and the gradient.
With your cursor, pull down the top of the black crop rectangle so that
it touches the tip of the top little diamond shape on the left hand side
of the lace. Don't be alarmed if you're cutting off some of the lace edging.
That's okay. I've placed an arrow in the picture on the left to show where
the diamond is.
With your cursor, pull
up the the bottom crop line so that it touches the tip of the bottom diamond
shape on the left of the lace.
Now double click in the
black rectangle in your image to crop it.
|
| |
|
|
|
8. If you feel
the graphic may be too big for a side border (and I think it is), resize
the image by going to Image || Resize and resize it to 75%. It may also
be necessary to sharpen the lace, so go to Image || Sharpen || Sharpen.
Note
to PSP 7 Users: To sharpen your image, go to Effects || Sharpen || Sharpen.
|
| |
|
|
Last step! We're going
to change the canvas size of the graphic so that it can be tiled on a web
page as a left side bordered background. First, go to the right hand side
of your screen and press on the bottom color rectangle to change the background
color. Change the color to white.
Now go to Image || Canvas
Size and place 1280 in the new width box. Change the height size so that
it is the same as the Current Height size. Uncheck "Center Image Horizontally"
and check "Center Image Vertically". In the "Left" box change the number
to "0". Press OK.
Go to Layers || Merge
|| Merge All (Flatten) to merge all your layers.
|
| |
|
When you are finished
viewing this page,
close this window to
go back to the Tutorials index.
|