
This section is where
you will find techniques to create great graphics using Paint Shop Pro.
If you have a question
or a tutorial you would like to share E-Mail
us and let us know!
©2001
This tutorial created
by CarolUK
CarolUKs'
E-mail
Modified with v6 steps
added by Bella Morte

This tutorial will show
you a simple way to make a marble room, with steps, pillars and windows.
You can vary the number and position of all the elements in it, to make
your own individual room.

First, you need to choose
the marble for your room. The pink one that I have used came from http://www.grsites.com
and you will find a huge selection of marble tiles there to choose from.
If you have not done part one of this tutorial, then go here
and you can access the download for this tutorial from there.

|
To make the floor of
the room, we need to change the perspective of the marble, and it will
make it too small to fit our room, so open a new image, 640x480. Make sure
that your marble is still the texture in the background style, and with
the fill tool  right click to fill the new image with the marble.
PSP
6 users: Make sure you select the flood fill tool and that it is set to
Pattern and that the pattern is still the marble image, then flood fill
the new image.
With your new marble
image the current one, select the deformation tool.  This will put a frame, with square 'handles' at each corner and the centre
of each side and a rotation handle in the centre, around your whole image.
Place your cursor on the handle at the top left corner, and hold down CTRL.
The cursor will then look like the image on left.
This will put a frame, with square 'handles' at each corner and the centre
of each side and a rotation handle in the centre, around your whole image.
Place your cursor on the handle at the top left corner, and hold down CTRL.
The cursor will then look like the image on left.
|
| |
|
|
Still holding CTRL down,
left click and drag towards the right. Release the CTRL key and the mouse
button and check the figures on the status bar. You need them to read 124,0
when the cursor is on the corner handle. It does not matter if the second
figure reads 2 or 4, but the first one needs to be 124. If the figure is
higher, press CTRL again and click and drag left. If it is too low, move
right. Always hold down the CTRL key while you are moving the cursor, so
that the top right corner will mirror the top left. When you have it in
the right position, go to the tool options panel and press apply. Your
marble now looks like the image below.
Note
to PSP 6 users: When deforming the floor, use your judgement as the status
bar does not show any coordinates. Suggestion: Have the rulers on by going
to View || Rulers.
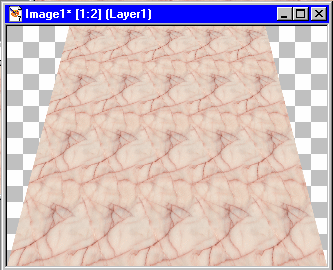
In the illustrations which
follow, I have this marble image zoomed out to 1:2 in order to keep the
tutorial illustrations small. If you find working in a small size image
difficult, you can zoom the image to 1:1.
|
| |
|

|
Now press the deformation
tool again
and place your cursor on the handle at centre bottom of your image. Left
click and drag upwards till the second figure on the status bar shows 130.
You will have to release the mouse button to check the readings. Apply
the deformation at the tool options panel again. Now your marble looks
like the image on left. |
| |
|
|
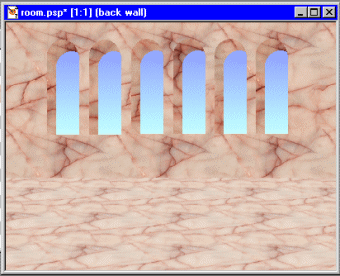
Use Edit || Copy to put
it on the clipboard.
Make your room image the
current one, and on the layer palette click on Layer 1 so that is the current
layer. Use Edit || Paste || as new layer. The marble will appear in your
image. If it is showing behind the windows or any of the green is still
showing, use the mover tool  to adjust it into position. In the layer panel, it will appear as layer
3, immediately above layer 1. Right click on this layer, select rename
from the menu, and rename it floor. Your room is now taking shape.
to adjust it into position. In the layer panel, it will appear as layer
3, immediately above layer 1. Right click on this layer, select rename
from the menu, and rename it floor. Your room is now taking shape.
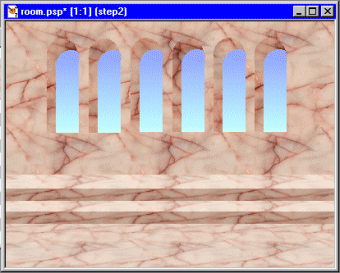
Now we are going to add
a couple of steps at the back of the room. If you have used the clipboard
for anything else since you did the floor (I am assuming that people may
not do the tutorial all at once) then go to the floor layer, click on it
to make it current, and use Edit || Copy to put it on the clipboard again.
If you are going straight from the floor to the steps it will still be
on the clipboard.
In the layer palette,
click on the top layer - back wall - to make it active, and then use Edit
|| Paste || As New Layer. Another copy of the floor will appear across
the middle of the image. It will not be easy to see where it ends and the
floor starts, but we need it lighter anyway, so use Colors || Adjust ||
Brightness and Contrast. Set brightness to 15 and contrast to 0 and click
OK. Go to the Layer Palette and rename this layer Step 1.
Use the mover tool
to pull it to a position where it leaves about half of the floor uncovered.
It will be covering the wall to a little way up the windows, and we need
to cut off that part. The easiest way to do that is first to draw the slider
of Step 1's layer in the layer palette back a little so it becomes semi
transparent and you can see where the wall ends and the floor starts underneath
it.
|
| |
|

|
Now use the selection
tool  set to rectangle in the tool options palette, and make a rectangular selection
that can start anywhere above the step marble, must be the full width of
the image, and the bottom must be exactly on the line of the wall joining
the floor.
set to rectangle in the tool options palette, and make a rectangular selection
that can start anywhere above the step marble, must be the full width of
the image, and the bottom must be exactly on the line of the wall joining
the floor. |
| |
|
|
Hit the delete key, and
then put the Step 1 layer slider back to 100. Now select a narrow rectangular
strip at the bottom of the step marble (about half a centimetre deep, and
it does not matter if your selection rectangle goes beyond the bottom of
the step marble) and use Colors || Adjust || Brightness and Contrast with
brightness at -48 and contrast at 0. That will make the riser for your
step.
Adding another step is
simplicity itself. With Step 1 still the current layer, use Edit || Copy
and Edit || Paste || As New Layer. Rename the new layer to Step 2, and
bring it down till it is halfway across step 1. Make it semi-transparent
as you did with the first one, select and delete what is above where step
1 joins the back wall, and put the layer slider back to 100.
|
| |
|
Next, we add pillars and
view another sample Marble Room in part
3

When you are finished
viewing this page,
close this window to
go back to the Tutorials index.
|