 Home > Tutorials Index > V5 & V6 Effects Home > Tutorials Index > V5 & V6 Effects
Painting on Canvas |
|||||
|
|
||||
| This tutorial will teach you how to make your images appear as if they have been painted on canvas or linen, using a fine linen Pattern and the Flood Fill tool. The tutorial teaches you how to "Multiply" your original picture, and add a texture layer underneath it for the linen texture to appear. You may experiment with all different patterns and textures for different effects. The steps below show how to perform each task using the PSP menu options. Alternatively, you may wish to use the keyboard shortcuts for some of the tasks - these are displayed in small text - surrounded by [square brackets]. The instructions below were written for PSP Version 5. Where steps are different while using PSP Version 6, these V6 steps are shown in green. |
|||||

|
This tutorial requires you to use a picture you wish to place on canvas and a fine linen texture as a pattern. To download the picture we have used and the fine linen texture image: 1. Click on the Download file link to the left. 2. After downloading these files - unzip them, extracting the "finelinen.bmp" file into your PSP | Patterns or Textures directory, and the "/tutorial/html/tuteff/moonlit.jpg" image into your normal images directory. 3. Open the "/tutorial/html/tuteff/moonlit.jpg" and "finelinen.bmp" files to your workspace. |
||||
 |
To ensure that you don't lose the original images - save them as new psp files. To save the two images as psp files: 1. Click on the original "/tutorial/html/tuteff/moonlit.jpg" image. 2. Click on the File | Save As menu option, and save the new file into your current images directory as "moonlit2.psp" [F12]. 3. Click on the original "finelinen.bmp" image. 4. Click on the File | Save As menu option, and save the new file into your current images directory as "finelinen2.psp" [F12]. 5. Click on the "moonlit2.psp" image (to make it the active image). |
||||
 |
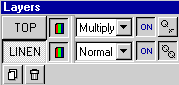
Before you add the linen effect, you need to adjust the Layer Palette by promoting the "Background" to a layer, and changing its Blend Mode. To promote the "moonlit2.psp" image background: 1. Using the Layer Palette, right click on the Background layer. The system displays a drop-down menu. 2. Select the Promote to Layer option (the system promotes the layer, and names it Layer 1). 3. To rename the promoted layer, right-click on the Layer 1 layer, and select the Properties menu option. The system displays the "Layer Properties" dialog box. 4. In the Name field, rename this layer TOP. 5. Click on the down-arrow next to the Blend Mode field, and - from the drop-down list of blend modes - select the Multiply option. 6. Leave all other settings in this dialog box as they are, then click on the OK button to accept the settings. |
||||
|
Now you need to add a layer for your linen texture, then move it underneath the TOP layer. To create the texture layer: 1. In the Layer Palette, click on the Add New Layer icon. The system displays the "Layer Properties" dialog box for the new layer. PSP Version 6:2. Name this new layer "LINEN". |
||||
|
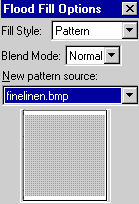
Next you will add the texture to your LINEN layer. Before flood filling, you need to change the Flood Fill settings to include your linen texture. To adjust the Flood Fill settings: 1. Click on the Flood Fill tool, and - in the "Controls" dialog box - click on the down-arrow below the Fill Style, and select "Pattern" as your fill style. 2. Now click on the Options button. The system displays the "Flood Fill Options" dialog box (as shown on the left), and click on the down-arrow beside the New Pattern Source field, and select the "finelinen2.psp" pattern from the displayed list (note - this list will show all of the "open" images in your workspace). 3. The "Flood Fill Options" dialog box should now look like that displayed on the left. Leave all of the other settings as they are, and click on the OK button to accept the settings. PSP Version 6
|
||||
 
|
You are now ready to flood fill the LINEN layer with your selected pattern, then adjust the layer opacity to your liking. Because your TOP layer has the Multiply blend mode, the linen look underneath will "shine through" the TOP layer. To flood fill the LINEN layer: 1. Using the Flood Fill tool, click once on image. The image should look like the top image shown on the left. Now you need to change the LINEN layer's opacity, so that it doesn't dominate your original image. To adjust the LINEN layer opacity: 1. In the Layer Palette click on the LINEN layer's Opacity Slider, and slide it to the left, so that your layer's opacity is around 54% (or to your liking if you think the linen look dominates the image too much). Your image should look like that displayed on the lower-left. 2. Finally save your image. This is the end of the tutorial. |
||||
