|
Begin by
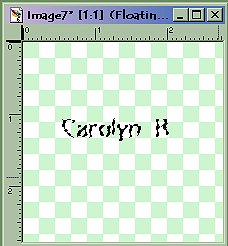
creating a new image 200 x 200 pixels, 16 million colors, background transparent.
* For the most part, when
you are creating an image to use as a texture design you will want to keep
your design fairly small. Both the Sculpture and Texture filters allow
you to enlarge or shrink the size of the design. The bucket tool however
places the design at a fixed size. As this is text, you want it large enough
that you can use the cutout filter and still see some area within the outlines
of your text.
Using your text tool,
pick out a font that you like to use and type your name with floating and
antialias checked. If you choose a font which is very bold, you can use
the emboss filter on it or the cut-out filter to change the look of your
text. We will use the cutout filter for this example. You may deselect
your text at any time.
|
| |
|
|
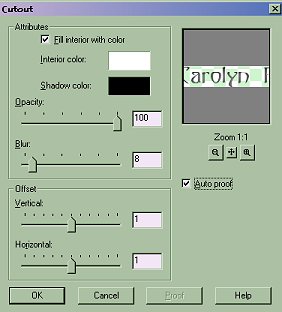
Using the
Image || Effects || Cutout filter, with "fill interior with color" checked,
(interior color white), opacity of 100, blur of .8 and vertical and horizontal
offsets 1. |
| |
|
 |
Use the rotate
tool and rotate your design left 45 degrees. |
| |
|
|
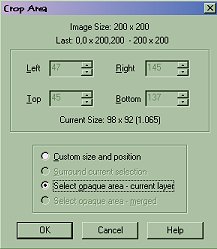
Double click
your crop tool and check "select opaque area, current layer" and then click
"crop". |
| |
|
 |
Now save
your selection in .bmp (format Windows, 8-bit) in the textures directory.
(I called mine "single name.bmp" (but you can use any unique name). It
is transparent in the interior sections and your background color will
show through. Your image will now appear in the texture effects under Image
|| Effects || Textures. It will be listed at the very end of the drop down
menu box. |
| |
|
|
Now when you use the
fill tool, you can specify a paper texture and choose your image to fill
your selections. You may have to close and open your Tool Options palette
to have your new texture show up. It will appear in alphabetical order. |
| |
|
 |
To save the
image for use as a pattern for use with the sculpture tool, save as a .bmp
into the patterns directory. (usually found under c:\program files\paint
shop pro 6\patterns) This will now appear in the Sculpture effect
under Image || Effects || Sculpture. It will appear at the end of the drop
down box of pattern images. |
| |
|

|
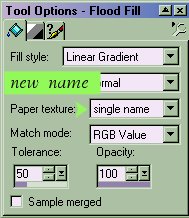
Now to test
your new texture. Open a new image 200 x 200, transparent. Using the fill
tool pick linear gradient in any two colors you like. Select your image
as the paper texture, 100 percent opacity and 22 percent tolerance. |
| |
|
 |
To get an
embossed type of effect. Create a new image and fill with your choice of
fill (no texture). Go to Image || Effects || Texture. Choose your texture.
Adjust the size with the slider under the example of your texture and watch
your preview window to see when you like the effect. Adjust any of the
other sliders till the picture is the way you want it. |
| |
|
|
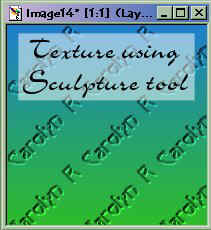
To use the texture with
the Sculpture tool you need to first fill your layer with color. Now, create
a new layer and fill this one as well, the color won't matter. Go to Image
|| Effects || Sculpture and choose your texture. Pick a color for the layer.
Play with the sliders, watching the preview to get your effect. Once you
have done that you can further adjust the layer by using the layer palette
Blend modes. I used the multiply blend effect on the graphic on the right. |
| |
|