|
Push Tool Effects |
|
|
||||
| You can use the Retouch Tool - Push mode to create all sorts of interesting duplication effects in your graphics. In this tutorial we will use the Retouch Tool to duplicate the roses and leaves, then we'll add a border, fill the border with a roses pattern, add some cutouts to the image, and finally add a bevel and a texture to the frame.
The steps below show how to perform each task using the PSP menu options. Alternatively, you may wish to use the keyboard shortcuts for some of the tasks - these are displayed in small text - surrounded by [square brackets]. The tools you will use in this tutorial include the Retouch Tool (push mode), the Crop tool, the Selection tool, the Magic Wand tool, the Mover tool, the Paint Brush tool and the Flood Fill tool. The instructions below were written for PSP Version 5. Where steps are different while using PSP Version 6, these V6 steps are shown in green. |
|||||
 |
To begin the tutorial:
1. Open a favourite picture in Paint Shop Pro. I chose to use this simple rose shown to the left, but you can use anything you want - as long as the image stands out against a plain background. If you don't have a picture on hand, just right click on the image, and - from the pop-up menu - choose the Save image as...menu option. After saving this image to your hard disk, open the "/tutorial/html/tuteff/ptrose.jpg" file to your workspace. 2. Duplicate your image [SHIFT+D] (to ensure you don't lose the original). 3. After duplicating the image, close the original, then save the new image as roses1.psp [F12]. |
||||

|
If you are using our image, set the background colour to black, and increase your canvas size, to give you plenty of room to create your bunch of roses.
To increase the canvas: 1. Using the Colour Palette, change your Background Colour to Black (Foreground Colour = any colour). 2. Click on the Image | Canvas Size menu option. The system displays the Change Canvas Size dialog box. 3. Change the canvas size dimensions to the following settings: New Width = 400, New Height = 610, 4. Change the image placement settings to the following: Centre Image Horizontally checkbox - checked, Centre Image Vertically checkbox - unchecked, Change the Top setting to 280, Change the Bottom setting to 25. 5. Click on the [OK] button to accept these settings. The system doubles the original size of the canvas, placing the rose at the bottom of the image. |
||||
   
|
Now we will change the Retouch Tool settings to those shown on the left.
To change the Retouch Tool settings: 1. Click on the Retouch Tool in your Tool Palette. 2. V5 - Using the Controls dialog box - Tool Controls tab - change the settings to: Retouch Mode = Push, Paper Texture = None, Sample Merged checkbox = unchecked. PSP Version 6
Retouch Mode = Push,
Paper Texture = None, Sample Merged checkbox = unchecked, Build Up Brush checkbox = unchecked. 3. V5 - Now click on the Brush Tip tab at the top of the Controls dialog box, and change the settings as follows: Shape = Round, Size = 50, Opacity = 70, Hardness = 45, Density = 100, Step = 60. PSP Version 6
Shape = Round,
Size = 50, Hardness = 45, Opacity = 70, Step = 60, Density = 100. |
||||

|
Now we will use the Retouch Tool - Push mode to multiply various sections of the image. The first part of the image to multiply is the rose flower head.
To multiply the rose head: 1. Left click in the centre of the rose head. 2. Holding down the left mouse key, slowly drag your mouse directly upwards. When the system displays a duplicate copy of your rose, release the left mouse button. Notice how the copy of the rose head is 50% of the size of the original rose head, with a lower opacity than the original (as per the settings you made in the previous step). |
||||

|
You can create two different effects using the push tool.
To create a bunch of roses all at 70% opacity of the original rose head: 1. Again click on the original rose and drag it up and to the right - the next rose's opacity is that set in your Retouch Tool settings (i.e. at 70%). If you don't release the mouse button, and continue dragging outward, your 'multiple' roses will all be the same opacity as set in the Tool Settings Box (i.e. at 70%). 2. Repeat the above step going out in several directions. Your image should look like that shown on the left. |
||||

|
To create a bunch of roses that fade in opacity towards the outer edge:
1. Again click on the original rose and drag it up and to the right - the next rose's opacity is that set in your Retouch Tool settings (i.e. at 70%). 2. Release the mouse button. 3. Click on your second rose, and drag it up and to the right - the next rose's opacity is now 70% of the second rose's opacity. 4. Repeat the above step going out towards the edge of your image. 5. Repeat steps 1 to 4 going out in several directions. Your image should look like that shown on the left. |
||||
 |
To create a bunch of roses all at 100% opacity:
1. Change the Opacity setting in the Tool settings - Retouch Tool - Controls dialog box - Brush Tip tab to 100% (instead of 75%). 2. Click on the original rose, and holding down the left mouse key, drag the roses out in several directions. Your image should look like that shown on the left. |
||||
 |
Now that you have created your bunch of rose heads, repeat the above techniques on the rose stems.
Your image should look like that displayed on the left (dependent on the types of rose heads you chose). After dragging the top leaves, I then dragged upwards on the 'black area' below the roses, to reduce the length of the stems. After creating the bunch of roses, save your image [CTRL+S]. |
||||
 
|
Next we are going to resize your image back to its original size using the Crop tool.
To resize the image back to its original size: 1. Double click on the Crop tool. The system displays the Crop Area dialog box. 2. Change the Crop Area settings as follows: Left = 80, Right = 280, Top = 215, bottom = 520. 3. Click on the [OK] button. The system displays your crop area (as a thin white frame surrounding your roses). After making these settings, you may need to drag the crop area to the left, right, up or down - dependent on how far out your roses extend to centre the roses inside your crop area. To do this, hold down your left mouse button and drag the crop area to the desired position. 4. V5 - After centering the roses inside the crop area, using the Controls dialog box - Tool Controls tab, click on the Crop Image button. The system crops the image to your selected area. PSP Version 6
5. Now would be a good time to save your image
[CTRL+S]. |
||||
|
Next we'll create a rose pattern for the frame, by selecting a 100 x 100 px area of our image.
To create the rose pattern: 1. Double-click on your Selection tool. The system displays the Select Area dialog box. 2. Apply the following settings: Left = 50, Right = 150, Top = 120, Bottom = 220. 3. Click on the [OK] button to accept your dimensions. 4. Check that your selection sits nicely around an area showing the roses and some of the leaves (if not, click on the Mover tool, then - holding down your right mouse button - drag the selection so that it sits over your required area of the picture). 5. Copy your selection [CTRL+C] to the clipboard. 6. Deselect the 100x100 area [CTRL+D]. 7. Paste the clipboard contents as a new image [CTRL+V]. 8. Save the new image as pattern.psp [F12]. 9. Click on the roses1.psp image for the next steps. |
||||
 
|
Now we shall add a border. To add a border: 1. Click on your Background Colour in the colour palette, and change the background colour to white. 2. Click on the Image | Add Borders... menu option. The system displays the Add Borders dialog box. 3. Apply the following settings: Symmetric checkbox = Checked, Top = 20, Bottom = 20, Left = 20, Right = 20 (as you've selected the Symmetric option, you should only need to type in the top dimension of 20 - the rest will automatically appear). 4. Click on the [OK] button to add the white border. |
||||
|
|
Next we'll promote the white border to a layer.
To promote the white border to a layer: 1. Using your Magic Wand tool, click once on the white border area (to select it). 2. To promote the white border to a new layer, use the Selections | Promote to Layer menu option [SHIFT+CTRL+P]. 3. Do NOT deselect. |
||||
   
|
To fill the border with the rose pattern: 1. Click on the Flood Fill tool. 2. V5 - Using the Controls dialog box - Tool Controls tab, click on the down arrow beside the Fill Style, and select Pattern from the drop-down list. PSP Version 6
3. Leave the following Controls dialog box - Tool Controls tab options as: Match Mode = RGB Value Tolerance = 0, Opacity = 100, Sample Merged checkbox = unchecked. 4. Click on the Options button. The system displays the Flood Fill Options dialog box. 5. Change the options as follows: Fill Style = Pattern, Blend Mode = Normal, New pattern source = click on the down-arrow beside this option, and select the Pattern.psp image. 6. Click on the [OK] button to accept these settings. 6. Click on the Flood Fill Options tab, and select
7. Now click once inside the selected white area. The
|
||||

|
Next we'll adjust the brightness and contrast of the frame.
To adjust the brightness/contrast of the frame: 1. Select the Colours | Adjust | Brightness menu option [SHIFT+B]. The system displays the Brightness/Contrast dialog box. 2. Change the Brightness and Contrast settings as follows: Brightness = -10, Contrast =+30. 3. Click on the [OK] button. Do NOT deselect. |
||||
|
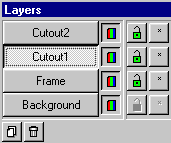
Now we'll rename the frame layer, and add two new cutout layers.
To rename the rose frame layer and create 2 new layers for a cutout effect: 1. Click on the Layer Palette. 2. Double-click on the Promoted Selection layer. The system displays the Layer Properties dialog box. 3. Rename this layer Frame, then click on the [OK] button. 4. Still using the Layer Palette, click on the New Layer icon, and create a new layer naming it Cutout1. 6. Again using the Layer Palette, click on the New Layer icon, and create another new layer naming it Cutout2. 7. Click on the Cutout1 layer to make it your active layer. Your Layer Palette should now look like that shown on the left. |
||||
 
|
Next you're ready to apply two cutouts to the image (to make it stand out from the frame). To apply the first cutout to the image: 1. Invert your selection, using the Selection | Invert menu option [SHIFT+CTRL+I]. 2. On the Cutout1 layer, choose the Image | Effects | Cutout... menu option. The system displays the Cutout dialog box. 3. In this dialog box, select the following settings: Fill interior with color checkbox = checked, Interior Colour = White, Shadow Colour = White, Opacity = 60, Blur = 20. Offset Vertical/Horizontal = 3. 4. After making these selections, click on the [OK] button. The system applies your cutout to the top and left area of the image inside the frame. Do NOT deselect. |
||||
 
|
Now we'll apply the second cutout.
To apply the second cutout to the image: 1. Using the Layer Palette, click on the Cutout2 layer (to make it the active layer). 2. On the Cutout2 layer, choose the Image | Effects | Cutout... menu option. The system displays the Cutout dialog box. 3. In this dialog box, change the following setting: Offset Vertical/Horizontal = -3 (leave the rest of the settings as per the previous cutout). 4. After making these selections, click on the [OK] button. The system applies your cutout to the bottom and right area of the image inside the frame. Do NOT deselect. |
||||
  
|
In this step (PSP V5 ONLY) we'll apply a texture effect to the frame.
To apply the texture to the frame: 1. Using the Selections | Invert menu option, invert the selection (so that the frame is now selected). 2. Using the Layer Palette, click on the New Layer icon, and create a new layer naming it Texture. 3. Using the Colour Palette, click on the Foreground Colour, and change it to a medium red (I used the 4th colour from the left on the top row of the colour Color Palette - #C00000). 4. Select the Paint Brush Tool, and using the Controls dialog box - Tool Controls tab - change the settings to: Paper Texture = Fruit Peel. 5. Still in the Controls dialog box - click on the Brush Tip tab, and change the settings to: Shape = Round, Size = 30, Opacity = 90, Hardness = 88, Density = 75, Step = 25. 6. Now paint around the frame using the above settings. 7. Using the Layer Palette, hide the Background, Cutout 1 and Cutout 2 layers, making sure the Frame and Texture layers are the only layers visible. 8. Now, - using the Layers | Merge | Merge Visible menu option, merge the Frame and Texture layers. 9. Still using the Layer Palette, double click on the merged layer, and rename it Frame2. |
||||
 |
In this step (PSP V6 ONLY) we'll apply a texture effect to the frame.
|
||||

|
In this step (PSP V5 only) we'll apply a buttonise effect to the Frame2 layer.
To apply the buttonise effect to the frame: 1. Using the Layer Palette, click on your Frame2 layer to make it the active layer. 2. Choose the Image | Effects | Buttonise... menu option. The system displays the Buttonise dialog box. 3. In this dialog box, select the following settings: Height = 5, Width = 5, Opacity = 80, Transparent Edge option = checked. 4. After making these selections, click on the [OK] button. The system applies a bevelled effect to the frame. 5. Now deslect the Frame using the Selections | Select None menu option [CTRL+D]. |
||||
|
PSP V6
|
||||

|
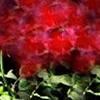
In this last step we'll finish off the frame and image, and save your work.
To finish off the image and frame: 1. Using the Layer Palette - click on Visibility Toggle beside the Background, Cutout 1 and Cutout2 layers (to make them visible). 2. Using the Layer Palette - right-click on the Background Layer, and from the pop-up menu options - select the Duplicate option. 3. Still using the Layer Palette, click on the Copy of Background layer, and change the Layer Blend Mode to Overlay, then change the Copy of Background layer Opacity to around 35%. This makes the roses stand out a little more from the frame. Your final image should look like that shown on the left. 4. To finish off, merge all layers using the Layers | Merge | Merge All (flatten) menu option, then finally save your image [CTRL+S]. This is the end of the tutorial. |
||||
