 |
 "
Home
>
Tutorials
>
Screen Saver (1) - Planets "
Home
>
Tutorials
>
Screen Saver (1) - Planets
|
|
|
Creating Planets
Created by: ZuAtHome @2000
|

|
|
|
The first three (3) Tutorials are able to be used as stand-alone space images. The fourth (4) tutorial creates a .jpg comet image for animation. The series is created so that in the fifth (5) tutorial, using a Screen Saver Program, one is able to use these images to create a Screen Saver for use on their computers.
The first tutorial in a series used to create graphics for a space screen saver:
(The tutorial is written for version 6 as version 5 does not have similar features.)
Two additional enhancements are provided to show other Planet results by using different color schemes and values for textures and shadowing effects. There are an unlimited number of possible images with these techniques. Enjoy :o)
Note: For the Screen Saver Tutorial, save the Stary Background as a separate JPEG file. And, Save the Planet as a GIF file using a transparent background.
|
|

|
OVERVIEW: Creating Planets uses techniques to:
- Create a Background of a Star Field
- Create a Circle for the Planet
- Enhance the Circle with Color and Texture
- Shadow the Circle for a 3-D Effect
- Blur it to look like a Planet in Night Sky
|
|
|
Begin with a New Canvas: 300x300 pixels, black background, 16 million colors
|
|
|
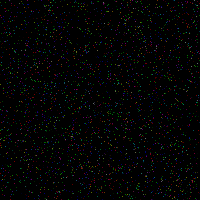
Create a 'Starfield Background'
- Create a Star Field background using NOISE:
IMAGE || NOISE || ADD;
Noise = 10%, Random = Checked
- To change the density of the Starfield, increase Noise percentage for more and decrease Noise percentage for less stars.
|
|
 |
TIP: Adding Brilliance to the Star Field.
- In the LAYER PALETTE, right click on the layer.
- Select: New Adjustment Layer || Brightness/Contrast
Set Brightness = 60
Set Contrast = 80
- Click on OK
- Use LAYERS || MERGE || MERGE ALL to create a single layer.
|
|
 |
The stars are too colorful to be realistic. Use COLORIZE
to tone them down.
- In the Layer Palette, Highlight LAYER 1
- Use: COLORS || COLORIZE
- Hue = 185, Saturation = 30
- Click on OK
|
|
 |
Create a New Layer for the Planet.
- Click on the New Layer
button.
- Name it "planet"
- Click OK.
|
|
|
Create Planet - Step 1 - Use the SELECTION TOOL. 
|
|
 |
Create a circular selection in the middle of your image. Size may
vary, but don't make it too tiny or fill up the entire canvas.
DO NOT DESELECT!
- Highlight the Planet Layer
- Use the SELECTION TOOL
Selection Type = Circle
Feather = 0
Antialias = Checked
|
|
|
Create Planet - Step 2 - Use the FLOOD FILL TOOL. 
|
|
 |
Set COLOR PALETTE:
- Foreground = Wedgewood blue (R86, G116, B146),
- Background = White (R266, G255, B255)
Use the FLOOD FILL TOOL
- Fill Style = Solid Color
- Blend Mode = Normal
- Paper Texture = None
- Match Mode = None
- Tolerance = n/a
- Opacity = 100
- Sample Merged = Unchecked
- Right Click to fill selection with White.
-
DO NOT DESELECT
|
|
|
Create Planet - Step 3 - FLOOD FILL With a Texture.
|
|
 |
Create Planet
- Use the Tool Options - Flood Fill and Change the Paper Texture.
- Change Paper Texture to Terrain by Clicking on the Down Arrow and highlighting 'Terrain'.
- Leave other settings the same.
- Left Click to fill selection with a Blue Texture for a Cloud-Like Effect. DO NOT DESELECT
MERGE all Layers: LAYERS || MERGE || MERGE ALL (flatten).
DO NOT DESELECT
|
|
|
Create a Shadow Effect on Planet
|
|
 |
- First, Increase the Selection by 2 pixels:
Use SELECTIONS || MODIFY || EXPAND SELECTION.
Value = 2
Click on OK
- Next, Set the Shadow using CUTOUT:
IMAGE || EFFECTS || CUTOUT
Fill Interior with Color = Unchecked
Interior Color = n/a
Shadow Color = Black
Opacity = 100
Blur = 25
Vertical = -15
Horizontal = 15
Click OK
DO NOT DESELECT
|
|
|
Final Step: BLUR the Image
|
|
|
Use: IMAGE || BLUR || BLUR MORE
Deselect the Selection: (CTRL + D)
|
|
 |
For Variation, try different colors, textures and cutout settings. There are unlimited options for creating a 'planet' in the night sky.
|
|
 |
Create a "Moon" using these settings:
- Paper Texture = Sponge
- Foreground Color = (R170, G146, B124)
- Background Color = Black (R0, G0, B0)
- Cutout Vertical & Horizontal = 30
- All other steps are the same
|
|
 |
Create a "Red/Orange Planet" using these settings:
- Paper Texture = Tree Bark
- Foreground Color = (R251, G162, B67)
- Background Color = (R128, G0, B0)
- Rotate the Selection 90 degrees before applying the Cutout Effect:
IMAGE || ROTATE
, Direction = Left or Right
, Degrees = 90
- All other steps are the same
|
|
|
Next in the series is to add RINGS to a planet.
|