 Home > Tutorials Index > Home > Tutorials Index >
V5 & V6 Effects > Tubed Padded Border Background |
|||||
|
|
||||
| This tutorial was written for those who are new to Paint Shop Pro Version 5.
The background image we have created is 1475 pixels wide. The reason we have created such a wide image is that when you placed a left bordered background on a web page, it tiles both across and down your web page, and we don't want the left border to appear more than once. The Paint Shop Pro (PSP) tools you will use include the Selection, Mover, and Flood Fill tools. Finally, the steps below show how to perform each task using the PSP menu options. Alternatively, you may wish to use the keyboard shortcuts for some of the tasks - these are displayed in small text - surrounded by [square brackets]. As this is a long tutorial, you may wish to use the following links to skip to the section of the tutorial you require: |
|||||
|
|
|||||
|
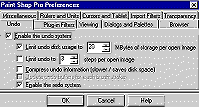
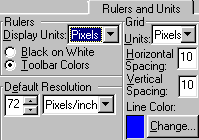
PREPARATION First we are going to open Paint Shop Pro, and set up our program preferences. These preferences are personal only - and are outlined herein to ensure you are using the same units and color references as described in this tutorial. This section may be skipped if you have already set up your Preferences, except that you need to change your Foreground and Background colors (as outlined in step 7) and create a new 400 x 400 Transparent image. To set up the program preferences: 1. Open Paint Shop Pro V5. 2. Click on the File > Preferences > General Program Preferences... menu option. The system displays the Paint Shop Pro Preferences dialog box, with several tabs at the top (displaying the "Undo" preference tab by default). 3. Click on the Dialogs and Palettes tab, and apply the following settings: Display flat style toolbars checkbox = checked, Color palette Display Colors in RGB format = checked, Hexadecimal display radio button = checked. 4. Leave all of the other settings on this tab unchecked, then click on the Rulers and Units tab and apply the following settings: Rulers - Display Units = Pixels (click on the down-arrow beside this field, and select Pixels from the drop-down list), Toolbar Colors radio button = checked. Default Resolution - 72 (click on the up or down-arrows beside this field to set the required number), Pixels/Inch (click on the down-arrow beside this field, and select Pixels from the drop-down list), Grid - Ignore these settings 5. Click on the Transparency tab and apply the following settings: Grid Size = Small, Grid Colors - Scheme = Light Grey (click on the down-arrow beside this field, and select Light Grey scheme from the drop-down list). 6. After choosing these preferences, click on the [OK] button at the bottom of the Paint Shop Pro Preferences dialog box. 7. Next, we'll set the colors to those used in this tutorial. Using the Color Palette, click once on the Foreground Color, and change it to #FFF5D0. Now click on the Background Color, and change it to #A1872D. 8. If all of your Palettes and Toolbars are not already displayed, click on the View > Toolbars... menu option. The system displays the Toolbars dialog box. Make sure there is a tick in all of the checkboxes except for the Histogram Window checkbox (not required for this Tutorial), then click on the [OK] button. 9. Again Click on the View menu, and select the Rulers option (to turn on your Rulers). When turned on, a tick will appear beside the Rulers option in the View menu. |
||||

|
Now we are going to create a new image.
To create a new image: 1. Click on the File > New... menu option [CTRL+N]. The system displays the New Image dialog box. 2. Apply the following settings: Image Dimensions - Width = 400 Pixels, Height = 400 Pixels, Resolution = 72 Pixels / Inch, Image Characteristics - Background Color = Transparent, Image Type = 16.7 Million Colors (24 Bit). 3. After choosing these settings, click on the [OK] button. The system displays your new image, showing a transparent background. |
||||
|
|
|||||
 
|
CREATING THE PADDING First we're going to make a selection, using the Selection Tool and the Select Area dialog box (to which we'll apply the padding). To make our first selection using the Select Area dialog box: 1. Click once on the Selection tool icon in your Tool Palette. 2. Now check the (tool) Control Palette to ensure that the: Selection Type = Rectangle, Feather = 0, Antialias checkbox = unchecked. 3. Now double click on the Selection tool icon in your Tool Palette. The system displays the Select Area dialog box (as shown below left). 4. Change the Select Area dialog box settings to the following: Left = 50, Right = 90, Top = 0, Bottom = 400, Custom size and position button = checked. 5. Once you made these settings, click on the [OK] button. The system displays your new "selection" (with marching ants) on your blank image, 50 pixels in from the left of your image, and 40 pixels wide. |
||||
|
Next we are going to apply a drop shadow to your selection.
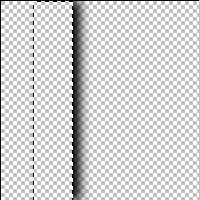
To apply a drop shadow to the selection: 1. Click on the Image > Effects > Drop Shadow... menu option. The system displays the Drop Shadow dialog box. 2. Apply the following Drop Shadow settings: Attributes - Color = Black Opacity = 100 Blur = 15.4 (approx.) Offset - Vertical = 0 Horizontal = 7 3. After making these selections, click on the [OK] button. The system applies your drop shadow, as shown in the image displayed on the left. 4. Using the Selections > Select None menu option [CTRL+D] - deselect your selection. 5. Now would be a good time to save your image. Using the File > Save [CTRL+S] menu option, save your image as a .psp file, naming it "pleated.psp". |
||||
 
|
Next we are going to make a new selection,
again using the Select Area dialog box. To make a new selection using the Select Area dialog box: 1. Double click on the Selection tool icon in your Tool Palette. The system displays the Select Area dialog box. 2. Change the Select Area dialog box settings to the following: Left = 90, Right = 140, Top = 20, Bottom = 380, Custom size and position button = checked. 3. Once you made these settings, click on the [OK] button. The system displays your new selection (with marching ants) around the right-hand side of the drop-shadow (as shown in the image on the left). Do not deselect. |
||||
|
Now we'll copy this selection, then paste as a New Layer
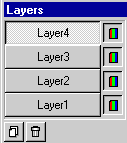
3 times, then delete our original layer (Layer1). To copy and paste the selected part of the drop shadow, and delete Layer1: 1. Using the Edit > Copy menu option [CTRL+C], copy your selected part of the drop shadow. 2. Now, using the Edit > Paste > As New Layer menu option [CTRL+L], paste the image as a new layer 3 times. Each time you paste, the system will place the copy of your shadow directly in the center of your image. 3. Check your Layer Palette to ensure you now have four layers on your image (as shown on the left). 4. Deselect your selection [CTRL+D]. 5. Right-click on Layer1 in your Layer Palette, and - from the pop-up menu - select the Delete option (to delete Layer1). Your Layer Palette should now look like that shown on the left, having only Layers 2, 3 and 4 - with Layer 2 being the "active" layer. 6. Now would be a good time to again save your image [CTRL+S]. Your image should look like that shown on the left. |
||||
   |
Next we're going to hide each layer while we move
the shadows to their required positions on the image, then merge the "Visible" layers into one layer. To hide each layer while we move the shadows, then merge them as "Visible" into one layer. 1. Using the Layer Palette, click once on each of the Visibility Toggles beside each of Layers 3 and 4 (to hide Layers 3 and 4). Layer 2 should remain visible and your "active" layer, as shown in the image on the left. 2. Click on your image title bar, then choose the Selection > Select All menu option [CTRL+A]. 3. Using your Selection tool, click once on your Shadow (this will select only the shadowed part of the image). 4. Hold down the SHIFT key, then press the right -arrow on your keyboard 10 times to move your shadow 10 pixels to the right, so that its left edge is sitting at exactly 200 pixels in from the left. Note: - you could simply use the Mover tool in this step and - holding down your left-mouse button - drag the shadow to the right so that its left edge sits on 200 pixels from the left of your image. 5. Deselect your selection [CTRL+D], then - using the Layer Palette - click on Layer 2's Visibility Toggle (to hide it). 6. Still using the Layer Palette, click on Layer 3's name (to show it and make it the active layer). 7. Click on your image title bar, then choose the Selection > Select All menu option [CTRL+A]. 8. Now, using your Selection tool, click once on your Shadow. 9. Hold down the SHIFT key, and press the right -arrow on your keyboard 30 times - to move your shadow 30 pixels to the right so that its left edge sits on 220 pixels from the left. 10. Deselect your selection [CTRL+D], then - using the Layer Palette, click on Layer 3's Visibility Toggle (to hide it). 11. Again using the Layer Palette, click on Layer 4's name (to show it and make it the active layer). 12. Click on your image title bar, then choose the Selection > Select All menu option [CTRL+A]. 13. Again using your Selection tool, click once on your Shadow (to select it). 14. Hold down the SHIFT key, and press the right -arrow on your keyboard 50 times - to move your shadow 50 pixels to the right, so that its left edge sits on 240 pixels from the left. 15. Deselect your selection [CTRL+D]. 16. Using the Layer Palette, click on each of the Visibility Toggles beside Layers 2 and 3, so that all three layers are now visible. Your image should look like that displayed on the left - like 3 "pleated" borders. 17. Use the Layers > Merge > Merge Visible menu option to merge all 3 layers. |
||||
 |
In this next step, we'll select the borders, then crop the image, so that only the three pleated borders remain (removing all the blank space around them).
To select the borders and crop the image: 1. Double click on the Selection tool, and - in the Select Area dialog box - change the settings to: Left = 200 Right = 260 Top = 20 Bottom = 380. then click on the [OK] button. 2. Now - to crop the image to our selection - click on the Image > Crop to Selection menu option [SHIFT+R]. The system crops your image just showing the "pleated" borders, as displayed on the left. 3. Again save your image [CTRL+S]. |
||||
|
|
|||||
|
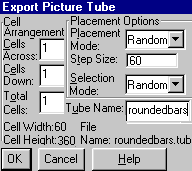
EXPORTING AS A PICTURE TUBE Now we're ready to duplicate the image, mirror it and export it as a Picture Tube. To duplicate, mirror and export the image as a picture tube: 1. To duplicate your image, press the [SHIFT+D] keys. The system displays your duplicated image as the active image, over the top of your original. 2. To mirror the duplicated image, select the Image > Mirror menu option [CTRL+M]. The system mirrors your duplicated image, giving it a more rounded (rather than pleated) effect, as shown on the left. 3. Save your duplicated image [CTRL+S] as "rounded.psp". 4. To export the "rounded.psp" image as a Picture Tube, select the File > Export > Picture Tube... menu option. The system displays the Export Picture Tube dialog box. 5. Change the settings in the dialog box as follows: Cell Arrangement - Cells Across = 1, Cells Down = 1, Total Cells = 1, Placement Options - Ignore these settings, as we only have one picture in each tube file. Tube Name - Name this tube "roundedbars". 6. Click on the [OK] button. The system saves the tube to your PSP Tubes folder (i.e. to Program Files > JASC > PSP5 > Tubes folder). 7. Save [CTRL+S] and Close (File > Close menu option) both the pleated.psp and rounded.psp images. |
||||
|
|
|||||

|
CREATING THE PADDED BORDER Now we're ready to create your padded border background image, using the tube you just created (roundedbars.tub). To create a new image: 1. Click on the File > New... menu option [CTRL+N]. The system displays the New Image dialog box. 2. Apply the following settings: Image Dimensions - Width = 1500 Pixels, Height = 100 Pixels, Resolution = 72 Pixels / Inch, Image Characteristics - Background Color = White, Image Type = 16.7 Million Colors (24 Bit). 3. After choosing these settings, click on the [OK] button. The system displays your new image, showing a white background. |
||||
|
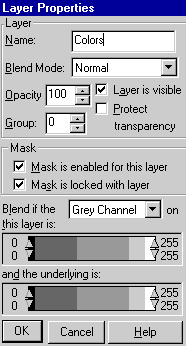
Now we'll create a couple of new layers.
To create 3 new layers: 1. Click on the Layers > New... menu option. The system displays the Layer Properties dialog box. 2. Name your first new layer as "Colors". 3. Repeat steps 1 and 2 twice - naming the 2nd new layer "Shadow1", and the 3rd new layer as "Shadow2". 4. Now would be a good time to save your image. Using the File > Save [CTRL+S] menu option, save your image as a .psp file, naming it "mybackground.psp". |
||||
|
In this next step, we're going to place your new tube
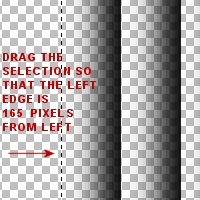
on the "Shadow" layers. In this exercise we are going to use the rounded tube once, then copy and mirror the second copy of the rounded tube. To place your roundedbars tube on your image: 1. Using the Layer Palette, click on the Visibility Toggle on the Colors, Background and Shadow2 layers (to hide them), and check that your active layer is the Shadow1 layer (as shown on the left). 2. Click on the Title Bar of your image, click on the Zoom tool in your Tool Palette, and click twice on your image - so that you are viewing it at 3:1. 3. Now click on the Picture Tube icon in the Tool Palette. 4. Using the (tool) Control Palette, click on the down-arrow beside the tube name, and select the "roundedbars" tube from the drop-down list. Make sure the Scale is set to 100%. 5. To place the "roundedbars" tube on your image, click somewhere on the left side of your image (so that its left edge is at least 100 pixels in from the left). 6. To select your shadow tube image, type [CTRL+A] (to Select All), then using your Selection tool, click once on the shadow. 7. Now click on the Mover tool, and - watching the ruler at the top of your image - hold down the left mouse button, and drag your selection across - so that the left hand side of your selection is exactly at 165 pixels in from the left of the image, and that the right hand side of your selection is exactly at 225 pixels in from the left of the image. 8. With your selection still active, copy the tube image using the Edit > Copy menu option [CTRL+C] (this will sit in your Clipboard's memory ready for the next steps). 9. Once you've done this, deselect [CTRL+D] your selection. |
||||
|
Now we're ready to paste the padded border (which we copied in the previous step), mirror it, then move it to its required position.
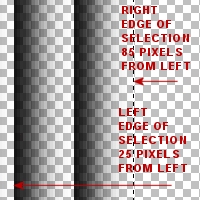
To paste the padded border, mirror it and move it on your image: 1. Using the Layer Palette, click on the Shadow1 Visibility Toggle (to hide it), then click on the Shadow2 layer name (to view and select it as the active layer). 2. Using the Edit > Paste > As New Selection menu option [CTRL+E] click once on your image your image, pasting the second copy of the tube approx. 25 pixels in from the left (DO NOT DESELECT). 3. To mirror this copy of the shadows, use the Image > Mirror menu option [CTRL+M]. The system mirrors your shadows, and moves them slightly to the right. DO NOT DESELECT. 4. Using your Mover Tool, hold down your left mouse button and move (drag) your selection across so that its left-edge is exactly 25 pixels in from the left, and the right edge of your selection is exactly 85 pixels in from the left. Your image should now look like that displayed on the left. 5. Now we'll merge the 2 shadow layers (check in your Layer Palette that the Colors and Background layers are still ";hidden" before you do this). Click on the Layers > Merge > Merge Visible menu option. The system merges your two Shadow layers. Your Layer Palette should now look like that shown on the left. 6. Next we'll make a selection and crop the image (to get rid of the blank area to the left of your padded border). Double click on the Selection tool. The system displays the Select Area dialog box. 7. Change the settings to: Left = 25 Right = 1500 Top = 0 Bottom = 100. then click on the [OK] button. The system crops the image so that your left shadow is placed exactly on the left hand edge of your image (zoom in to check - if necessary use your Mover tool to move the shadows to the exact left edge). 8. Save your image [CTRL+S]. Your image should look like that shown on the left. |
||||
|
|
|||||
      
|
COLORING THE PADDED BORDER BACKGROUND
OK - now all the hard work is out of the way, and this is the fun part. In this step we are going to flood fill the left, center and right sections of our padded borders. To flood fill the borders: 1. Using the Layer Palette, click on the Visibility Toggles beside each of the Colors and Background layers (to show them). 2. Again using the Layer Palette, click on the Colors layer (to make it the active layer). Your Layer Palette should look like that shown on the left. 3. To select and flood fill the center section of our border, double click on the Selection tool icon in the Tool Palette, and - in the Select Area dialog box - make the following settings: Left = 40, Right = 135, Top = 0, Bottom = 100, Custom size and position radio button = checked. 4. Click on the [OK] button to apply these settings. Your selection should look like that shown on the left. 5. Click on the Flood Fill tool in the Tool Palette, and check the (tool) Control Palette that your Fill Style is set to Solid Color, then left-click once inside your selection. The system flood fills your CENTER section with the pale yellow color. Deselect your selection [CTRL+D]. 6. To select and flood fill the left section of our border, double click on the Selection tool icon in the Tool Palette, and - in the Select Area dialog box, just change the following settings (leave the others as they are): Left = 0, Right = 40. 7. Click on the [OK] button to apply these settings. Your selection should look like that shown on the left. 8. Click on the Flood Fill tool in the Tool Palette (your Fill Style should still be Solid Color in the (tool) Controls Palette) then, right-click once inside your selection. The system flood fills your LEFT section with the dark gold color. Deselect your selection [CTRL+D]. 9. To select and flood fill the right section of our border, double click on the Selection tool icon in the Tool Palette, and - in the Select Area dialog box, just change the following settings (leave the others as they are): Left = 135, Right = 175. 10. Click on the [OK] button to apply these settings. Your selection should look like that shown on the left. 11. Click on the Flood Fill tool in the Tool Palette, then right-click once inside your selection. The system flood fills your RIGHT section with the dark gold color. Deselect your selection [CTRL+D]. 12. Save your image as a jpg file (to use in an HTML document) - e.g. mybackground.jpg. To view this padded border background as a web page, click here. |
||||
|
|
|||||
  
|
VARIATIONS TO THE PADDED BORDER
BACKGROUND The following are some variations you may like to try for your padded border backgrounds, by flood filling the left, center and right sections with different colours, patterns and gradients. Variations 1. For this padded border, I first created a 100 x 100 textured pattern image (flood filling the image with white, then using the Image | Noise | Add... filter), then I darkened the image with a Colors | Adjust | Gamma Correction of 64 (as shown on the left). When flood-filling the center of this padded border image, I changed the Fill Style in the (tool) Controls palette to Pattern, then clicked on the [Options] button - I then selected the 100x100 textured image that I had created as my pattern). I then used the Solid Color Fill Style (in my tool Controls palette) to fill the left and right sections of the padded border. To view this as a web page, click here 2. For this next padded border, I used a Rectangular Gradient as my Fill Style for the center section, then used a Solid Color Fill Style in the left and right sections. When viewing this, notice how the center pattern tiles down the page. To view this as a web page, click here. 3. In this last padded border example, I used a darker Solid Color Fill Style for the center section, with a lighter blue on the left and right sections. I then reduced the "Merged" layer's Opacity to 65%, and placed a picture tube (of a fish) on a new layer. The variations for bordered backgrounds are limitless. To view this variation as a web page, click here. |
||||
|
|
|||||
|
|
PLACING THE PADDED BORDER BACKGROUND IN
YOUR WEB PAGE Finally, the following code shows you how to place your padded border background into an HTML document that uses a very basic internal cascading style sheet. To place the padded border background as a background for an HTML document: 1. Open Notepad, and create a basic HTML document, (using an internal style sheet). 2. Alternatively you can copy and paste the following code into a Notepad document, changing the <BODY BACKGROUND="/tutorial/html/tuteff/mybackground.jpg"> image name to whatever name and path you have given it (ensuring that you have saved both the image and the html document in the same folder on your computer). <HTML> <HEAD> <TITLE>Padded Border bg Sample 1</TITLE> <meta http-equiv="Content-Script-Type" content="text/javascript"> <meta http-equiv="Content-Style-Type" content="text/css2"> <STYLE type="text/css"> p { margin-left: 200px; } </STYLE> </HEAD> <BODY BACKGROUND="/tutorial/html/tuteff/mybackground.jpg"> <p> This is where you would paste the bulk of your web page's content. <br><br> Notice that the text begins to the right of your padded border background. That is because we set up the internal style sheet paragraph paragraph (p) style to have a left margin of 200 pixels and your padded border is only 175 pixels wide. <br><br> This is test text. This is test text. This is test. This is test text. This is test text. This is test. This is test text. This is test text. This is test. This is test text. This is test text. This is test.</p> </BODY> </HTML> Note - you must have the correct path to this image - for example, if you are saving your HTML document as "index.html" in a folder called C:\My Documents\mywebpages\ then the background image must also be placed in a folder called: C:\My Documents\mywebpages\ If you are familiar with style sheets, you could also specify the body background image in your style sheet. 3. To view the web page on your computer, open Windows Explorer, locate the C:\My Documents\mywebpages\index.html' document, then double click on it. The system will display your web page with a bordered background. 4. The code above produces THIS SAMPLE document. |
||||
|
This is the end of the tutorial. To return to our Tutorials Index, click here. |
|||||
