|
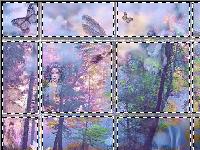
Glass Block Window with Kang's Filters |
|||||
|
|
||||
In this tutorial, we'll use Kang's Filters to create a beautiful glass block window from an image. |
|||||
|
In the download file on the left, you'll find Kang's Filters and the image that we use in this tutorial. Just unzip the filters into your ..\PaintShopPro\Plugins folder and you're ready to begin. |
||||
| Open "/tutorial/html/tutfilters/Sbeginpic.jpg" from your download file or another image of your choice. Go to Window || Duplicate so you can work on a copy of your image, and close the original image. | |||||
 |
Go to Effects || Plug-ins || kang 4 || gemBars2. Set "x frequency" and "y frequency" to the number of sections you want your window to have. Set thickness to the desired thickness you want to show between glass window sections. Set toner and lighter to the desired brightness you want to show between glass window sections. I had these settings: Once you have achieved the look you want of the frame, click OK. Your image will now show the frame you'll be using between the glass windows. |
||||
|
Go to your toolbar and click on the Selection tool. Set the selection tool at: Place your cursor over your picture beginning at the corner of one of the squares you want to turn into a glass block window, and select the entire area between the frame. You can select all or as many sections as you want at one time by holding down the Shift key while you use your Selection tool. |
||||
 |
Once selected and your ants are "marching" ... Go to Effects || Plug-ins || kang 4 || bubblecross Waves. Set the filter to the following specifications: Use this same setting for each and every glass block window within your picture. (Feel free to sample different settings if you wish for desired effect, however, remember to keep the same setting for each section in the same picture.) Deselect by right-clicking into your picture. |
||||
| Please note: It may seem easier, to apply this effect to the entire image before adding the window frame (gembars2) to save time, however, the effect is much more intense and detailed when applying it to each window section individually. | |||||
| Once each section is completed with the window effect ... go to File || Save As, and you're done. | |||||
| This can be used with any image, or sections of an image if you like. Feel free to experiment as the filters used for this tutorial have many different settings and many different effects can be achieved by simply experimenting until you find what you like. | |||||
