|
(Prof's PSPv7 Effects and Techniques) > Inner and Outer Bevel Effects |
||
|
||
|
In this session we will explore the 3D Effects || BEVELS (both inner and outer bevel). Bevels are added to a selection which give it dimension and a 3D appearance. The inner bevel will work inside a selection while the outer bevel works on the outside of a selection. Beyond that difference, the options available are the same for both types of Bevels. The best teacher is just to use the Effect. So, let's begin. |
||
|
|
Basic Set Up1. Foreground and Background Colors are not important. 2. New Canvas: 300 x 300 White background, 16 M colors.
NOTE: 3. In the Layer Palette, Right Click on the layer and select 'Promote to a Layer'.
NOTE: |
|
|
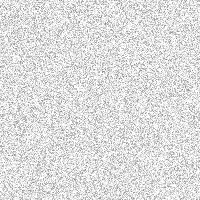
OverviewCreate a Grey Sandstone Effect So that we can more easily see the effect, let's create a grey sandstone background. This effect is one we covered last Spring.
1. Effects || Noise || Add with Noise = 100% and Uniform
Checked. Now we have a bit of texture in our canvas. With this background our BEVELS will show up better to illustrate this PSP v7 feature. |
|
|
|
Using Bevels -- Review BEVELS work on 'Selections' which may be rectangular, squared, or any shape and text. The INNER BEVEL works on the inside of a selection. The OUTER BEVEL works on the outside of a selection. Both types of Bevels use the same set of Values to create the outcome. Bevels are used to give a beveled edge to shapes for a 3D effect and often are able to be used to create a 'Frame' around images. Bevels are often used to create realistic looking wood objects like furniture, molding, tables as well as to give raised effects to text and shapes. Mastering Bevels provides one with a tool that has unlimited possibilities in the enhancement of images. The best way to become familiar with any 'Effect' initially is to use the PRESETS. These default values provide a basic set of effects from which to more easily learn how various options for the effect create the various images. |
|
|
|
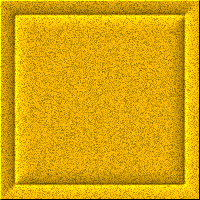
EXPLORING THE BEVEL OPTIONSThe 'Frame' Effect We begin our exploration by using the INNER BEVEL without any drawn selection. When used in this fashion the default selection is actually the edge of the image. Thus, we are able to create some pretty nice 'FRAMES' for images with this Inner Bevel. |
|

 Frame Preset Pillow Preset 
 Round Preset Soft Edge Preset |
Explore the PRESETS As stated above, the best way to learn how a particular Effect works and is displayed, is to use the PRESETS. View the options and their settings as you explore in this exercise:
1. Use: Effects || 3D Effects || INNER BEVEL
|
|

|
REVIEW OF OPTIONS We will review the OPTIONS and explore how their settings effect the outcome. 1. Select the 'PILLOW' Preset. As you go through this exercise, note the default values. You will want to return to them as you explore each setting. The OPTIONS control how the Light Source affects the image in the way the option and combination of options handle shadow and light on the selection. 2. Take each Option and explore its particular options, values and/or settings. (Remember to note the default value and return to it before moving on to the next option. |
|

 Bevel: Row 2 #2 Bevel: Row 2 #3 Size = 19 Size = 31 
 Bevel: Row 3 #4 Bevel: Row 1 #4 Size = 13 Size = 31 |
THE BEVEL OPTIONS
1. BEVEL:
2. WIDTH: Go Ahead now and quickly explore the different bevels and then the different sizes. First though, set 'Smoothness' = 0. NOTE: When done return to the Top Row, second from right Bevel and Width = 8. Also, notice how the pillow preset has a similar appearance as the 'Buttonize' effect but with more definition. |
|
|
Bevel Used: Row 2 #3 
 Smoothness = 0 Smoothness = 50 Depth = 5 Depth = 10 Ambience = 0 Ambience = 20 Shininess = 0 Shininess = 0 Bevel Used: Row 2 #2 
 Smoothness = 100 Smoothness = 0 Depth = 100 Depth = 10 Ambience = -40 Ambience = -20 Shininess = 40 Shininess = 0 |
THE IMAGE OPTIONS
1. SMOOTHNESS:
2. DEPTH:
3. AMBIENCE:
4. SHININESS:
NOTE: Default Values |
|
|
Bevel Used: Row 1 #2 
 Color: lt. Blue Color: lt. Blue Angle = 315 Angle = 315 Intensity = 50 Intensity = 50 Elevation = 20 Elevation = 20 Bevel Used: Row 3 #4 
 Color: lt. Purple Color: lt. Purple Angle = 225 Angle = 45 Intensity = 30 Intensity = 30 Elevation = 40 Elevation = 40 |
LIGHT OPTIONS
1. COLOR: (Wow, we just experimented with COLORIZE).
2. ANGLE: TIP: Click on the clock hand, hold mouse button done, drag it to other values, or change the value in the box from 0 to 360.
3. INTENSITY:
4. ELEVATION:
NOTE: Default Values: |
|
|
AN ILLUSTRATIONThese various options provide you with a multitude of options to create a multitude of bevels. Often, using the Inner Bevel in this fashion, one can create a variety of neat FRAMES. As you first play with the PRESETS, notice the preset values. Then at some point, just experiment. Look through the 12 possible Bevels and explore various values for the various options. Here is one I often use and like. However I often use it on a woodgrain background instead of the sandstone background.
Bevel: Middle Row, third from left Click on CANCEL |
|
 Selection with Inner Bevel  Selection with Outer Bevel |
EXPLORING BEVELS WITH SELECTIONS.In this exercise we will first start with a square or rectangular selection in the middle of the canvas and then apply an INNER BEVEL to just see how it works. You should be back to the grey scale noise canvas now. If not use [Control+Z] until you return to the original image. 1. Use the Selection Tool and just draw a rectangle somewhere in the middle of the canvas. Positioning is not important other than somewhere in the middle of the canvas and to just to have some space outside of the selection. 2. Then apply an Inner Bevel of your choice and click on OK to set it and deselect [Control+D] NOTICE: Now you have a type of button effect in the middle of your canvas. 3. Use [Control+Z] to get the selection back 4. Now, select OUTER BEVEL and experiment with the presets and then select a bevel and values you like with this first image. When done, set it and deselect [Control+D]. NOTE: To see the original, click on the EYE and your effect will return to the original. Click on the EYE again to see the Outer Bevel Effect. NOTE: Note how the bevel is formed on the outside of the selection. Also, note how different bevels will give different frame looks. Hint: When you combine the inner and out bevels, just make sure the ANGLE is the same for both and best to also have the intensity and elevation the same as well. You can experiment with different colors for different types of effects. Ok, when done, use [Control+Z] to return to the original image. |
|

|
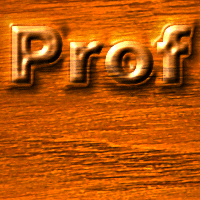
USING SHAPES (TEXT) with BEVELSIn this exercise, let's explore using TEXT and Bevels together to get an idea of how shapes handle Bevels. 1. First, lets set the image to a woodgrain effect. Flood Fill a canvas to a solid white background. Use: Effects || Textures || Sculpture || Mahogany Preset
Then change these Values: Click on OK for a rich colored mahogany background. |
|
|
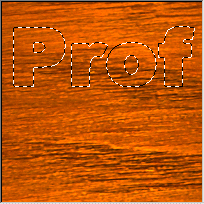
2. Use the TEXT TOOL and click in the center of the image.
Use: ARIAL BLACK or any large font. TEXT: Use TEXT or a Short text word like nickname. SIZE: as large as possible. Somewhere between 48 and 72. HINT: To get 60 (which is the value I used).
Highlight the text first. Then click on OK You will get a selection around the text. (If you want to position your text, click on the Shift Key and use the Arrow Keys to move the text to where you want it.)
Use: Selections || Save to Alpha Channel Then, use Selections || Load from Alpha Channel and your text selection without the color will appear. |
|
|
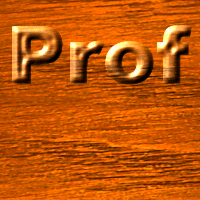
3. Now, use Effects || 3D Effects || INNER BEVEL Select a bevel and play with the various options to find a bevel effect you like.
Values I used: |
|
|
4. Next add an OUTER BEVEL. You may need to reload from Selections || Load from Alpha the selection to get Outer Bevel to work. Then just play with the various values to see the various possible effects.
Values I used: Click on OK Deselect [Control+D] How you have a very nice wood carved text on a wood background. |
|
|
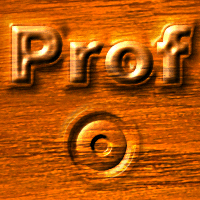
ONE LAST EXAMPLEWe will continue with the same image on which you have added text. This example will illustrate a technique that may be used to create knobs such as those on furniture. Use the Selection Tool, set it to 'CIRCLE' and draw a small circle about 1/2 inch in diameter somewhere on the canvas, preferentially below your text, but position does not matter. Try to at least center it vertically. Now, first, use the INNER BEVEL, then the OUTER BEVEL to create a button handle that one might see on a wood drawer.
Inner Bevel Values I used:
Outer Bevel Values I used: Now you have an idea of how to create another type of shape using a selection and the Bevels. Ok, just have fun and experiment. Next Week we will cover the Sun Burst Effect. |
|
