|
(Prof's PSPv7 Effects and Techniques) > Chisel Effect |
||
|
||
The Chisel Effect is both an interesting and in some ways not a simple effect to achieve although a very easy effect to use. Basically, the effect created is a chiseled look to a shape (text or shape) that gives it an appearance of being carved out on a background image. |
||
|
|
Chisel Effect, Options, and TipsThe Options:
Size in pixels, and either: Key Points in Using the Chisel Effect:
1. Must be used on a Layer (not the Background) Tip #1: The Size of the Chisel Effect should be fairly small for the effect to appear its best. However, experimentation is always in order. The effect also looks better on a textured background, usually grey or greyish in color. The Effect also looks better when there are more curves in the shape (selection). Tip #2: A very interesting outcome is created (a picture mat) using the Chisel and Colors > Negative Image. |
|
|
|
EXPLORATION - ILLUSTRATIONS |
|
|
A. Basic Set up:1. New Canvas, 400 x 400 Transparent, 16 M2. Flood Fill with Light Grey (192,192,192) 3. Use Effects > Noise set to 20% and uniform. 4. Use Effects > Texture Effects > Sculpture using the 3D preset. |
|
 Chisel Effect with Size = 20 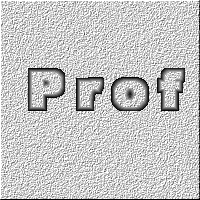 Chisel Effect with Size = 8 |
B. Illustration #11. Duplicate the Background Layer to preserve basic setup.2. Add a New Top Layer
3. Either Enter Your Name with the Text Tool using the
biggest or fat font possible:
4. Save the selection being used:
5. Set:
6. Use Effects || 3D Effects || Chisel 7. Duplicate the Canvas Window || Duplicate 8. Go back to original canvas and use Control+Z until the chisel effect has been removed. Then use Chisel again but reset the size = 8 - 10. If your selection is not showing, first use Selections || Load from Alpha. 9. Just compare the two chisel effects of different sizes. Comment: This image is nothing fancy. It only shows you the basic technique for using Chisel on a textured background. |
|
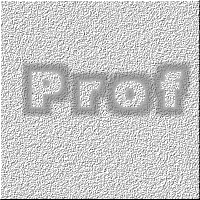 |
C. Illustration #2In either canvas, turn off the top layer and use the duplicated background layer. Get your selection from Selections || Load from Alpha.
Use: Chisel with these values: Notice the difference from the first images. |
|
|
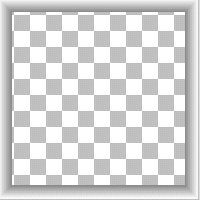
D. Illustration #3Create a new canvas, 300 x 300 Transparent.
Double Click on the Selection Tool Set Foreground = Black and background = White Use Chisel with Size = 20 and Background Color Deselect [Control+D] Use Colors || Negative Image
Optional: You now have a Matting for inside your Frames or as a frame for your images. Just save it as a Frame file. File || Save As .pfr with name you will remember in your FRAMES directory and it will then show up as a Frame when you use Image || Picture Frames. If you use it as a matting, first load it and then load the frame you want afterward. Enjoy -- Prof -- |
|
