|
(Prof's PSPv7 Effects and Techniques) > Drop Shadow Effect |
||
|
||
|
The Drop Shadow Effect is very simple and easy to use. It creates a shadow around an shape (selection) that gives the shape the appearance it is raised with a shadow behind it. Similar to the Cutout Effect, Light Source is basic and one is able to set 8 positions using the Offset Values. One varies the sharpness/softness of the shadow with the opacity and blur attributes. Tonight we will look at how the Drop Shadow works, then create a backdrop shadow for a selection and finish up with a neat image using the 3D Effects we have explored to date. |
||

|
Basic Setup:New Canvas: 300 x 300 pixels, White, 16 M Colors Promote 'Background' to a 'Layer' Create a New Top Layer. Comment: Many 3D effects require a layer. Thus, we promote the background to a layer.
Use: Selection Tool Draw a Rectangle that is taller than wide in the center of the canvas.
Use: Effects || 3D Effects || Drop Shadow
Comments on Options: (2)Offsets place the Shadow dependent upon the value of the offset. (3)Attributes soften/darken the shadow dependent upon the Opacity and Blur values. (4)The Color Attribute normally will be 'Black' though one may use any color wanted. Often, the shadow color is dependent upon the image and its color. A darker shadow color is usual though there will be times a light color is preferred. |
|
|
|
Explorations:A. Exploring the Options:#1: No Blur, Full Opacity, No Shadow Color = Black Opacity = 100 Blur = 0 Offsets = 0 Comment: The basic settings will not create a shadow around the selection. We will use this beginning to now explore the options. |
|
 Offsets = 12  Offsets = 8 |
#2: Exploring Offsets
Comment: (2) With no blur, the shadow effect is only on two sides and is dependent on whether the value is a plus or minus value. |
|
 Blur = 40  Blur = 20 |
#3: Exploring Blur
Comment: (2) The higher the blur value, the more shadowing occurs on the other two sides of the selection. |
|
|
Blur = 40 Blur = 20 |
#4: Exploring Opacity
Comment: (2) With low opacity, increasing the Blur gives a little more definition to the shadow effect. |
|
 Opacity = 40  Blur = 30 |
#4: Exploring Opacity
Comment: (2) With low opacity, increasing the Blur gives a little more definition to the shadow effect. |
|
 Full Blur/Opacity  Opacity = 60/Blur = 100 |
#5: No Offset and full Blur and Opacity
Comment: (2) Lowering either or both Opacity and/or Blur create a softer background shadow. (3) This set of values often can be used to highlight a selection in a very subtle way. Keep in mind also that using different colors for the background will give selections a nice definition particularly if the color compliments the selection. |
|

|
#6: Combining Shadow Effects
Comment: |
|
|
|
B. Using Drop Shadow and Cutout EffectsThe Drop Shadow can also be used with the Cutout Effect to create a Cutout of a selection.To create a cutout effect with 'Cutout' one uses two separate layers: one for the dark shadow and one for the light shadow. However, combining the Drop Shadow effect with the Cutout Effect one is able to use a single layer for the cutout. |
|

|
New Canvas: 300 x 300, Transparent, 16 M colors. Flood Fill Canvas with a Pastel Blur (212, 240, 255)
Cutout Effect with Drop Shadow
Use: Effects || 3D Effects || Drop Shadow |
|

|
C. Using All 3D Effects From Previous LessonsNew Canvas: 300 x 300 pixels, Transparent, 16 M Colors Promote the Background to a Layer Flood Fill it with a Pastel Blue (212, 240, 255)
Use Selection Tool
New Top Layer |
|
|
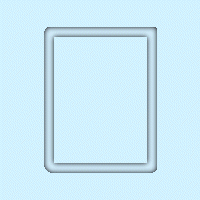
Create a Tube Frame -- Cutout
|
|
|
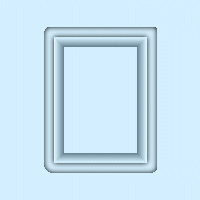
Frame Mat -- Chisel
Create a new layer
Use: Colors || Negative Image We have just created the inside mat illustrated during the chisel lesson. |
|
|
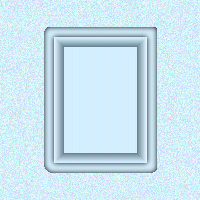
Background Texture -- Noise |
|
|
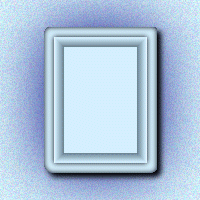
Drop Shadow
Create a New top layer |
|

|
Buttonize You now have a nice buttonized image with a frame inside using just these 3D effects You might add a picture to the inside of the frame or text or just another image. With these basic 3D effects, there are many opportunities of creating some neat and unique images, frames and buttons. Next week we will explore Perspective Shadows Enjoy -- Prof -- |
|
