|
(Prof's PSPv7 Effects and Techniques) > Sunburst Effect |
||
|
||
|
The Sunburst Effect in 3D Effects || Illumination Effects is a simple yet effective effect to give the illusion that the sun is shining with rays and glare. This effect is best used on an image that has landscaping or is a photo. However, it is able to be used on any image to add some enhancement. As is true of most effects, when you first use one, it is often best to use the preset options. In this fashion you will get a good idea of how the option values affect the outcome. |
||
 Default Preset  Upper Left Preset  Center Preset |
Exploring The PresetsTo first get an idea of how the sunburst looks we will work with a solid blue background image and just explore the preset values. 1. New Image: 300 x 300, blue background, 16 M colors. 2. Use: Effects || Illumination Effects || Sunburst 3. Drag the Sunburst Window away from your canvas to see the image. 4. In the PRESETS, just click on a preset, and just note the option values for the presets. 5. Explore each of the presets. |
|
 Color = White Rays Density = 0 Rags Brightness = 0 Light Spot Brightness = 50 Light Spot Horizontal = 10 Light Spot Vertical = 10 Circle Brightness = 0 |
Exploring The OptionsAgain just on a blue background let's explore the options.Initially just set all options to a value of 0. There will not be any effect with these values. 1. Exploring Positioning the Light Source (Light Spot): A. Set Light Spot Brightness = 50 (Intensity) B. Now just experiment with the Horizontal and Vertical settings. There range is from 0 to 100. By adjusting these options you are able to position the light spot to any angle. C. When done exploring the Horizontal and Vertical settings end up with these values for each: 10 |
|
 Circle Brightness = 100 |
2. Exploring the Glare (Circle): Just set the Circle Brightness to various values (range is from 0 to 100). When done use the value = 100. |
|
 Rays Density = 100 Rays Brightness = 50 |
3. Exploring the Rays. A. Explore both values (Density and Brightness). Start with a low Density value initially. B. When done set density = 100 and brightness = 50 |
|
 Color = 192, 224, 255 |
4. Exploring the Color: Click in the color box for the color wheel and just try some color values. When done, end up with 192, 224, 255 for your color. |
|
|
|
5. Saving this Custom Setting: Whenever you create a setting you like and think you want to use it in other images, then click in the Preset area on SAVE AS, and just title the setting to something that is descriptive of your settings. As an example, for this setting we have just completed, name it 'UpperLeft-Blue- Strong' or something like that. Then click on the OK button |
|
|
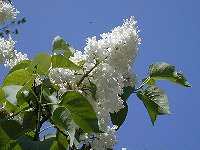
Using Sunburst On Photo's And ImagesAlthough you can experiment on any image you want, in PSP there are some images I will use here that you may choose to use as we explore some tips and hints in using this sunburst effect.1. In the PSP directory IMAGES, and perhaps in the SAMPLE Folder there is an image, '/tutorial/html/tutmini/lilacs.jpg'. Open that image into your PSP program. As you view this image, note that the light source appears to be coming from the upper left corner area. Thus, when you apply the sunburst effect, you will want the light spot also to be somewhere in that area. |
|

|
2. Settings: A. First, use Windows || Duplicate to preserve the original and then close the original. B. Use the Sunburst Effect. Note: If you saved the settings from the last example, they will be the starting point. And, your presets value will be 'Last Used'. C. Just experiment with values to find one you like. D. TIP: In the Sunburst Window, your original image is shown in the upper left and your effect is displayed on the right image. In the left image, you can click on the sun spot, hold mouse button down and drag to the position you want. Then, you can refine the location with the horizontal and vertical values. D. My Values:
Color: 255, 240, 224 |
|
|
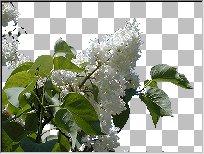
A TechniqueIn this example we will actually use the sunburst on a lower level than the image itself. If you are using the Lilacs.jpg image, you will use the following steps.We want to remove the sky blue from the image leaving just a transparent area. 1. First, use your Dropper tool to get the blue from this image into your Foreground. 2. Next, use the Magic Wand with these Settings:
Match Mode = HUE Then click on a blue area. The selection should be around most of the lilacs and leaves leaving only a few blue spots. Click on the DELETE key to remove the blue. Then, click on the other blue spots and remove them until you have basically a transparent background.There may be a few small blue areas and that is ok. |
|

|
3. Create a new layer and drag it to the bottom. 4. Flood Fill it with the blue foreground color. 5. On the bottom layer, add your Sunburst Effect Although the effect is very subtle, the sunburst is now more in the background than when done on a single layer. To realize this effect, exaggerate your option values some. |
|
|
|
Final CommentsThe sunburst effect is a nice effect to enhance photo's and images. You can apply the sunburst to any layer. If you have multiple layers, and you want to have some of them show the rays for example, just use the sunburst effect on each layer with the same values.Have fun with the Sunburst Effect. -- Prof -- Next Week we will cover the Illumination || Lights Effect, an incredible and most interesting effect. |
|
