|
Colour Popping in PSP |
||||
|
|
|||
|
In Paint Shop Pro it is a relatively simple matter to create this technique, called 'Colour Popping', which enables you to convert a photograph to black and white and then color an object in the photograph. Note: This tutorial was originally written for PSP 10. However, the technique and steps are the same for versions 8 and 9. |
||||
|
You may use any photograph of your choice. If you wish to use the photograph used in this tutorial download the zip file on the left. | |||
 |
Open your photo from the download file or another picture of your choice in your PSP program and duplicate the original (Window || Duplicate or Shift+D). Close the original to preserve it. | |||
|
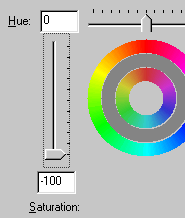
Convert the Picture to Black and WhiteIt is often here that beginners make a fundamental mistake (yes, including myself): Because most of the image is black and white it is assumed that the next step is to click on "Greyscale" to remove all colour. This simply won't work very well because Greyscale will reduce the photograph to 256 colours. I'm going to show you another approach here. The next step is to add an extra layer – called an 'Adjustment Layer'. Right-click on the "Background" layer in your Layer palette and go to 'New Adjustment Layer'. From the sub-menu, choose "Hue/Saturation/Lightness". Alternatively, you can go to Layers || New Adjustment Layer || Hue/Saturation/Lightness. This opens the dialogue window on the left. In this dialogue window, lower the "Saturation" slider (located on the left side) to -100 (minus 100) thus removing all colour from the image without affecting the colour depth of 1 million colours. |
|||
 
|
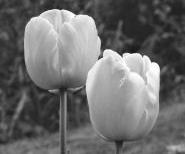
Re-Adding the Colour to the PetalsFirst of all make sure the 'Adjustment' layer is highlighted and that your Foreground colour is Black and your Background colour is White. Determine what area of your photograph you want coloured. In our example, we will add colour back to the petals. Choose the Paint Brush tool at a suitable size. When you hold down your mouse button and start to move it over the image you will see that the colour reappears. Carefully go over the petals to reintroduce the pink colour. If you make a mistake either right-click and draw over (effectively using the white Background colour) or swap the Foreground colour to white and go over the incorrect area. You might want to zoom into the picture and use a smaller-size brush when painting the edges of the petals. Also make sure your Hardness and Opacity options are set to 100, though if you reduce the Hardness value you might be able to better paint the edges of the petal and not into the other areas. Take your time as you paint over the petals. Paint all the areas you want in colour and when finished you will have a very unique Colour Popping picture, similar to the one on the left. As you master this technique you will be able to create interesting and unique coloured photographs. |
|||
