This section is where
you will find techniques to create great graphics using Paint Shop Pro.
If you have a question
or a tutorial you would like to share E-Mail
us and let us know!
©1999
This tutorial created
by SharC
Try me out!

This tutorial will show
you how to incorporate several mouseover buttons into one image. You will
need to download Picture
Dicer to cut up the templates into several images. The author has written
this program and made it available as a free download. There is also a
shareware version containing more features. If you like the Picture Dicer
program, send the author an e-mail and tell him where you learned about
it. I'm sure he will be thrilled to hear from you.
I suggest that you create
a new folder using Windows Explorer to place all of your new images to
keep them separate from other files.

|
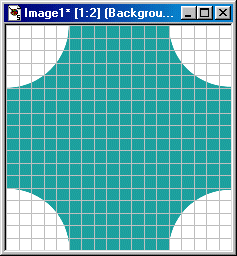
First, we will create
the template or image for the buttons. Open a new image 450 x 450, white
background, 16M colors.
Set the foreground color
on the color palette to R=20 G=113 B=114
Set the background color
to white.
Using the floodfill tool
set to solid color, match mode = none, Opacity and Tolerance set to 100,
fill your image with the foreground color.
Ctrl+Alt+G to view the
grid.
Choose the selection tool
and set as follows:
Circle
Feather = 0
Antialias checked
Place the your cursor
at the upper left hand corner of the image (0,0) and drag out and down
5 grids and release the mouse.
Now hit the delete key
on your keyboard.
|
| |
|
|
Repeat this step in each
corner of your image. |
| |
|
|
Ctrl+D after the final
corner.
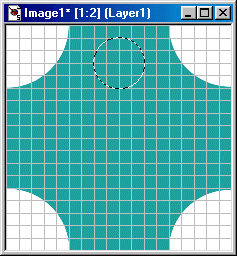
Next we will add a new
layer by holding the shift key and click on the new layer button at the
bottom left corner of the layer palette.
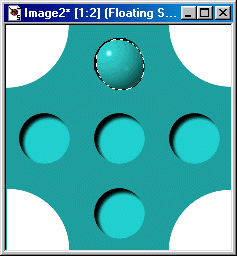
With Layer 1 Active, choose
the selection tool leaving the settings as they are. Position the tool
at the coordinates (226,76) and draw a circle up and out 2 grids (176,76).
DO NOT deselect.
|
| |
|
|
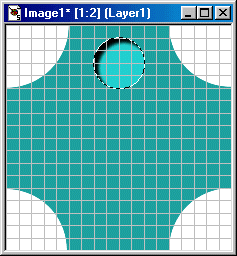
Set the background color
on the color palette to R=35 G=215 B=213 and floodfill the selection with
the background color.
Go to Image || Effects
|| Cutout and set as follows:
Check fill with interior
color
Interior color = background
color
Shadow color = black
Opacity = 95
Blur = 10
Vertical and Horizontal
= 9
Click ok
|
| |
|
|
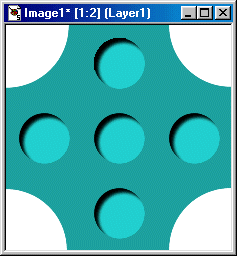
DO NOT deselect and go
to Selections || Modify || Contract and select 1 as the pixel number.
Ctrl+C to copy the selection.
Ctrl+E to paste a new
selection and without pressing any mouse button, move the selection to
the coordinates (24,174)
Ctrl+E to repeat the paste
and place each at the following coordinates:
(176,326)
(326,176)
(176,176)
Ctrl+D to deselect the
the selection. Go to View on the menu bar and uncheck the grid.
|
| |
|
|
You now have the first
image to be used for the mouseover. To create the second image Shift+D
to duplicate this image.
We want to work on a new
layer, so holding the shift key, click on the new layer button on the layer
palette.
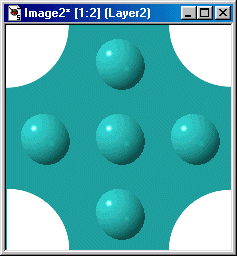
Select the tube tool,
choose the "colored spheres" tube and set the scale to 75%.
Place your cursor in the
center of one of the circles and left click to add a sphere. NOTE:
Don't worry if the circle isn't completely covered, we will take care of
this later. Just try to center the sphere in the circle. If you don't like
the color of the sphere you get or the placement... Ctrl+Z to delete and
start over again.
|
| |
|
|
Repeat and add a sphere
over each circle.
We can now activate layer1
on the layer palette, right click and delete this layer. You will now have
just the spheres for your second image.
|
| |
|
|
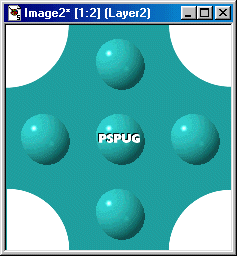
Set the foreground color
on the color palette to white.
Select the text tool and
click in the center of one of the spheres. Set the text tool to Herald
font, bold, 18pt. Enter your text and click OK. NOTE:
I selected this font and size to fit the sphere. You can select any font
and size you wish that will fit within the sphere.
Go to Image || Effects
|| Drop Shadow and use these settings:
Shadow color = Black
Opacity = 100
Blur = 1.5
Vertical and Horizontal
= -2
|
| |
|
|
|
Repeat the above, adding
text to each sphere.
We now have our two images
and are ready to cut them up using Picture Dicer... :o).
|
| |
|
|
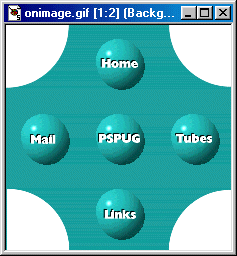
First, activate the image
with the spheres and save this image as onimage.gif in the new folder you
created at the beginning of this tutorial. Then activate the image with
the circles and save this image as offimage.gif to the same folder.
Open Picture Dicer
Once you have it open,
you will see the menu bar at the top of the Picture Dicer window...
Click on File
Click on Open Image
Browse to the file named
offimage.gif and select
|
| |
|
|
You will see a window
named Verify Basename. This is where Picture Dicer will save the graphic
after it has diced it up.
If you made a separate
folder for your image as suggested above, you can use the default and the
graphics will be saved there. If not you can choose a new folder and save
the images to it. It is important to remember where you save your images.
When Picture Dicer saves
the images, it will save them as such:
offi000.gif
offi001.gif
offi002.gif
and so forth until it
has saved and named each piece of the graphic it dices. This will make
more sense once we do a graphic! For now, just click OK on this window.
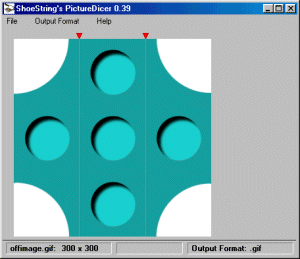
Now the image is open
in the Picture Dicer Window. We will be placing a grid on the image using
both horizontal and vertical lines to make the grid. Picture Dicer will
then dice each box in the grid, and save it as a separate graphic.
To place a vertical line
on the graphic... Move your mouse over top of the graphic and between the
left circle and the middle three circles. until the cursor turns in to
a crosshair. Use your judgment to place it equally between the circles.
Holding down the left mouse button, drag with your mouse to the point where
you want the line and then release the mouse button to place the line.
|
| |
|
|
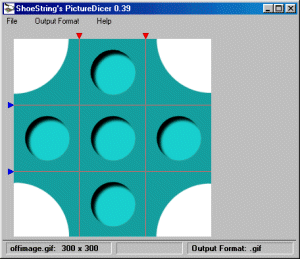
If you wish to remove
a line, move the mouse over the little triangle at the edge and the icon
will change to a  .
Click on this triangle and the line will be gone so you can try again.
This shows you how to remove an individual line. .
Click on this triangle and the line will be gone so you can try again.
This shows you how to remove an individual line.
Now we want to place another
vertical line between the middle circles and the circle on the right. Again,
use your visual judgement to place the line in the middle.
We now want to place the
horizontal lines on the image. To do this, move your mouse over the image
between the top circle and the middle three circles. until you get the
crosshair and hold down the RIGHT mouse button, drag to where you want
the line to appear and release to place a horizontal line.
Repeat this step placing
a horizontal line between the middle three circles and the bottom circle,
again centering the line between the circles.
|
| |
|
|
You now should have a
grid with 9 boxes which Picture dicer will name offi000.gif through offi008.gif.
It will dice the image starting from the top, working to the right, then
down to the second row of the grid, left to right, and so forth.
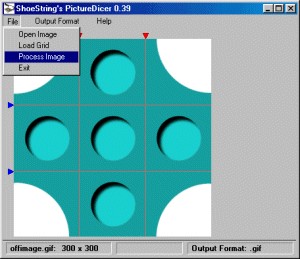
We will now process the
image. Click on File, then Click on Process Image.
|
| |
|
|
NOTE:
When Picture Dicer processes the image, it will save the images as well
as two additional files called offi.grd and offi.htm. Offi.grd saves the
grid you just made to be used again if you like... we will be using this
:o) Offi.htm saves the html code you need to use the images in a webpage,
giving you the sizes of each image. We will use this file as well later.
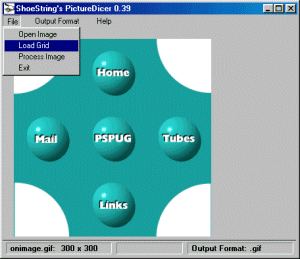
Now, open onimage.gif
in Picture Dicer. Click on File || Load Grid. Select offi.grd and click
OK.
You should now have the
same grid you made of the offimage.
All we need to do now
is click on File || Process Image and Picture Dicer will save the images
in exactly the same sizes as the offimage. The new images will be named
onim000.gif through onim008.gif and the new html file will be named onim.htm.
You now have all the images
you need to place the mouseover image on your webpage. To do this, you
will need to know javascript or you can use The
Mighty Mouseover Machine which is a great program that will do the
code for you!
If you want to use a template
html file to use with the image we just created, you can download it here.
Just remember when you use the template, you may have to change the image
sizes to the sizes of your images which you can find in offi.htm and onim.htm.
Have fun creating!
|
| |
|
When you are finished
viewing this page,
close this window to
go back to the Tutorials index.
|