
This section is where
you will find techniques to create great graphics using Paint Shop Pro.
If you have a question
or a tutorial you would like to share E-Mail
us and let us know!
©2000
This tutorial created
by Carolyn Ross


Making your own Outlook
stationery is very easy to do with Paint shop Pro. You simply create
a graphic or even just a textured background to be used as stationery.
|
Create a new image 500
x 300 pixels. This image is larger than necessary because we will be making
a selection and then we will tile the smaller selection.
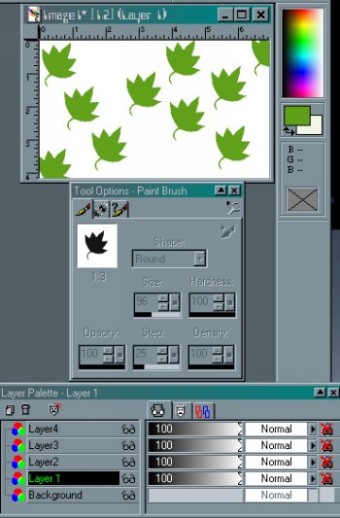
For the Fall image shown
above, create 4 more layers over your background layer. On Layer 1 use
your brush tool, set it to Custom and choose the leaf brush. Using green
(R96,G160,B25), dab your brush all over the page.
Apply a motion blur by
clicking on Image || Blur || Motion Blur with the settings:
Angle = 90
Intensity = 15 pixels
Set the layer opacity
to 40% and layer blend mode to "multiply". The image should appear similar
to image on right. If you'd like the image even lighter, then just
adjust the opacity slider to a lower number than 40%.
|
| |
|
|
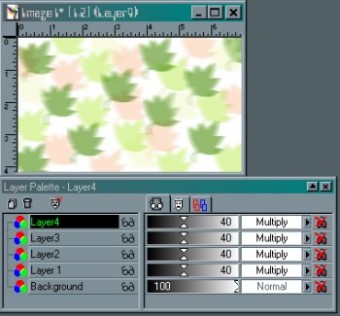
On each of the other
3 layers use a different Fall color. I used light green (R167,G227,B22),
a light orange color (R248,G178,B127), and a pale yellow (R237,G245,B183).
Use the same settings
for the Motion Blur on each layer and set each to the same opacity (40%)
and blend mode (multiply) as shown on the left.
Click on the background
layer to activate it and choose another pale shade a yellow or off white.
I used R246,G248,B237. Set your fill tool to:
Fill Style = Solid Color
Blend Mode = Normal
Paper texture = Canvas
(your choice)
Match Mode = RGB Value
Tolerance = 200
Opacity = 100
Sample Mode = unchecked
Fill with this layer with
this texture or the texture of your choice. Make sure that all your colors
and textures are subtle unless you want to have use a very bright, bold
text when you write your messages.
Flatten your image (Layers
|| Merge || Merge Visible)
|
| |
|

|
Use your selection tool
set to
Type = Square
Feather = 0
Antialias = unchecked
Select part of your image
(anywhere where you especially like your colors or design). After making
the selection, click Selection || Convert to Seamless Pattern. You
then save the new image.
Save your image in the
file called "stationery". This will be found under c:\program files\common
files\Microsoft shared\stationery. All your stationery graphics and files
must be saved under this directory for them to work with Outlook or Outlook
Express. Save your file as fall.jpg or a name which will readily be identified
by you.
Now you get to create
your stationery.
|
| |
|
|
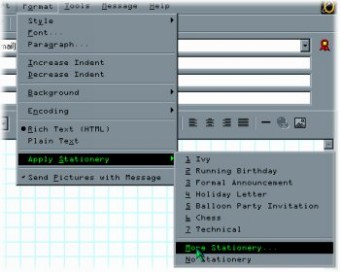
Open Outlook Express
and click on File || New || Mail Message. When your email opens, click
on Format || Apply Stationery || More Stationery.
You should now have a
new menu which lists all the stationery which loaded with Outlook Express
and it will show any new ones that you create. Click on the button which
says "Create New".
|
| |
|

|
You are now greeted by
the stationery wizard. Click Next. Check "Picture" and, using the drop
down menu, locate your saved picture "fall.jpg." It will appear
in the preview window on the left.
Position should be "Top,"
"Left" and for "Tile", check "Entire page". Since our graphic
covers the right side of the page, we do not need to select a background
color for this stationery so leave the "Color" box unchecked.
NOTE: If you were
use a single graphic which was not tiled over the entire page, just tiled
down vertically, you could select a background color.
Click "Next".
|
| |
|
|
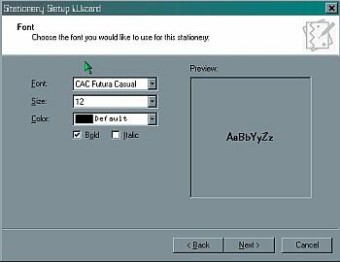
Select the type of font.
Choose a size which is large enough to see easily, a 12 or 14 point text
is usually good depending on the font. Select a font color which can be
seen on top of your texture. |
| |
|
|
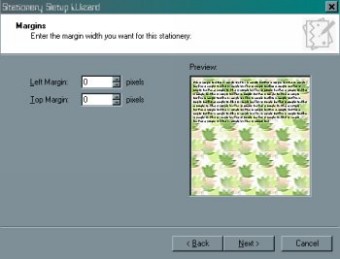
When you click "Next",
you will most likely see the example text all over your graphic. The margins
will not need to be changed for this example.
NOTE: If you used
a vertical tiling side image, you would want to change the side margin
so that the text would not cover the graphic. Since this is WYSIWYG,
you could see the example text move over to accommodate the graphic.
|
| |
|

|
Click "Next" and name
your stationery.
Click "Finish" and you
are taken back to the Select Stationery screen and your stationery is shown
in the window.
Click "OK". You
are now ready to type your email on your personalized stationery.
|
| |
|
When you are finished
viewing this page,
close this window to
go back to the Tutorials index.
|