|
User-Defined Filters |
||||
|
|
|||
| It is my hope that with this tutorial you will learn to explore the user-defined filters feature that comes with PSP 8. While taking an online class, I began using this filter and found it extremely versatile. There are many presets already in this filter and as you experiment you will be able to create your own. | ||||
|
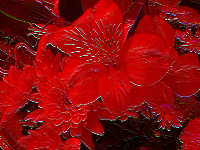
The picture that I used for this tutorial came from a Photo Workshop activity. The picture was obtained from Blaikiewell Animal Sanctuary. You may use this picture or one of your own. | |||
| Unzip your file and open it in PSP. Let's duplicate it by using Window || Duplicate (Shift+D) and close the original. | ||||
| As many of you know, PSP 8 came with scripts to make things you do all the time a little more efficient. Although this picture was very good, I used the One Step Photo Fix to brighten it up a bit. If your Photo toolbar isn't opened on your workspace, go to View || Toolbars || Photo. Next click on Enhance Photo, then choose One Step Photo Fix from the drop-down list. | ||||
  
|
Let's see what the user defined filter does: Go to Effects || User Defined. There are several sections for this filter: the Filter Matrix, Matrix Modifiers and the Apply To. In the Filter Matrix section there are 49 boxes, all set to 0 but the middle one that is set to 1, if you click on the Default button in the top right of the dialog. In the Matrix Modifiers section you have Divisor and Bias and a Compute button. The Compute button is your friend. Then in the Apply To section you have Color Channels, Grey Values, and Red, Green, and Blue. Randomly pick boxes and put in numbers, from -999 to 999. As many or as few as you like. Your picture will most likely disappear, be blurry or simply fade out. Don't panic. Now click on the Compute button. Depending on where and what values you have put in your picture will change. Now let's look at the Bias factor. As a former seamstress (before PSP) I thought of bias as stretching the fabric. The bias works in much the same way. Pick a random number for this box (from -100,000 to 100,000). Negative numbers make it darker, positive numbers make it lighter. In the Apply To section of the window, click on Grey Values and you will see that Red, Green and Blue are no longer available. Click back on the Color Channels, then uncheck Red. You'll see that the red values of your image have all been greatly altered. Put a check mark back by Red and uncheck one or two of the others. You will then see how this affects your picture. Now let's reset it to default and see what we can do with this picture we have. |
|||
|
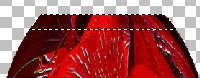
For the purposes of this tutorial, we are only going to use the 9 boxes in the center, a 3 x 3 set. In the top 3 boxes of this set place a -1 (minus 1), the middle 3 boxes get a 0 (zero), and the bottom 3 boxes get a 1. Use your Compute button and it should show your Divisor to be 1. Leave the Bias at 0. In the Apply To section, check Color Channels and uncheck Red. Click on OK. Your picture should now be mostly red and look a little oriental (if you used the download picture). |
|||
|
|
Now we are going to use some effects to make this into a vase. First, go to your Layer palette and promote the 'Background' layer to a raster layer: Right-click on the 'Background' layer and choose "Promote Background Layer" from the pop-up menu. Then go to Effects || Geometric Effects || Circle and check Transparent, then click on OK. You should have a circle on a transparent layer. Click on your Deform tool and pull the sides in a bit to make it an oval. Click on any other tool to apply the deformation. |
|||
|
|
Grab your Selection tool. Set it to: Make a selection at the bottom of your image and hit the Delete key (or Ctrl+X) to give it a flat surface to sit on. Do the same at the top of your oval or (you could use an ellipse if you wanted a kind of rounded surface at the top). Then deselect with Selections || Select None (Ctrl+D). |
|||
 |
Some tutorials have you now use a Cutout effect on separate layers to create a 3D type image. I chose an Inner Bevel instead as the Cutout made the vase too dark. Go to Effects || 3D Effects || Inner Bevel. My settings were: This is of course dependent on your original image. |
|||
|
Make another selection at the top of your vase for a "lip". Go to Selections || Float. Flood-fill this with a color from your image, or with white or black. I chose white and did a Flaming Pear Silver preset. However, you could also use Effects || Texture Effects || Sculpture or even Effects || Texture Effects || Blinds to get an effect you like. Do the same to the bottom of the vase. |
|||
 |
Here's my finished image. I hope you enjoy exploring the user-defined filter feature of PSP. | |||
 |
Here is one I made from a different picture. | |||
