|
Tutorial no. 2 of Prof's PSP 9 Art Media Tutorials > Art Media Tools & Tool Options Palette – Painting a Cloudy Sky |
||||
|
|
|||
|
In this series of tutorials I will explore the new Art Media tools and features of PSP 9. We will explore both the tools and Tool Option palettes as well as some techniques for painting pictures. In the first tutorial, we explored the new Art Media Background when creating new images, the Mixer Palette and the Art Media Layer in the Layer palette. In this tutorial we will explore the Art Media Tools or Brushes and set the stage for painting a sky scape. |
||||
|
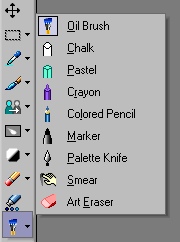
The Art Media ToolsIn PSP 9, the Tools toolbar is basically the same as in PSP 8 with two differences. One new tool set is the Shapes (Rectangle, Ellipse, Symmetric, and Preset Shapes). The second new set is the Art Media tools or brushes. The Art Media tools include nine (9) brushes or art tools: Oil Brush, Chalk, Pastel, Crayon, Colored Pencil, Marker, Palette Knife, Smear, and Art Eraser. As with all tools, each tool has its own Tool Options palette where the various options and values are set. Suffice it to say at this point, each of these brushes or tools functions much like its counterpart in live painting on canvas with similar tools. In this tutorial series of introducing Art Media, the focus will be mainly on using the Oil Brush, Palette Knife, Smear and Art Eraser. In future tutorials I will explore the other Art Media tools. |
|||
The Art Media Tools Tool Options PalettesThe Tool Options palette is where various values and settings are entered to give the tool its tip shape, size, thickness, rotation, head tracking, head loading, viscosity, firmness, auto clean and trace. Learning how these options work is one of the keys to learning how to paint with the Art Media tools and palettes. In this tutorial I will only be able to overview these options rather than explore in detail how different settings create different effects. Also, when discussing creating a landscape picture, I am using a laser mouse which has more control than a regular mouse, but less options and control than a pen tablet. At some point I will be trying out a pen tablet to see the differences in creating paintings. I am not an artist by any shake of one's imagination. What I have learned is from long hours of trial and error, exploration and attempts to create particular effects. I have much to learn. However, I mention this point to encourage you to do the same. Do not worry about being an artist. Be courageous and willing to explore using these tools, experimenting with various values and working toward the goal of achieving a picture of which you will be proud. Keep in mind there are two additional resources for learning to use the Art Media tools. One is to use the help files and in particular the 'Context Help' where you select a particular item to get information on what it is and how it works and sometimes on how to use it. The second is to use the Learning Center palette (F10) where you can find one learning section on Art Media in the 'Art' Quick Guide. Now for the single settings in the Tool Options palettes for the Art Media Tools: |
||||

|
Presets: Most of the tools/brushes have presets. One should explore each of them just to see how they show up and as well check out the other option values. Also, make sure you know where to set the default settings (use the curved-arrow button) because often you may need to start with those settings. Shape: There are only two shapes, either a circle shape or square shape, and these are the brush/tool tips that one can use. Size: The tip size is set here. |
|||
|
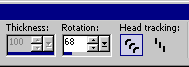
Thickness: When set to 100, the tip shape is full size. When using the Head Tracking of 'Fixed angle' (the one that is not highlighted in the screenshot on the left), the Thickness will be active and one can set it from 1 to 100 (full size). When 'Track path' is highlighted for the Head Tracking (like in the screenshot), Thickness is at its default of 100 percent and the Thickness value will be grayed out. Rotation: One can rotate the tip from 0 degrees to 359 degrees; when the tip Thickness can be set (when 'Fixed angle' is active) one can create slanted tip shapes that way. Head tracking: The highlighted Head Tracking in the screenshot on the left is 'Track path' and when active the full size of brush/tool tips are used. The other is the 'Fixed angle' which can be set by its Thickness and Rotation values. These options create different effects of painting with the Oil Brush and Palette Knife in particular. The combination of brush tip Size and these values allow for a variety of ways to paint or draw. We will explore these values later on in this tutorial series. |
|||
|
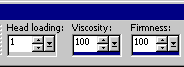
The following options control how the paint/oil/colors are used when the brush or knife pick them up from the mixer palette: Head loading: This value governs the amount of oil/paint/color the brush/knife tip has when the brush is dipped into the paint. The value is from zero (0) to 100. The more loading the longer the brush tip is able to paint on the canvas. Viscosity: This value governs how much paint is loaded. The lower values (1) are very little to a lot (100) and will then either allow light painting or heavy painting in reference to paint texture on the canvas. Firmness: With a mouse, this value really has little effect. However, I understand this value with a pen tablet governs the light/heavy pressure used of the brush. |
|||

|
Bristle size: With a mouse, this value also has little effect. Its values also range from zero (0) to 100 and are related to the size of the brush bristles. This option is only used with the Oil Brush. Auto clean: When Auto Clean is checked the brush/tip is cleaned each time a new stroke is used (mouse button released and then pressed down again). When Auto Clean is not checked the brush keeps the original paint and tends to blend into the paint/oil that is already on the canvas. Clean: The Clean option is activated when Auto Clean is unchecked to clean the brush and then start again with the oil color being used. These options create different effects of painting with the Oil Brush and Palette Knife in particular. The combination of brush tip size and these values allow for a variety of ways to paint or draw. |
|||
 |
Trace: When Trace is checked, colors from a lower layer are picked up. This option is used when taking a photograph, as an example, and creating an oil painting from it by tracing the objects in the photograph. We will not be exploring this option at this time. | |||
 |
Two additional options can be used and are set in the Layer palette by right-clicking on the Art Media layer and then choosing from the pop-up menu: Dry Art Media Layer: To dry the painting this option is activated. This allows additional colors to be placed over the painting without the colors/oils smearing into the lower level of paint. Wet Art Media Layer: The default value of Art Media is this Wet Layer which causes all additional oil colors to blend or smear together. |
|||
Some Guidelines for PaintingWe are now ready to begin painting. The first step in painting is to have an idea of what you wish to paint. In this tutorial series, my objective is a landscape scene that has sky with clouds, snow-capped mountains in the background, a body of water, and a foreground of land with foliage. Let me side-track a moment and mention that for many years I enjoyed watching an artist on a public broadcasting station paint using oils and regular paint brushes of various sizes and a putty knife. My interest in using PSP has been to duplicate the landscapes painted by this artist. What I basically learned is that one paints the background first, starting with that which is the most distant, then paints each subsequent layer so to speak coming forward until one finishes with the foreground. Secondly, I learned that one starts essentially with dark colors upon which to add lighter colors. Thirdly, I learned it does not matter what you paint or where you add objects. It is what you feel like doing. And, in essence using oils one can not make mistakes, only unexpected effects. And, one can paint over areas to make things look better. In these tutorials on painting with PSP 9, these basic principles are followed as guides but not as gospel. The key is to enjoy, to do, to explore and just create as each creation is a work of art. |
||||
|
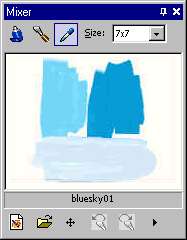
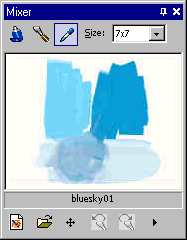
Sky-Scape Mixer Palette1. Set the Colors From this point on I will describe the steps I have taken. Keep in mind your creation may well look somewhat different from the illustrations I am using which is perfectly fine. The important part of these steps is to learn using the Art Media features. Often it is very worthwhile to take a lot of time with each step and just play with it, try different colors, different ways of mixing paints and checking how they look when used. In the Mixer palette, I used three different shades of blue from darker sky blue, to lighter blue and almost a white-blue color. To set the Mixer palette with colors, first select the color you want in your Materials palette for the Foreground Color. In the Mixer palette you start with the Mixer Tube and splash the color on the palette. You can just set its size and then either dab the color or drag it in a vertical and/or horizontal fashion. Then, select another color and do the same but leave just a tad of space between the colors. I set two vertical colors and one horizontal color. Also, notice that some colors will have a slight variance in the way they are spread on the mixer palette. Sometimes placing more color from the Mixer Tube (clicking more than once or twice) will also create a slight textured appearance of the oil (color). |
|||
|
2. Mix the Colors There are a couple of ways to mix the oils. The most common way and one which has more control is to use the Mixer Knife. The other way is, when placing the colors on the Mixer palette with the Mixer Tube, to continue to hold down the mouse button and drag over the other color. However, I usually prefer to use the Mixer Knife. One highlights the Mixer Knife and then holds down the mouse button and drags it between the colors. Using a straight line stroke between colors will spread the colors into one another. Using a circular motion will also mix the colors. The amount of mixing will produce either a new color (relatively solid) or a color with various hues to it. For this tutorial I worked with the Mixer Knife and mixed the three blues to create a forth which has all three shades in the mixed color. It can take time to develop a color mix being sought. This step is one you will want to explore using various strokes when mixing and then checking it out when setting the color to the Materials palette. In essence the more you explore mixing to get the color variations wanted, the more you will know what effect you are seeking. |
|||
|
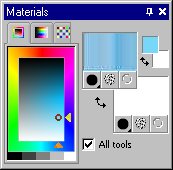
3. Fix the Color Using the Mixer Dropper one fixes or sets the color to use in the Materials palette. In the Tools toolbar, make sure the Oil Brush is active. Then the color you choose from the Mixer palette will show up in the Foreground Material box in the Materials palette. Also, if you wish to change colors just pick up a new area from the mixer palette and it will be placed into the Foreground Material box. If you want a totally different color, then use the Materials palette and select the color you want to use. You could add that new color to the mixer palette and mix it in too if you want. Later, I will be using a solid white color to create clouds. |
|||
|
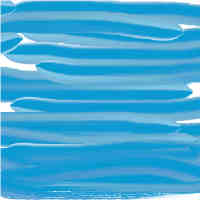
Painting a Sky Scape1. Using the Oil Brush Now we are ready to start painting. We have our Art Media canvas with a white background on a 'Simple Canvas' texture. We have mixed our paints and we have set the initial Foreground Color for the Oil Brush. What I often do at this point is create a new layer (Layers || New Art Media Layer) for painting in case I want to either change the background or delete parts of the painting that is on other layers. At this point, there are no correct techniques to use for painting. Generally I start out with the default settings for the Oil Brush and just paint using the strokes across the canvas until the whole canvas is painted. If one paints from left to right, the stroke will show one of the colors at the top of the stroke. If one paints from right to left, the stroke reverses the colors. If one holds the mouse button down and paints holding down the mouse button one can blend the painting until the brush runs out of the color. Then releasing the mouse button and starting again, one picks up the color again. With Auto Clean checked, each time one starts anew the brush is filled with the paint. |
|||

|
2. Using the Smear Brush At this point the painting does not really have any character. However, if we use the Smear brush (default settings for now) one can blend the painting to get some interesting characteristics and effects. Holding down the mouse button, drag across various areas of the painting. Use short strokes or long strokes or stroke back and forth or up and down. Just experiment to see how the Smear brush works. It takes the paints and blends them together. The more one smears the more the colors blend, so just explore various ways to use the smear and think about the end result you wish to achieve. My initial result begins to have some appearance of a blue sky with clouds. |
|||
 |
3. The Fun and Additional Techniques From this point on, just play around. You can add colors again using the Oil Brush and then the Smear brush. One technique that can be a lot of fun is to just quickly click the mouse and one gets variations of the colors in circles. Another technique is to lower the 'Viscosity' to a value of 1 or a very low value. The result is the colors are much lighter (less thick if you think in terms of oils). Also one can change colors by clicking in the Mixer palette to select other color variations. |
|||
 |
Use the Smear brush and alternately the Oil Brush. Remember there are no mistakes, only creative results. If you don't like something just paint over it and smear again. Try different colors to get variations in the sky and clouds. Try decreasing and/or increasing Viscosity, Hardness and Bristle Size to see how each different set of options has a different effect when using the Oil Brush. Sometimes enlarging the size of the Smear brush will cause more smearing to occur. Blend the painting lightly or heavily depending upon your preference. When you have something you like that stimulates sky just save it. At this point, save it as a .psp or .pspimage file as we will be adding to it in the next lesson. |
|||
|
The key is to have fun, explore, experiment. The more you do so, the more you develop your techniques in painting. In the next tutorial we will use the Palette Knife to create snow-capped mountains. Have fun. – Prof – |
||||
