|
Learning PSP 9, Lesson 17: > A 3D Flag Picture (2) |
||||
|
|
|||
| In this two-part tutorial we use a number of the techniques and tools (Selection, Eraser, Deform, Straighten, Perspective Correction, Mesh Warp, and Clone tools) described in the lessons on learning PSP 9 (Lessons 6-9, and 11-16) to create a 3D flag picture and a 3D room with the 3D flag picture. In Part 1 we used the basic techniques to create a 3D flag picture. In this tutorial, we will create a 3D barn wood room. | ||||
The Tools We Will Use
Part 2:
|
||||
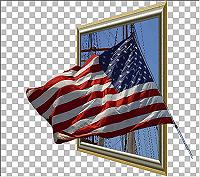 |
The Basic TechniqueThe basic technique explored in Part 1 is to choose the object wanted for a 3D effect. Then, erase the background in order to isolate just the object. Then, using the Deform tool, deform the main or original picture. Finally, add the object to this deformed picture. The picture we used is a flag on a ship. |
|||
Part TwoIn this tutorial we will use additional tools to correct a photograph's perspective and then other tools to create a 3D barn wood room. The specific tutorials referenced will give more detail on how to use a particular tool and the techniques used to fashion the images needed for our final picture. A very important aspect in creating the necessary components used in the final picture is to always make a .psp or .pspimage file of the final product of every particular step. There will be many steps to each component part and often we use various parts more than once. |
||||
|
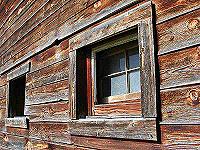
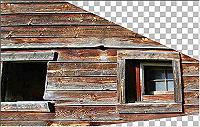
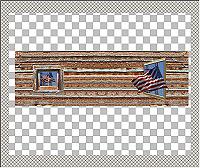
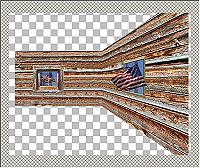
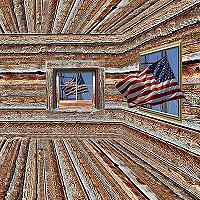
Fix the Barn Wall PerspectiveMy objective in using the barn wall picture is to change its perspective, extract the window and fix its perspective, particularly the inside panes. The final group of images include the window, the walls, floor, ceiling and the 3D Flag picture from part one. We will use the Perspective Correction tool as described in Lesson 14 to put the barn wall and window into a correct perspective for our puposes. Once we have the barn wall the way we want it save it as a .psp or .pspimage file for later use in other steps. |
|||
 |
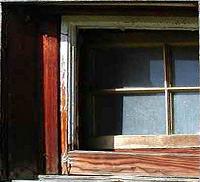
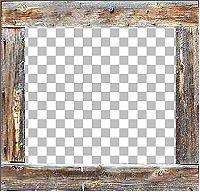
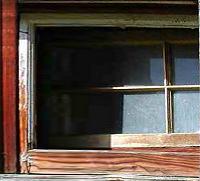
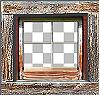
Extract the WindowNext we will extract the window with its wood frame and inside panes. First duplicate the image created with the Perspective Correction tool in the above step (Window || Duplicate or Shift+D). Then either use the Crop tool to crop to the window only or use the Selection tool to set the selection around the window and copy it to a new image. When finished extracting the window, save it as a .psp or .pspimage file. Hint & Tip: Once the window is extracted, use the Straighten tool (Lesson 13) to make sure the window is horizontally aligned. Also, where you might have the boards around the outside edges of the window showing, use the Eraser tool to remove them so you can set a shadow around the window later. |
|||
|
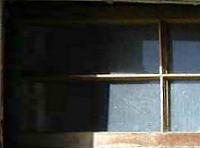
Fixing the Inside WindowOur next task is to fix the 'inside window'. This task is multi-faceted as first one will extract the inside window and then use various steps to create the correct perspective for the inside window frame and its panes. Extract the Inside WindowIn a similar fashion as extracting the full window from the barn wall, one can use either the technique of cropping to the inside window or using a rectangular selection and copying/pasting to a new image. If you use the crop approach just duplicate (Window || Duplicate or Shift+D) the image and use it. When the inside window is extracted, save it as a .psp or .pspimage file. Erase the Inside WindowTo complete this task, use the Selection tool and set the selection to the inside window of the original window with its outside frame. Delete it so that there is a transparent area inside the window frame. To remove any areas on the inside of the frame, first zoom in and then use the Eraser tool at full value for all its options and set the shape to a rectangle. Set the size fairly large and carefully erase unwanted areas at the edge of the frame. Save this frame picture as a .psp or .pspimage file. |
|||
 
|
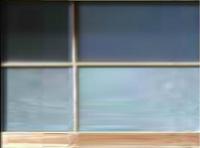
Mesh Warp - Left SideUsing the Mesh Warp tool (Lesson 15) one will need to experiment with the settings in order to get the correct position for the mesh. Thus, the Undo function (Edit || Undo or Ctrl+Z) is your friend. At times zooming into the image will also be helpful. We will be using the extracted picture of the inside frame/panes. Fixing the left side is a two-step process. The settings I used are: Then place the cursor on one of the nodes in the third column. Hold down the Shift key and mouse button and pull left until you have a good perspective of the inside left frame (bottom illustration). You might need to experiment with values and how far to pull to the left to get the perspective you want. Then click on the 'Apply' button to set the fix just made. |
|||
|
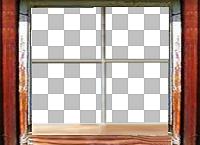
Fixing the PanesExtract the Inside Pane AreaNow, we need to set the correct perspective for the panes. We again will use the Mesh Warp tool and pull the panes to the left. However, the first step is to extract just the inside pane area. Use either the duplicate image and crop to the inside pane area or use the Selection tool to set the selection around the inside pane area and copy/paste to new image. Mesh-Warp the PanesUsing the same techniques as used in fixing the left frame, use the Mesh Warp tool to pull the panes to the left so they will be balanced and in perspective (keep in mind there is another step to create a frame on the right side of the picture.) This process is multi-stepped in that one pulls the pane left then pulls a node to the right of that pane to create the proper thickness of the pane. When satisfied use 'Apply' to set it. Work slowly repeating the three steps as above until the pane is pulled to the left connecting with the left side of the image. Use Undo as needed for each set of steps. |
|||
|
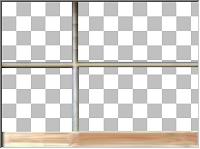
Delete Inside the Pane AreaIn order to place the original flag/ship picture into our window, we need to delete the areas within each pane. Use the selection tool set to a rectangle and delete each pane area. Then use the Eraser tool set to a rectangle and default values for full erasing ability and erase areas to clean up the pane. Zoom into the picture to see those areas more easily. When done, save the picture as a .psp or .pspimage file. |
|||
|
Fix Left Side FrameIn order to finish the window we need to have a frame on the right side. Looking closely at the window there are areas we also need to fix using the Clone tool (the top left area of the frame). Using the original inside window file, use the Clone tool on the left frame area and fill in at the top left part. Set the clone tool as a rectangle with its size just slightly wider than the frame. Set the Hardness to around 50% and the Opacity to around 80%. Then right-click an area to clone and left-click to set it. Repeat as needed to fix the frame. Another approach is to just crop the image to cut out the top shadow area. Or one can use the Mesh Warp tool and move the top frame area up to eliminate the black shadow part. |
|||
|
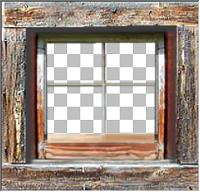
Copy/Paste Left Side to Right SideFirst, set a selection around the inside pane area and delete it. Then, using the .psp/.pspimage file for the inside panes area, copy it as a new layer and set the new layer below the Frame layer. Use the Deform tool to make sure it fits in correct perspective. You may have to grab a corner and pull in or out to have it fit correctly. Next, using the Selection tool, set a selection around the left side of the frame, copy it, then paste it as a new layer (Edit || Paste || Paste As New Layer or Ctrl+L). Use Image || Mirror, and move it to the right with either the Move tool or the Deform tool using the Shift plus the right-arrow key. Set it so it is in correct perspective with the whole window. Save this picture as a .psp or .pspimage file. |
|||
|
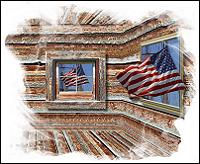
Finish With Outside FrameWe now will add the outside frame: Copy the inside window that you have just completed and paste it as a new layer (Ctrl+L) below the Frame layer in the .psp/.pspimage file. Then add some shadow effects to the inside of the outside frame. Activate its layer and use the Magic Wand tool, clicking inside the frame to set a selection. Then go to Effects || 3D Effects || Cutout and set: Then add a new layer, go to Effects || 3D Effects || Cutout again and set: You may need to experiment with values for best results. Save this picture as a .psp or .pspimage file. |
|||
|
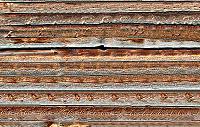
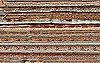
Fixing the Barn WallIn my final picture, I needed a barn wall. I used the Clone tool (Lesson 16) to clone out the windows. This process takes time in order to get the barn boards fixed or aligned correctly. Lesson 14 will describe this technique in more detail. One will need to experiment with various settings of the size and will need a fairly steady hand. The main Hardness setting I used was 75% with an Opacity setting of 100%. Basically the size I used was a rectangle and as large as one board to be over and below the top/bottom slits in the boards. Sometimes I would just right-click for the image and left-click to clone. Sometimes I would drag the cursor. If new to the process of cloning a large area, the process will take time, though as one gains skill the process can go fairly quickly. Again, use lesson 16 to help you set this part of the final picture. |
|||
|
Finishing the PictureNow that we have all the various parts, it is time to have some fun and finish a picture of an inside barn wood room with a window viewing a ship with a flag, and a 3D flag framed picture on a wall. All parts of the room will be in perspective. So, organize your PSP workspace with the saved .psp/.pspimages:
|
|||
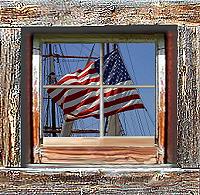 |
Window & Flag/ShipWe will first need to reduce the Flag/Ship picture so it will fit behind the window. Note that the width of the window is about 248 pixels and the original Flag/Ship picture is 1024 pixels wide. Thus, with a duplicate of the original Flag/Ship picture, resize it to about 200 pixels wide using 'Smart Size' for the Resampling option. Use Adjust || Sharpness || Sharpen to sharpen this image. Then, to fit it behind the panes, copy it and paste it as a new layer into the Window picture (Ctrl+L). Make this layer the bottom layer. If there is transparency visible, click on the Deform tool, grab a corner and pull out to enlarge the picture some. Also use the Deform tool with the Shift plus Arrow keys to move it into a position you want. If there are any transparent areas on the outside of the window, use the Crop tool to remove them. Save this picture as "Window.pspimage". |
|||
|
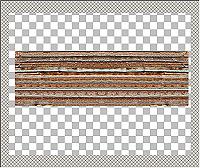
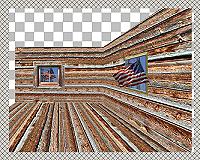
Building the RoomInitially we will be using all images at full size so our new canvas will be quite large. We do this to preserve the relationship between the barnwood and window and picture. However, later we will be resizing the final product. Create a new transparent image 2048 by 1600 pixels and name the layer 'Transparent Background'. Use the Zoom tool to make this image small enough to fit on your PSP workspace. Use the barnwood .pspimage picture you did when you cloned out the windows. Copy this image and paste it as a new layer into the transparent image (Ctrl+L) and label this layer 'Left Wall'. Then in the Layer palette, duplicate this Wall layer, use Image || Mirror, move it to the right and label this layer 'Right Wall'. Draw the image corners outside a bit with your mouse so there is an area surrounding the canvas. Use the Deform tool and arrow keys to move the two wall sections together so there is no seam in the middle. |
|||
 |
Add Window and 3D Flag PictureUse "Window.pspimage", merge all layers (Layers || Merge || Merge All) and copy it, then paste it as a new layer into the new image as the top layer. Move this image to the left. Label this layer 'Window'. Use the "Flag/Ship.pspimage", merge visible layers (Layers || Merge || Merge Visible), copy it and paste it as a new layer as the top layer. Move the image to the right and label this layer 'Flag Pic'. |
|||
 |
Right Wall PerspectiveHighlight the 'Right Wall' layer. Use the Deform tool. Grab a right top or bottom corner node and use the Ctrl key. Drag up (or down) until the boards are in parallel perspective with the frame of the flag picture. You may want to now move the picture a bit to the left. |
|||
|
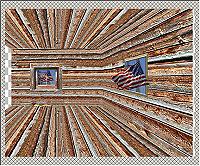
Floor and CeilingTo create the floor and then the ceiling, first highlight the left wall. Duplicate it (Layers || Duplicate), then use Image || Rotate || Free Rotate and rotate that layer 90 degrees. Label it 'Floor1'. Then duplicate (Layers || Duplicate) this layer. Now move the two floor layers so they form a single barnwood image. Turn off all layers except the two floor layers. Use Layers || Merge || Merge Visible and label the layer 'Floor'. Turn on all layers. Move the 'Floor' layer so its left side matches the left side of the wall and its top matches the bottom of the wall. Use the Deform Tool. Grab the right middle node and pull it in so that side matches the corner where the two walls join. Then, zoom the image smaller. Open it up (grab a corner of your image and drag out) so you can find the bottom of the Deform square. Grab the bottom middle node and drag up to the bottom of the canvas. Then grab the bottom right node and use the Ctrl key and drag to the right to match the right side of the floor to the right bottom of the right wall. Now you have a perspective floor. To add the ceiling, first duplicate the 'Floor' layer and label it 'Ceiling'. Then use Image || Flip to create the ceiling. Use the Move tool to position the ceiling correctly. |
|||
|
Fine TuneYou are just about finished with your final picture. You want to fine tune it now. So, first, save as a .psp or .pspimage file to preserve your work. Duplicate (Shift+D) and work only on the duplicate now. Then, move the window to the right some and the flag picture to the left some and crop the picture to a size that looks good to you. Some enhancements you can use at this point are to put shadows around the window and the flag picture (using Effects || 3D Effects || Drop Shadow). You would use the Magic Wand on the 'Window' layer first, set the shadow using values wanted, and then set the shadows on the 'Flag Picture' layer.
You could also add a mask to give the picture another enhancement. Add a top layer and flood-fill it with White. Then go to Layers || Load/Save Mask || Load Mask from Disk and select one of the masks you like. Check 'Invert Transparency' and click on 'Load'. Then in the Layer palette, highlight the 'Mask - Raster 1' layer, right-click it, select 'Delete' from the pop-up menu and then click on 'Yes' to merge the mask with the layer below. Highlight the 'Group - Raster 1' layer, right click on it, and select 'Ungroup Layers' from the pop-up menu. You now have a finished 3D picture. You can resize it and ultimately save it as a JPEG file for use on your web site. Mastering the 3D picture techniques can bring you to having a lot of fun creating interesting masterpieces. Enjoy – Prof – |
|||
