| ||||||
|
|
|||||
| This page shows you how to resize a photograph in PSP to the size required for the FlipAlbum ® Photo Cover Tutorial - specifically to 360 pixels wide by 530 pixels high. These dimensions allow for an additional 20 pixels in length, which will be cropped off in the FlipAlbum ® Photo Cover Tutorial. | ||||||
|
To practice resizing, we'll use a picture of my brother and his family. Download the picture with the download file on the left. As this image is large in byte size, we have zipped it. Unzip it into your working folder and open it PSP.
The original photo dimensions are 535 x 751. We want to resize it to approx. 360 x 530 - most importantly giving it an aspect ratio of approx. .679245. In the first step below we will view the Image Information box to ascertain its current dimensions. |
|||||
|
To view the image's information:
1. Click on the Image > Image Information menu option [SHIFT+I]. The system displays the Current Image Information message box - showing its name, location, dimensions, status and the amount of memory used, as displayed in the image below. Don't worry if your memory figures are different - this just reflects how much you have open in PSP. 2. After making a note of your current image size, click on the [OK]button. Note - if you are using your own photograph, it is essential you note down its width/height dimensions. 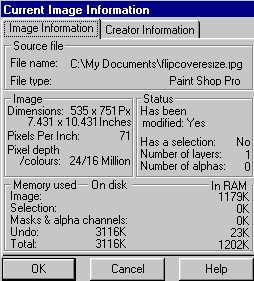
|
||||||
|
My image's Canvas Size dimensions are 535 pixels wide by 751 pixels high. This gives the dimensions an aspect ratio of .712383 (i.e. 535 divided by 751) - which is not exactly the ratio I want of .679245.
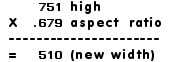
To fix this (before resizing), first we need to change the Canvas Size to give it the correct aspect ratio we want. To calculate the new image dimensions using the aspect ratio of .679245: 1. To increase the Canvas Size (to give it the correct aspect ratio): Calculate the width divided by the required aspect ratio - i.e. 535 divided by .679245. This would require me to give the canvas a new (increased) height of approx. 788 pixels (still by 535 pixels wide). 2. Alternatively - to decrease the Canvas Size (to give it the correct aspect ratio - a preferable alternative) Calculate the height multiplied by the required aspect ratio - i.e. 751 multiplied by .710. This would require me to give the canvas a new (reduced) width of 510 pixels (still by 751 pixels high). The reason the latter calculation is preferable is that it is better to have a smaller image size before using the Resize option - for better image quality. 3. When doing these calculations for your own photo, choose the Canvas Size dimensions that produce the smaller image. |
|||||
   
|
Now try both of the following methods, and see how they look
with our photo. To increase the Canvas size in PSP (using the first method above): 1. Left-click once on your Background color in the Color Palette, and change it to Black. 2. Click on the Image > Canvas Size... menu option. The system displays the Change Canvas Size dialog box. 3. Change the canvas settings as follows: New Width = 535 pixels, New Height = 788 pixels, (Note - the system also displays your current image canvas size dimensions). Centre image horizontally checkbox = checked, Centre image vertically checkbox = checked. (Note - because we are increasing the canvas size, we don't have to specify exactly how to place the image in the new canvas size). 4. After making these settings, click on the [OK] button. The system increases your canvas size by adding extra space to the top and bottom of your image and filling that space with black, as shown in the image on the left. Now this isn't really desirable, and as I can afford to lose a small amount of the width (and prefer a smaller Canvas Size before resizing - for image quality) I will reduce my image size instead. 5. Click on the Undo button (or use the Edit > Undo Canvas Size menu option). To decrease the Canvas size in PSP: 1. Click on the Image > Canvas Size... menu option. The system displays the Change Canvas Size dialog box. 2. Change the canvas settings as follows: New Width = 510 pixels, New Height = 751 pixels, Centre image horizontally checkbox = unchecked, Centre image vertically checkbox = checked. (Note - because we are decreasing the canvas size, we need to specify exactly which area we want to get rid of, in the image placement boxes. I couldn't afford to take any image area off the top because of the man's head being so close to the top of the image, so decided to reduced the bottom part of the image by 38 pixels instead). Left = 0 Right = -38. 3. After making these settings, click on the [OK] button. The system decreases your canvas size by reducing the left side by 0 pixels and the right side by 38 pixels. If you are using your own photograph, play around with these settings, using the Undo button as you go, until you have reduced the Canvas Size to your liking. |
|||||
 
|
Now we are ready to resize the image. This is also known as "resampling", and you should be aware that Resizing reduces
image quality. We will try to keep the image quality reduction to a minimum. To resize the image: 1. Click on the Image > Resize menu option. The system displays the Resize dialog box. 2. In this dialog box, change the settings as follows: "Pixel Size" button = checked (allowing us to specify our size. Ignore the "Percentage of original" and "Actual Print Size" settings - these should be "greyed out" now). Type the width = 360 pixels. Go down to "Maintain aspect ratio of" checkbox = checked. then type a new ratio = .679245 to 1. Note: Aspect Ratio is the relationship of the image’s width to height. By default, the Aspect ratio box displays the image's current aspect ratio, which we had already set up in the previous step. Now look up to the top of the box. The system should have placed our height of 530 in the height field automatically, but if not - type the new height = 530. Now change your "Resize Type" = click on down arrow and select Bilinear Resample. Note - Bilinear resample, reduces the size of an image by applying a specific algorithm. Use it when reducing photo- realistic images and images that are irregular or complex. Resize All Layers checkbox = checked . After making these settings, check that they look like those in our "Resize" image above left, then click on the [OK] button. The system resizes your image accordingly. 3. You may notice that that your image isn't as clear as the original. To slightly clarify this (without pixelating the image), click on the Effects > Sharpen menu option. The system applies a mild clarifying effect to the photo. You have now resized your image, and ready to continue with the FlipAlbum ® Photo Cover Tutorial. Just close this window to return to that tutorial. |
|||||
