 |
 Home > Tutorials Index > Photo Enhancements Index > Home > Tutorials Index > Photo Enhancements Index > Creating Covers for FlipAlbums ® |
 Download (???) Download (???)
|
 Email to Friend Email to Friend
|
Creating Leather Covers for FlipAlbums ®Created by: WendiM |
 |
We have just become aware of some new software -FlipAlbum ® - which "is the world's first 3D page-flipping digital photo album software". When purchasing the FlipAlbum Suite 4.0 software, you may request the "Standard Design Library" CDs at no additional charge (except shipping of $ 8.95 in the US), which has album covers, templates, borders, MP3, themes and clips-art for the user.
However, why not extend the challenge by using those creative talents you have (when taking your digital photos) to making your own custom album covers. These enable you to 'individualize' your albums, and create different covers relevant to different photo collection themes.
These tutorials show you how to make Leather Covers (this page), some Photo Covers and the third one is for another Textured Cover with Text - all made with PSP V7. This tutorial, which has been written for both new and experienced users of PSP7 - has been adapted from the Leather Bound Books tutorial created by Doro Sensen and MaggieA1.
This tutorial is broken into the following steps:


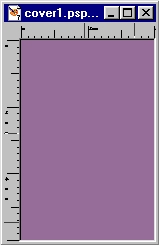
is set to your favourite (album cover) color. For this exercise, mine was set to #966C98.
To create a new colored image:
1. Click on the File > New menu option [CTRL+N]. The system
displays the New Image dialog box.
2. Use the following New Image settings:
Width = 400 Pixels,
Height = 600 Pixels,
Resolution = (approx) 72.0000 Pixels / inch
Background Color = Foreground Color,
Image Type = 16.7 Million Colors (25 Bit).
Now click on the [OK] button to accept these settings. The
system displays your new image, filled with your chosen color.
3. Click on the File > Save menu option [CTRL+S], and save your
new image as "cover1.psp".

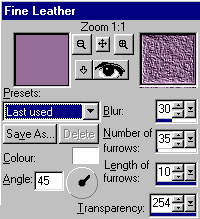

To add a texture to your colored image:
1. Click on the Effects > Texture Effects > Fine Leather...
menu option. The system displays the Fine
Leather dialog box.
2. In the Fine Leather dialog box, change the settings as follows
(as displayed in the image on the left):
Color = White,
Angle = 45 degrees,
Blur = 30,
Number of furrows = 35,
Length of furrows = 10,
Transparency = 254.
Now click on the [OK] button to accept these settings. The
system applies the Fine Leather texture to your image.
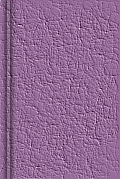
3. Save your image [CTRL+S]. Your image should look like that
shown on the left (except of course in a much larger size).

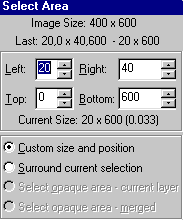
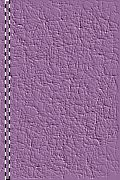
In this step we'll create the "crease" on the front cover of your album.
To create a new layer and add a crease:
1. Click on the Layers > New Raster Layer... menu option.
The system displays the Layer Properties dialog box.
2. In the Layer Properties Name field, type your new layer name as
"Shadow", then click on the [OK] button (accepting all of the
other default options in this dialog box).
3. Double click on your Selection tool. The system displays the
Select Area dialog box.
4. Use the following Select Area settings:
Left = 20,
Right = 40,
Top = 0,
Bottom = 600
Custom size & position button = selected.
Now click on the [OK] button to accept these settings. The
system displays a long narrow selection down the side of
your image.
This will be the crease area (20 x 600 pixels).
If you want your crease a little wider/narrower, use the
Undo button, and adjust the Select Area settings
in the previous step.
Your "Selection" should look like that displayed on the left.
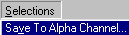
5. Now we're going to save your selection to an alpha channel.
Click on the Selections > Save to Alpha Channel... menu
option, then click on the [OK] button twice (to accept the default
options).
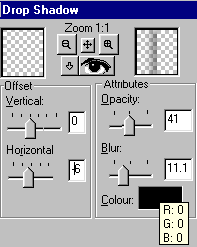
6. To apply our first drop shadow to give the crease some depth,
click on the Effects > 3D Effects > Drop Shadow...
menu option. The system displays the Drop Shadow
dialog box.
7. Use the following Drop Shadow settings:
Offset Vertical = 0,
Offset Horizontal = -6,
Opacity = 41,
Blur = (approx.) 11.1
Color = Black.
Note - if Black is not the default colour, click on
the color box and select Black (top right) from the
Basic Colors in the Color dialog box, then click
on the [OK] button to accept this setting.
Now click on the [OK] button to accept these settings. The
system displays a drop shadow down the left side of
your selection.
8. To apply our second drop shadow, again click on the
Effects > 3D Effects > Drop Shadow... menu option.
The system again displays the Drop Shadow dialog box.
9. Use the previous Drop Shadow settings (which remain in the
dialog box from your previous Drop Shadow), except
change the following setting:
Offset Horizontal = 6.
Now click on the [OK] button to accept these settings. The
system displays the second drop shadow down the right side of
your selection.
10. [CTRL+D] to deselect your selection, then save your image
[CTRL+S]. Your image should look like that
shown on the left.


To deepen the interior color of the crease:
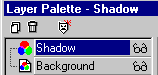
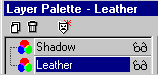
1. Click on your Layer Palette, which should look like the top
Layer Palette image displayed on the left.
2. Double click on the Background layer's name. The system
displays the Promote Layer & Edit Properties dialog box.
3. Rename this layer "Leather", then click on the [OK] button
to accept the rest of the default settings. Now look at your
Layer Palette again - it should now look like the second
Layer Palette image displayed on the left.
4. Now we'll reload the selection you saved to your Alpha Channel.
To reload your selection, click on the Selections > Load from
Alpha Channel... menu option. The system displays the
Load from Alpha dialog box, showing your 40x600
selection as #Selection1. Click on the [OK] button.
The system reloads your selection.
5. Now use the Colors > Adjust > Gamma Correction menu option.
The system displays the Gamma Correction dialog box.
6. Making sure that all your settings are the same number and that
the Link checkbox is checked - move the sliders across
so that the numbers now read .84 (as shown in the image on
the left).
Then click on the [OK] button to accept these settings.
The system displays your selection in a darker shade than the
rest of the leather. If you would prefer a color darker still,
click on the [UNDO] button in the toolbar, then redo this step
- moving the sliders even further to the left (the lower the number
- the darker the image).
7. Deselect your selection [CTRL+D], then to Merge
your layers (preparing for the next set of steps), click on the
Layers > Merge > Merge Visible menu option. The system
merges your Shadow and Leather layers, naming the merged
layer as "Merged" (check it in the Layer Palette).
8. Save your image [CTRL+S]. Your image should look like that
shown on the left.

To reduce the image size and apply a bevel:
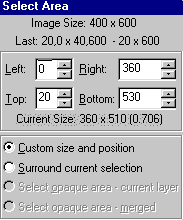
1. Double click on the Selection tool. The system displays the
Select Area dialog box.
2. Use the following Select Area settings:
Left = 0,
Right = 360,
Top = 20,
Bottom = 530,
Custom size & position button = selected.
Click on the [OK] button to accept these settings. The system
places a selection around a portion of your image - 20 pixels
from the top.
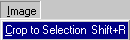
3. To crop the image to this size, click on the Image > Crop to
Selection menu option [SHIFT+R]. The system crops your
image to the specified size.
4. Use the File > Save As menu option [F12], and save your
image as "coverfront.psp".
This leaves your original image in tact, in case
you want to colorize the leather or apply some other effects.
5. Now use the Selections > Select All menu option [CTRL+A],
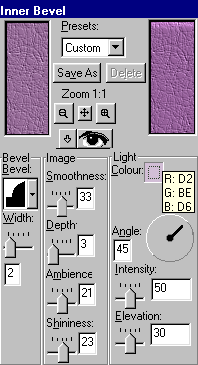
then click on the Effects > 3D Effects > Inner Bevel... menu
option. The system displays the Inner Bevel dialog box.
6. Change the Inner Bevel dialog box settings as follows:
Bevel
Bevel = As displayed - top row 3rd from left of bevel types
(click on the down-arrow beside the image to view these).
Width = 2.
Image
Smoothness = 33,
Depth = 3,
Ambience = 21,
Shininess = 23,
Light
Color - choose a shade similar to the original color of your
image, or white. I chose #D2BED6.
Angle = 45 degrees,
Intensity = 50,
Elevation = 30.
After making these settings, click on the [OK] button.
The system applies an Inner Bevel to the outside edges of your
front cover.
7. Deselect your selection [CTRL+D], then save your image
[CTRL+S].
Click on the image on the left to see the finished front cover
at actual size (a new window will open - just close the new
window to return here for the final step).

To duplicate and mirror your image:
1. Hold down the SHIFT key and press the D key (SHIFT+D]. The
system places a copy of your image over the top of your original.
2. Click on the File > Save menu option [CTRL+S], and save this
duplicated image as "coverback.psp".
3. To mirror the image, select the Image > Mirror menu option
[CTRL+M]. The system mirrors your image, placing the
crease on the right hand side, as shown in our image on the left.
4. Finally, save your image again [CTRL+S], then use the File >
Save As menu option [F12] and save both images as .jpg files
in your local (C: Drive) folder holding your FlipAlbum ®
images and album covers.
This is the end of the tutorial.